We are always looking for the best ways to connect the computer to the TV: it is indeed useful to take advantage of the TV’s large screen to view the contents you have on your computer.
Using the TV screen could be useful for giving a presentation, in a meeting room, for organizing a course, for viewing web page content, for showing multimedia content and streaming video.
There are several ways to connect your computer to the TV. The most trivial is to use an HDMI cable to activate the PC screen’s mirroring on the TV.
The HDMI cable also allows you to carry the audio signal: after connecting the PC to TVno, more cables are needed. Without using any audio cable, everything that appears on the computer screen will be reproduced on the connected TV. The sound will be managed by the speakers or speakers connected to the TV.
Connect PC to TV with an HDMI cable
HDMI ports are present on most televisions, even older ones, and on the vast majority of PCs.
The specifications of the HDMI ports are many: HDMI 2.1 even embraces 8K and 10K resolutions, but even the most widespread version (HDMI 2.0b) still allows you to manage 4K video at 60 Hz with HDR support.
To connect a notebook with the TV using an HDMI cable, you can use the following cables, depending on the connector available on the PC:
- HDMI 2.0 cable (HDMI to HDMI)
- HDMI 2.0 cable (mini HDMI to HDMI)
- Mini DisplayPort to HDMI cable
- USB Type-C to HDMI cable
Newer computers or Apple systems are equipped with a DisplayPort connector, usually in the “mini” version (allows the transfer of 4K video streams at 60 fps). Above, we presented the example of a mini DisplayPort to HDMI cable.
Ultrabooks often have a USB Type-C (or USB-C) connector: in these cases, the video signal can be transferred to the TV using a special cable, also presented above.
On Amazon, there are many examples of USB-C docks that allow you to connect a PC with a USB-C connector to HDMI, Ethernet, VGA, USB devices.
Alternatives for cable connection are DVI, S-Video, VGA to transfer the video signal; RCA Composite for audio: we only mention it because conveying multimedia content using these technologies in 2020 is now not recommended.
It would take a dip in the past that is not worth it, especially in image quality and sound performance.
The bandwidth offered by these types of connections is also widely exceeded by HDMI and DisplayPort. Not to mention that these are analog and non-digital technologies.
How to set up Windows PC for HDMI cable connection
After connecting the PC to the cable TV (best quality and best performance), by pressing the key combination Windows + P on the Windows system, you can decide how the TV screen should be used.
You can duplicate what is shown on the PC display ( mirroring ) or extend the desktop and enjoy a larger workspace on the TV screen.
Did we talk about it in detail in the article Connecting two monitors to the PC: how to do it?
For the video signal coming from the computer to be used on the TV, press the Source button on the remote control and set the source connected to the HDMI port as the source.
Usually, the TV indicates that a device is connected to an HDMI port. By repeatedly pressing the Source button, you can choose the correct source.
Connect PC to TV with Chromecast
In terms of ease of use, the Chromecast HDMI key remains one of the most effective and immediate solutions for mirroring activities and streaming audio and video content.
The TV’s USB port powers Chromecast: you need to connect the key to both the HDMI and USB connectors or, if the USB port on the TV is unavailable, you can use the wall socket.
The Google key can connect PC to TV wirelessly: Chromecast connects to WiFi and is added to other devices connected to the local wireless router.
Chromecast is meant to be used by the Google Chrome browser without installing any extension.
Mirroring and Streaming Video with Chrome: Watch movies on your TV and play your PC screen
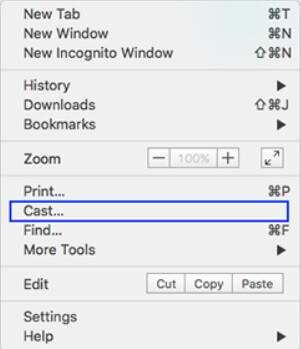
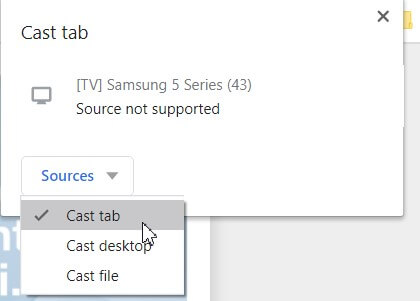
After installing Chromecast and turning on the TV to which the key is connected, starting the Chrome browser on a PC connected to the same local network, and clicking with the right mouse button on a free area on any web page, you will find the Cast item.

By clicking on it, Chrome will detect the presence of the Chromecast key on the network and allow instant mirroring (the TV that supports HDMI-CEC will turn on by itself if it is turned off).
Any content displayed on the PC screen will be played on the Chromecast-equipped TV. The audio generated on the PC will, in turn, be redirected to the wirelessly connected TV.

Always using the Chrome browser, by accessing services and applications compatible with Chromecast (for example, YouTube), an icon similar to the one shown in the figure will appear.

By clicking it, you can send the corresponding content directly to the TV without transmitting the other elements in the same browser tab or other windows currently open.
Android TV based televisions support Google Cast; they can also receive streaming data from the Chrome browser installed on the PC.
Alternatively, in the absence of Chromecast, you can connect an Android TV box that supports the same functionality or install an app on the smart TV that enables content management in Google Cast.
Chrome as a multimedia player
Chrome can be used as a multimedia player: just paste in the address bar the complete path – even network if necessary – referring to the multimedia content you want to send to Chromecast (example: D: \ miscellaneous \ FILM \ filename.mp4 ).
Alternatively, you can drag the multimedia content to be played from the Explorer window to the Chrome window.
The taskbar will show the file: // URI, and the playback of the media content will begin immediately.
To broadcast it on Chromecast, just follow the instructions seen above.
Alternatives to Chrome: Airflow and VLC
To stream any locally stored video to your TV, you can also use the excellent free Airflow software.
The application, presented in detail in the article Video from PC to the TV without Chrome, is excellent because apart from Chrome (it is not even necessary that the Google browser is installed on the system in use), it can detect the Chromecast sticks connected to the local network and allows the user to choose which video content to play and send to the TV.
Instead of Airflow, you can also use the well-known multimedia player VLC, which with the launch of version 3.0, has embraced support for Chromecast: Stream to Chromecast with VLC.
On mobile devices: Local cast and BubbleUPnP apps
Owners of a Chromecast key can also use their smartphone to decide which content to play on the TV.
The mobile device thus becomes a remote control to manage the playback of multimedia files.
One of the best applications ever is Localcast, which allows you to connect with any device on the local network and start wireless streaming to Chromecast. In the Local cast article, an app for streaming content from your smartphone, we described its operation in detail.
Among the best solutions that allow us to reach the same result, there is also BubbleUPnP.
It has the indisputable advantage of allowing unsupported content to be transcoded in real-time when needed.
Mirror PC screen to the TV with Miracast
An excellent alternative to connect PC to TV wirelessly is to resort to Miracast, the WiFi equivalent of the HDMI cable, so much that it is commonly called HDMI over WiFi.
To use Miracast, the two devices involved in the communication must support the standard.
The procedure to mirror the TV displayed on the PC is illustrated in the article Miracast, what it is, and how it works. Use the TV as a wireless screen.
Connect PC to TV via DLNA
All the latest TVs integrate firmware that also offers DLNA client functionality.
Therefore, it is sufficient to configure a DLNA server within the local network to play video contents, even wirelessly, which are stored on other PCs connected to the LAN.
A DLNA server can be activated using particular multimedia software such as Kodi, or you can leverage the built-in functionality in Windows and Windows Media Player:
– Distribute multimedia contents on the local network with DLNA and Windows Media Player
– Share multimedia files on the network with DLNA and solve rights issues
You can also use Serviioo Plex.
Both software, Serviio and Plex, use a transcoding engine that allows you to play multimedia files via DLNA that would not be natively supported by the TV.
It is worth mentioning that some NAS servers offer the ability to install Plex’s server component and set up a media server very simply. An example? The Synology NAS is itself still integrates a simple configuration feature to set up a media server.
However, the Plex server can also be installed on a Windows PC, Linux, or in any case on a machine connected to the local network.

I’m Mr.Love . I’m admin of Techsmartest.com


