It has become increasingly convenient to use multiple monitors connected to the same computer. The professional, the developer, or even the “gamer” can keep an eye on various activities simultaneously without abandoning the work in progress.
Connecting two monitors to the same PC is very simple: now all video cards, even the oldest and cheapest, offer more connectors.
In desktop PCs, check which and how many connectors are available on the back of the video card: HDMI, Displayport, DVI, VGA are now familiar to almost all configurations.
Connectors to connect multiple monitors to the PC

The first from the left is a Displayport connector; followed by HDMI, DVI, and VGA, the oldest and lower quality allowing only the transfer of an analog signal, we have illustrated all the main differences between standards and cables that can be used today for connecting monitor and TV.
In addition to the primary monitor, a second monitor can be connected to the same video card: the operating SystemSystem will then take care of its management.
To connect two monitors to the PC, the two monitors don’t have to use the video card’s accessory connection. Different types of adapters on the market allow you to convert the video signal from one interface to another.
On Amazon, you can easily find many adapters. However, it should be borne in mind that, for example, by connecting an old VGA monitor – via adapter – to an HDMI video output on the graphics card, you will not be able to benefit from any of the advanced features of HDMI, both in terms of image quality and, for example, as regards the transport of the audio signal (see also HDMI 1.4 and 2.0 cable, how to choose them and what the differences).
You will then need to equip yourself with the various cables to connect the monitor with the graphics card’s video output.
You will find a Mini Displayport / Thunderbolt connector to replace the standard Displayport in notebooks.
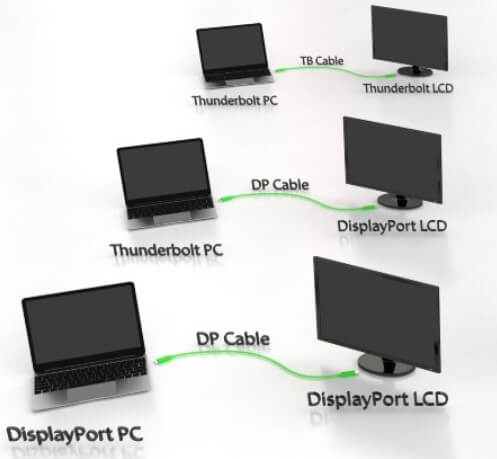
In this regard, it should be noted that it is possible to connect a Displayport monitor to a Thunderbolt port but not the other way around.
Extend the screen or duplicate it with two or more monitors connected to the Windows PC
If you want to connect two or more displays to the PC, the monitors will not need to be the same and support the exact video resolution: Windows will automatically manage it.
By pressing the Windows + P key combination, you can decide whether to use only the main screen, duplicate it, extend it, or use only the second monitor.
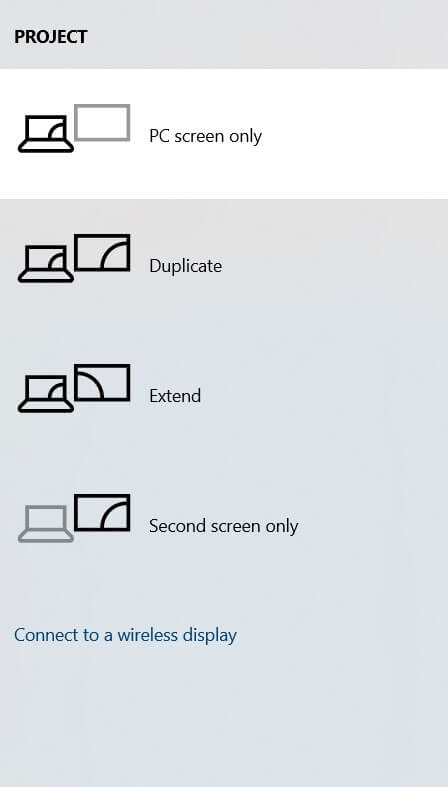
– Extend or duplicate the screen: the differences
Extending the screen means having an even more comprehensive monitor, which opens its edges on the accessory display.
Windows allows you to virtually “rearrange” the monitor by establishing the left monitor and the right one. It is also possible to adjust the “height” by dragging the images of the two schemes up or down.
Duplicating the monitor, on the other hand, consists of creating a “copy” of what is displayed on the main screen.
By default, Windows uses the same scaling ratio on both monitors. You can still freely change the size of text, applications, and all graphics using the bar with the percentage indication.
By typing Screen settings in the Windows search box, you can define how much to display on the first screen and how much on the second.
In particular, by clicking on each display, you can choose the scaling ratio, a useful setting when one monitor was at a high DPI value. At the same time, the other was a qualitatively inferior screen.
You can also choose to rotate what is displayed on the screen is placed on one side.
– How to manage multiple displays connected to PC in Windows 7
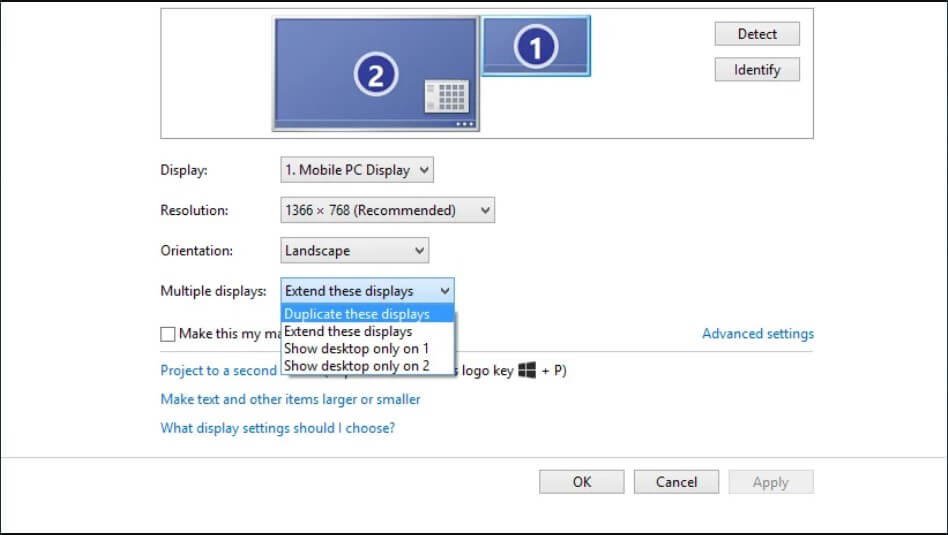
In Windows 7, you can right-click on the operating SystemSystem desktop, then choose Screen Resolution.
By clicking on Identify, it is possible to check the correspondence between the various screens indicated and, by dragging, you can specify which one is more to the left and which is more to the right.
To determine how the various monitors are to be managed, use the drop-down menu Multiple screens.
Windows 7 lacks the functionality common to Windows 8.1 and Windows 10, allowing you to extend the Taskbar to various monitors.
If you need this functionality, you can use, for example, the open-source software Dual Monitor Taskbar.
To manage two or more monitors connected to the PC to another level, we recommend the excellent Display Fusion. This program provides buttons and “shortcuts” to move windows from one monitor to another and reposition the elements in total freedom.
– How to manage multiple displays connected to PC in Windows 10
To manage two or more monitors connected to the Windows 10 PC, access the operating system settings by pressing the Windows + I key combination, choose SystemSystem, and then the Display item in the left column.
If the additional screens have not been detected, press the Detect button next to Multiple Screens.
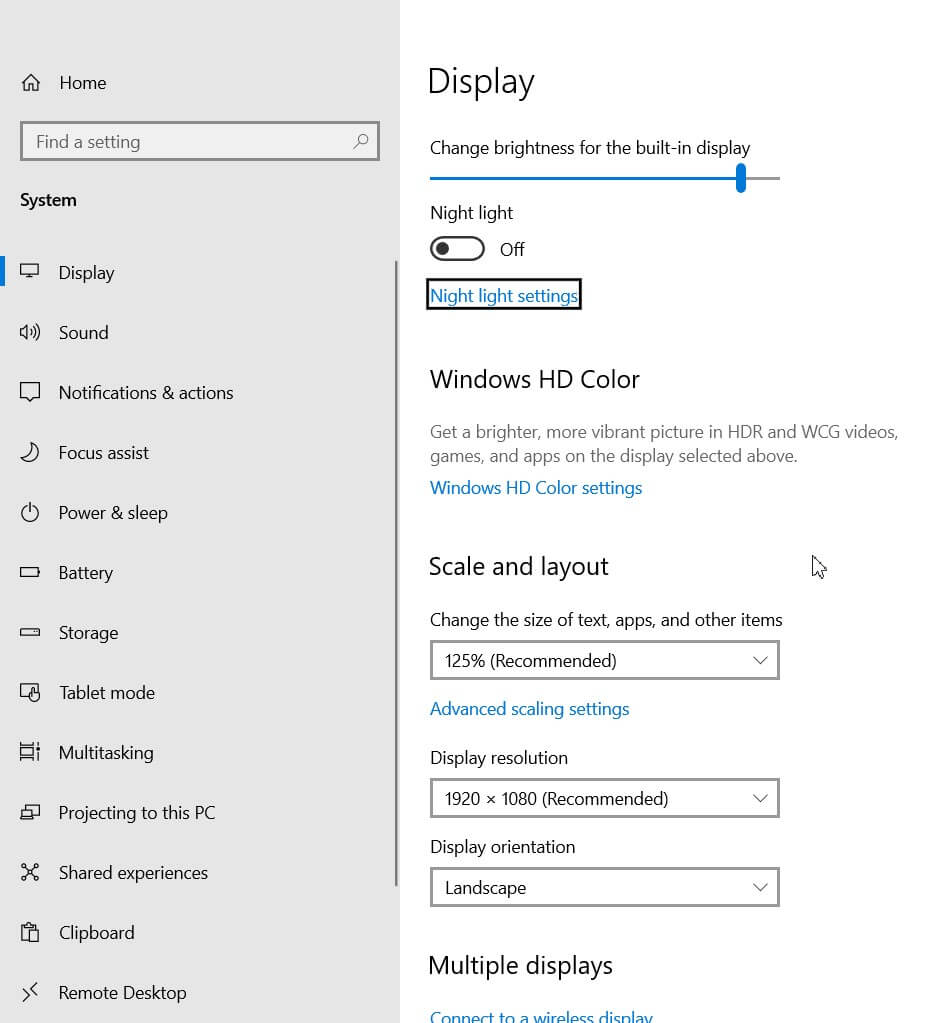
With a click on Identify, as in Windows 7, you can recognize the identification number assigned to each monitor.
By clicking on each display and dragging, you can reposition the screens by defining the main one.
It is obviously possible for each monitor to define its orientation, activate scaling, and finally set the display mode (for example, the extension or duplication of the screen as seen above).
– Windows 10 and Windows 8.1 taskbar extended to two or more monitors
Both Windows 10 and Windows 8.1 allow you to extend the Taskbar to all connected displays.
To do this, in Windows 10, you need to access the settings ( Windows + I ), choose Personalization, then Taskbar from the left column, and activate the Show taskbar on all screens options…
Alternatively, and on Windows 8.1, you can right-click on the Taskbar, then choose Properties or Settings.
By acting on the same window, you can indicate whether the buttons should be displayed on all the various screens’ application bars.
– Set a different desktop wallpaper in multi-monitor configurations
If you just wanted to set a different wallpaper for each monitor, you can take advantage of a little-known Windows feature:
1) Press Windows + R then type the following: control / name Microsoft .Personalization / page page wallpaper
2) Use the Browse button to navigate to the folder containing the images to use as wallpaper.
3) Deselect all images, then right-click on the one you want to set as background on the first monitor.
4) Choose the “target” monitor, then repeat the procedure for the other displays.
5) Using the Image Position pull-down menu, you can determine how the image should appear on each connected monitor.
Connect two monitors wirelessly
To connect two monitors, it is no longer necessary to resort to a “wired” solution.
For some time now, in fact, it is possible to use Chromecast and the Miracast standard.
Once the key has been configured, to cast the screen to Chromecast, start the Chrome browser, right-click on a free area of the page and choose Cast. It is no longer necessary to install any extensions, a requirement in the past.
Chrome will thus allow you to clone the single tab displayed in the browser or the entire screen.
Chromecast only allows you to clone the screen. At the time, we have identified an officially unsupported procedure that will enable you to extend the PC monitor.
Let’s assume that it doesn’t work with any configuration, but it’s worth a try: Extend the screen in Windows with Chromecast.
Chromecast can be purchased in two versions:
– Chromecast second version (supports Full HD 1080p resolution and costs 39 euros)
– Chromecast Ultra (supports 4K UHD resolution and costs 79 euros)
Finally, users of Windows 8.1 and Windows 10 can alternatively consider using the Miracast standard, often described as ” HDMI over WiFi “.
Miracast monitors / TVs are automatically detected by Windows, and using the Windows + P key combination mentioned above; you can activate the duplication or extension of the screen.
Windows 10, in the Display window seen above, contains the Connect to wireless display command that allows you to connect to the Miracast monitor.
In case the accessory screen does not directly support Miracast, you can use a Miracast adapter like this one as long as you have a USB port available on the monitor to power the device.
It is, of course, essential that the computer also supports Miracast.
To verify this, type dxdiag in the Open box and press Enter.
When the DirectX Diagnostic Tool completes the checks, you should click the button save all information and then store the report ( dxdiag.txt ) in your chosen folder.
After opening the .txt file with a standard text editor, next to the Miracast entries, you should find a message confirming Miracast support or, conversely, indicating the impossibility of using this standard. The latter case clarifies whether the problem depends on the WiFi card or the graphics card ( not supported by the WiFi driver or not supported by the graphics driver ).
In this case, the suggestion is to try to update the driver. This does not necessarily solve the problem, but it is still the first attempt to make.
In the video card driver’s case, at least WDDM 1.3 compatibility must be reported; otherwise, Miracast cannot be used.

I’m Mr.Love . I’m admin of Techsmartest.com


