Many users complain about the 100% disk in Windows 10 or Windows 8.1: help to solve a problem that slows down even those systems that, on paper, should be snappy.
One of the problems that Windows 10 and Windows 8.1 users report most frequently is the hard drive suddenly starting to read and write to its full potential.
It is easy to notice because by pressing the key combination CTRL + SHIFT + ESC to open the Task Manager, the disk is 100% in board processes (the window Task Manager’s appearance makes sure to click on More details ).
Below we present several tips to try to fix the disk problem 100% in Windows.
We suggest applying the advice one after the other to try to identify the cause of the problem. These are not solutions carved in stone because the reasons that can lead to the hard disk’s strange Use can be truly manifold.
Among the various checks, you should still find the one that will help isolate the problem.
1) Check if the disk is damaged
In the Windows 10 or Windows 8.1 search box, type cmd, then press the CTRL + SHIFT + Enter key combination to open the command prompt with administrator rights.
Type the following command and confirm the disk scan at the next system restart by pressing the S key:
chkdsk.exe / f / r
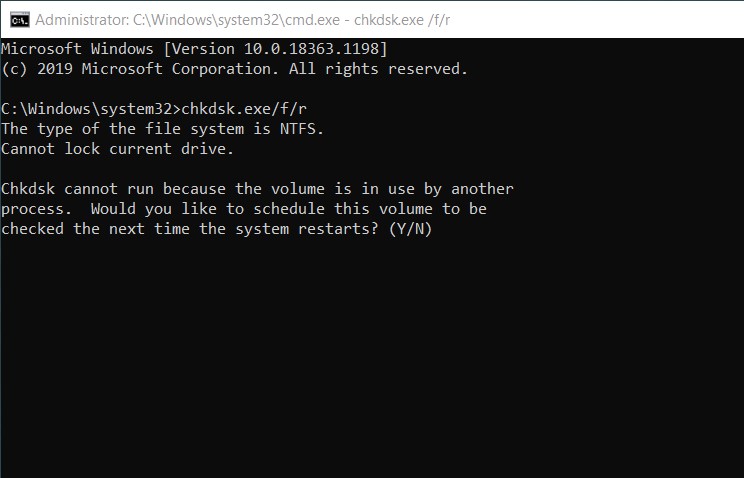
At this point, you can proceed with restarting Windows.
During the boot phase, the chkdsk utility will analyze the disk’s state and correct any errors. Some manufacturers’ systems allow access to a disk error scanning utility that can be launched immediately when the PC is turned on. On some machines, it is activated by pressing, for example, the F12 key. Then refer to the manufacturer’s instructions to access the diagnostic utilities.
2) Stop the Windows Search
service The Windows Search service is responsible for scanning the files stored on your PC and scanning their contents.
To check if Windows Search was 100% responsible for the disk, simply open the Command Prompt with administrator rights (same procedure as in the previous point) then type the following:
sc stop WSearch
If you want to permanently disable the Windows Search service, you can type:
sc config WSearch start = disabled
To reactivate everything, if Windows Search is not the cause of the disk at 100%, you can use the following commands:
sc config WSearch start = delayed-auto
sc start WSearch
3) Stop the Superfetch service
The Windows Superfetch service monitors files and applications used by the user and is activated to speed up subsequent openings. The mechanism performs a sort of “preload” of the data that the operating system believes is used most often.
One of the tips, when the disk is always at 100%, is to try to disable it using the following command prompt:
sc stop sustain
Then wait a few minutes to check whether or not the Change has impacted the Use of the hard disk.
4) Reset the virtual memory used by Windows
A further test to be carried out is to reset the size of Windows’s paging file (virtual memory).
To proceed, press Windows + R, then type sysdm.cpl and press Enter.
Then click on the Advanced tab, on the Settings button corresponding to the Performance box, and then on Advanced again.
Here click Change and clear the Automatically manage paging file size for all drives check box.
After choosing the Custom size option, specify the maximum size of 1024 x 1.5 x GB of installed RAM. For example, if 4 GB of RAM were installed on the system, write 6144 in the Maximum size box.
Confirm the changes by pressing OK and restarting the system.
From a command prompt window opened with administrator rights, then type:
rd% temp% / q / s
5) Disable antivirus and Windows Defender
Some antivirus software, including Windows Defender, can create problems in various configurations.
To check if your hard drive usage drops immediately, we suggest temporarily disabling Windows Defender or any third-party antivirus installed on your system.
If the situation improves, we suggest installing an alternative antivirus and checking its overall impact on system resources.
6) Disable prefetching in Google Chrome
If you were using the Google browser, we suggest you try to disable the prefetching feature by typing chrome: // settings / search # privacy in the address bar and then disabling the Use a forecasting service to speed up box loading web pages.
7) Try to uninstall Skype and use Skype for Web
The stand-alone Skype client can sink the system’s performance by asking to perform various read and write operations on the disk, especially when the user does not directly use it.
We suggest trying to completely uninstall Skype by typing Programs and Features in the Windows search box.
Instead of the traditional Skype client, you can use Skype for Web.
8)Beware of the bug in the AHCI controller driver
Press the Windows + R key combination, type devmgmt.msc then locate the IDE ATA / ATAPI controller entry. Here click on the AHCI Controller (often appears as Standard SATA AHCI Controller.
At this point, you will have to select the Driver tab then click on the Driver Details button.
In case you see the path c: \ windows \ system32 \ DRIVERS \ storage.sys , you will have to close the window, go to the Details tab and then choose the Device instance path from the Properties drop-down menu.
By right-clicking on the Value, you will have to select the Copy item and paste it, using the key combination CTRL + V in a normal text editor.
The next step is to open the Registry Editor ( Windows + R then type regedit ) and go to the HKEY_LOCAL_MACHINE \ System \ CurrentControlSet \ Enum \ PCI \ key.
After identifying the string corresponding to the instance copied previously and pasted into the text editor, you will have to open the Device Parameters \ Interrupt Management \ MessageSignaledInterruptProperties subkey and change the MSISupported Value to 0 in the right panel.

I’m Mr.Love . I’m admin of Techsmartest.com


. What are the news of the new format for images")


. What are the news of the new format for images")


