Boot Guard verified failed error sometimes can appear after or when updating Dell BIOS. More users report “Boot Guard verified DXE is fail” error on different Dell series. According to a survey, the error is mainly caused by either outdated BIOS or corrupted BIOS.
If you are among one of these uses, don’t worry. Here you can find the corresponding solutions to deal with this error.
Way 1. Update BIOS via a USB Drive
If you encounter the Boot Guard verified DXE is fail” error while updating BIOS within Windows, you can try using a USB flash drive to update BIOS instead. To do this, first of all you need to download the Dell BIOS update to a FAT32 formatted USB drive and then install it via the drive.
Step 1. Prepare a FAT32 USB Drive
Make sure that your USB drive is a FAT32 file system. If not, you need to format it or convert it to FAT32. However, Windows built-in tools can’t format a drive larger than 32 GB to FAT32. In this case, a free partition software can do that easily. Moreover, it can help you convert NTFS to FAT32 without data loss.
- Install MiniTool Partition Wizard to your PC.
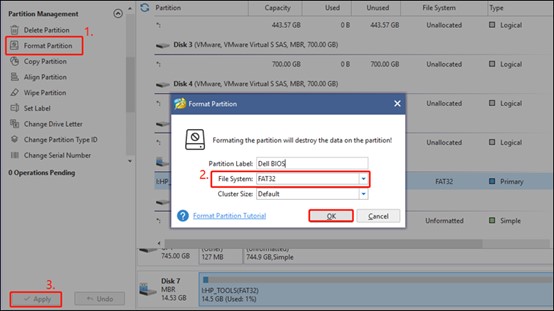
- In the main interface, select the USB drive from the disk map and click onFormat Partition from the left action panel.
- SelectFAT32 from the File System drop-down menu and click on OK. Also, you can set the Partition Label to something like Dell BIOS and choose Cluster Size according to your needs. Then click on Apply to execute the change.
Step 2. Use the USB to Update the BIOS
- Connect the USB flash drive to the system that is running normally.
- Download the Dell BIOS update executable file from the official Dell Support website and save the file to the USB drive. Here you need to note down the actual name of the BIOS file.
- Insert the USB drive into your Dell laptop, and then restart the laptop and press F12 before it is booted so that you can enter BIOS.
- In the Dell Boot menu, highlight the USB flash drive and hit Enter. Then a Command Prompt window should pop up, type the exact file name of the BIOS update and hit Enter. Then follow the on-screen instructions to complete the process.
Way 2. Repair the Corrupt BIOS
As mentioned above, the Boot Guard verification failed error can be caused by corrupted BIOS. Here is a tool called Dell BIOS Recovery tool that can repair a corrupted BIOS by using the BIOS recovery files from a hard drive or a SUB drive. Here’s how:
Step 1. Power on your Dell laptop, and then hold the Ctrl + Esc keys until the BIOS Recovery screen appears.
Step 2. Select Recover BIOS under the BIOS Recovery Options and press Enter or Continue to start the BIOS recovery process.
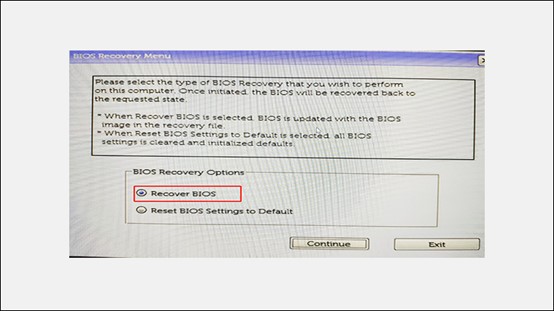
Step 3. Once done, reboot your computer and see if the Boot Guard verified failed Dell error disappears.
Way 3. Reset BIOS
If the Dell Boot Guard verified failed error persists after trying the above 2 methods, resetting BIOS may help get rid of the error. Here you can refer to the steps below to reset BIOS.
Step 1. Enter BIOS by restarting your laptop and pressing the F12 key.
Step 2. Navigate to the Advanced tab and find an option named Restore Defaults/Reset All Settings to Default/Reset to Default or something else in the BIOS menu.
Step 3. Once you select the option, press F10 to save the change and exit the BIOS window.
Recover Lost Data Caused by the Boot Guard Verified Failed Error
Some users experienced data loss after updating BIOS to fix the Dell Boot Guard verified failed error. Have the same trouble? Never mind! You can try to recover lost files using MiniTool Partition Wizard.
Step 1. Launch the MiniTool program to enter its main interface, click on Data Recovery from the top toolbar.
Step 2. Select the location where your lost data is stored and click on Scan.
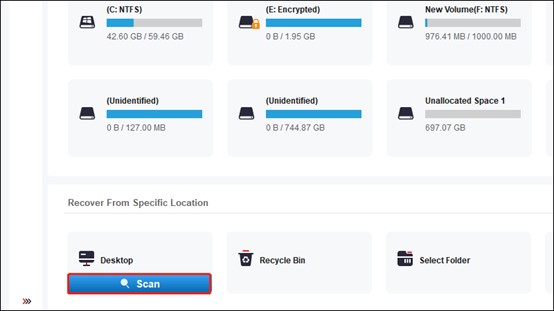
Step 3. Wait for the tool to complete the scan. Well, if you have found the lost data, you also can click Pause or Stop to suspend the process, select the checkboxes next to your desired files, and click Save.
Step 4. Select a directory to store these files and click OK to confirm that. Remember to save the recovered files to another drive. Or the lost/deleted data could be overwritten.
Step 5. Check out whether the recovered files are the ones you really need.

Taylor is a freelance SEO copywriter and blogger. His areas of expertise include technology, pop culture, and marketing.


