Surely it has happened to you that you want to see a photo and it turns out that the day before, while you were cleaning, you deleted it without realizing it. On computers, there are dozens of applications prepared to recover deleted files, as long as they have not been deleted long ago, but things change slightly when we talk about mobiles. Is it possible to recover deleted photos? Yes. It is easy? It depends.
There are several methods, each one more complicated, especially when we talk about recovering photos on Android, but we are going to see them all, regardless of the operating system. We also tell you some alternatives so you don’t get scared again.
On an Android mobile
We start with the Google operating system. Generally, on newer phones, manufacturers have implemented a trash can in the gallery app that saves photos for a few days before “completely deleting” them. The layers in question are One UI, LG UI, EMUI, and MIUI, in addition to Android One, Pixel Launcher, and other versions of Android Stock that generally use Google Photos as a gallery, an app that has a built-in trash can by default.
Before you start using applications and racking your brains to recover a photo, take a look at the gallery app to see if in the menus (the path will depend on the mobile) there is an option called “Trash”. If the photos have been deleted recently (between one or two weeks), you probably have them there safe. Select the ones you want to recover and voila, they will return to their place.
It is possible that your gallery app does not have a trash can, in which case you will have to use applications. The chances of recovery will depend on whether you have root access or not. Let’s see both. But first, note that if the photos were on the microSD card, you can try using Recuva.
No root
Most likely your phone is not rooted. That does not mean that you cannot do things, but we already anticipate that the options are reduced. Recovery applications can only access the cache and thumbnails, better known in the jargon as thumbnails. What does that mean? That what you will be able to recover are small photos, not the original file. It’s more than nothing but less than what you had before.
One of the most popular applications for this letter is DiskDigger. Its operation is very simple, you just have to give it permission to access the storage and wait for it to analyze all the internal memory of your mobile. All (eye, all) the photos you have on your device mixed will appear, that is, you will see both the deleted ones and the ones that have not. In my case, which I have tried on a Motorola One that I use as a secondary mobile, more than 1,000 photos have appeared, so finding the one you are looking for can be a complicated task.
Deleted photos are mixed with undeleted ones, so finding a specific one can be a difficult task.
Now you just have to browse through the entire collection of photos that appear and find the one you need to recover. When you find it, click on it and select the “Recover” button. The thumbnail, not the original photo, will reappear in your gallery and at least you can see it again as many times as you want. To give you an idea, from a 4128 x 2322 pixel photo we were able to retrieve a 640 x 360-pixel thumbnail.
Disk Digger
- Developer: Defiant Technologies
- Price: Free
- Download it at Google Play
- Category: Tools
Rooted
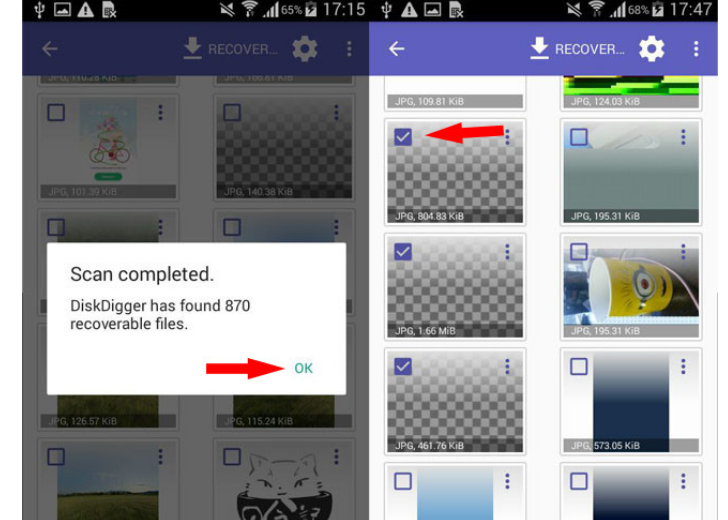
If you have root the thing improves, because the applications can do a deeper scan and sometimes show the original photos. The result largely depends on how long ago you deleted it. If it was recently, you might be lucky and get it back in full without too much damage. If you don’t have root permissions, you should know that getting them involves some risks, so do it at your own risk.
Having root access does not guarantee that you will find the deleted photo, it just increases the chances.
If you are a root user, open Diskdigger and give it root permissions. Then choose the specific partition that you want to analyze, although it is best to leave the one that is activated by default. Finally, select the format of the file you are looking for. In the free version, you can only choose photos or videos, if you want something else you will have to buy the Pro version for 3.34 euros.
And now it’s time to wait a while. The good thing is that once the search is finished, you will only see the photos and videos that have been deleted, so it will be easier for you to find what you are looking for. That does not mean that they are few, but surely they are less than those that appeared before. When you find the file, click on it and select “Recover”. Clever.
On an iPhone
On iPhone, it is much simpler since the “Photos” app has a trash can that saves the entire files for a month. If the photo you deleted is recent, don’t worry, it will almost certainly be there (unless you have deleted it manually, in which case things will get more difficult).
To recover a deleted photo on iPhone (or iPad), you just need to open “Photos”, go to “Albums” and scroll to the bottom. In the “More items” section you will see the option “Deleted”. There you will find every one of the files, whether photo or video, that you have deleted in the last 30 days along with the time left to be permanently deleted. Select the ones you want to send back to the gallery and click on “Recover”. The photos will return to their original state. If they don’t appear in “Deleted”, try your luck with the backup.
From a backup
By default, iPhone comes set to back up photos to iCloud Library. Even so, the free space is very limited, just 5 GB, so if you have been filling it since you bought your mobile with photos and videos, it is more than likely that the most recent ones have not been uploaded. Still, you lose nothing by trying.
- On iPhone, open the “Settings” app.
- Click on your name (at the top).
- Select iCloud.
- Check that the “Photos” section is activated and that, inside, the option “Photos in iCloud” is checked. If so, your photos may be safe in the cloud.
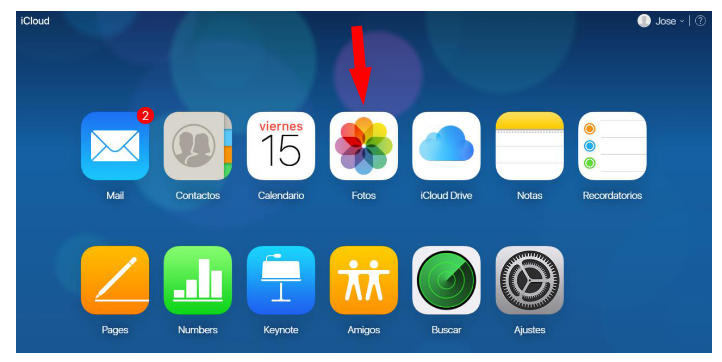
On a computer, go to www.icloud.com and sign in with your Apple ID. Enter the code requested and that will have appeared on the iPhone and select “Trust this browser”. You’ll come to a window like the one you have right up here. Choose “Photos”.
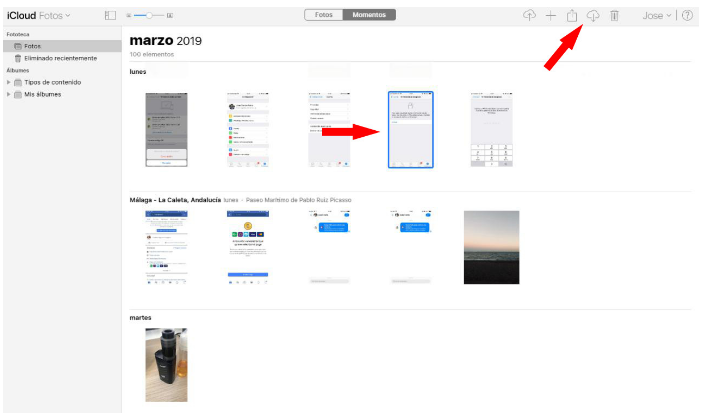
If you’re lucky and the photo is synced to the cloud, you’re in luck because it will be there. Mark the ones you want to recover and press the cloud icon with the down arrow. That will download it to your computer in its original size.
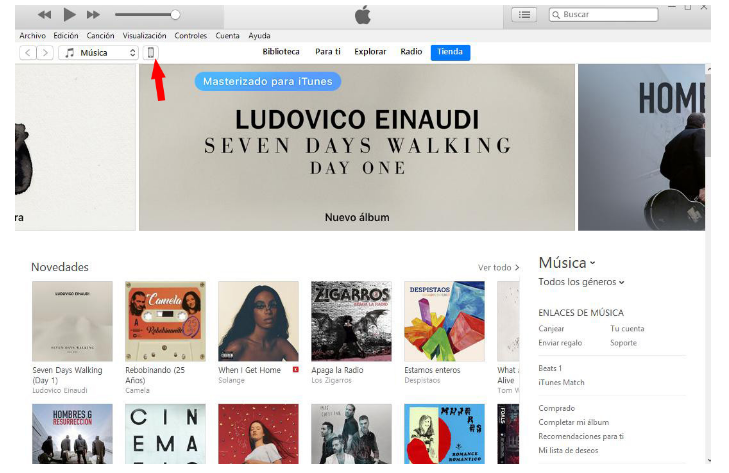
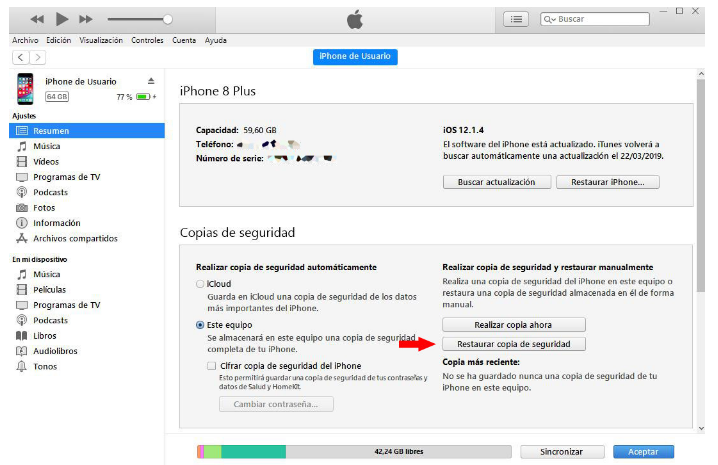
No this? Well, we still have the iTunes backup, which if you have not changed anything, is done every time you connect the iPhone to the computer and open the application. If you have a recent backup, or at least from before you deleted the photo, don’t worry because it’s probably there. Connect the iPhone to the computer and press the icon marked in the photo below.
Now locate the “Restore Backup” option. Below it will show you the date it was made. If it’s from before you deleted the photo, it’s probably there. Restore the copy and voila, with any luck you will be back in the gallery.
Don’t let it happen to you again
Did you manage to recover the photo? Goodness. It was a scare, but hey, everything is back on track. Now we are going to see some options so that this does not happen to you again. You have several alternatives, but the simplest is two: use a cloud storage service or periodically upload photos and videos to a physical medium such as a computer.
- Cloud applications: the most recommended is Google Photos. It works with your Google account and is available for iOS and Android, so it’s a surefire way to never miss a single image or video again. If you don’t like it, you can use Dropbox, Google Drive, or any other cloud app. On iPhone, you can use iCloud which is better integrated into the system.
- On physical support: as simple as connecting the mobile to the computer, looking for the DCIM folder, and copying all the files to the hard drive. It is slower, it requires a little more work on your part and a certain periodicity, but at least it is a method so that you do not have a scare again.

Sharlene Meriel is an avid gamer with a knack for technology. He has been writing about the latest technologies for the past 5 years. His contribution in technology journalism has been noteworthy. He is also a day trader with interest in the Forex market.


