Today we are going to teach you how to use the new Snip & Sketch feature, the new screenshot tool added to Windows 10 after the October 2018 Update. This application adds to the operating system the possibility of taking more advanced screenshots and being able to make rectangular or manually shaped clips or cutouts at the point you want on the screen.
We are going to start by telling you step by step how to launch the screenshots of this tool and what kind of screenshots you can make with them. Later we will tell you how to remap it to use the keyboard’s Print Screen key to launch these advanced screenshots instead of just saving a conventional screenshot. Remember that these screenshots will go to the clipboard and not to the screenshots folder, although you can open them in a specific application.
Take screenshots with Snip & Sketch

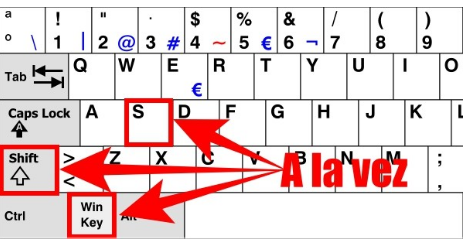
To launch the new Windows screenshot tool, you must press the Windows + Shift + S keys at the same time. This combination will launch the new Snipping and Sketch tool, which has been added to Windows 10 after the Windows 10 October 2018 Update.

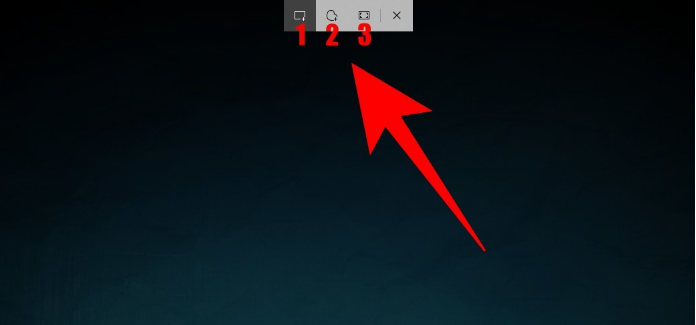
When you press this key combination, the screenshot options will appear at the top of the screen. All you have to do is click on one of the options, two of which are clippings, and mark the areas in which you want to capture. These are the three options available to you:
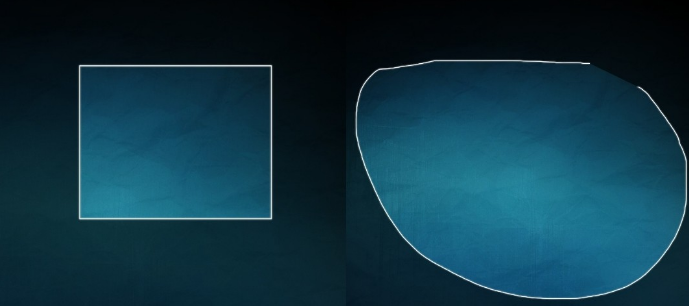
- Rectangular clip: When you go to mark the cutout with the mouse on the screen, it will be made with straight lines and right angles to give it a grid appearance.
- Free-form clip: You can draw with the mouse a cutout with the shape you want.
- Full-Screen Clip: A conventional screenshot is taken.

In this double capture, you can see the differences when making rectangular and free-form clips. It is important to note that these screenshots are saved to the clipboard, but are not automatically saved to an image file. For the latter, you will still have to use the Windows + Print Screen combination.
Once you take the clip or capture, a notification will appear notifying you of it at the bottom right of the screen. Click on this notification to open the screenshot in the Crop and Sketch application, which is the one that Microsoft has designed to finish giving it the last touches.
Once you open the Snip & Sketch app, you will be able to write and draw on the screenshot to be able to annotate or indicate something important within the screenshot. The tool also has the New option that reopens the option to take a screenshot, and there is also an option to open to edit any other with the tool.
How to remap Print Screen to use this feature
Windows also lets you assign the Print Screen key to this new snipping and capturing tool, though the option to do so is pretty much buried in system settings. To get started, open Windows Settings, and once there click on the Accessibility option.
When in accessibility, tap on the Keyboard option in the left column*** (1) to access various keyboard-related options. Now, scroll down to the Print Screen Shortcut section, and **activate the option Use the Print Screen button to open the screen snip (2). And that’s it, from now on when you press this key the cropping options will open at the top of the screen as if you had pressed Windows + Shift + S.

Sharlene Meriel is an avid gamer with a knack for technology. He has been writing about the latest technologies for the past 5 years. His contribution in technology journalism has been noteworthy. He is also a day trader with interest in the Forex market.


![How to Watch UFC 303 Live Stream Free [Updated 2024] UFC 259 Live Stream Free](https://techsmartest.com/wp-content/uploads/2022/03/UFC-259-Live-Stream-Free-100x70.jpg)

