How to configure Chromecast in a few simple steps: what obstacles you might encounter and how to behave when installing the device.
Google’s HDMI key, Chromecast, remains one of the simplest and most effective ways to connect any device to a TV, even if not recently made. It is sufficient that the TV has an HDMI port and possibly a USB port for the power supply (otherwise, you will have to use the supplied cable to connect Chromecast to an electrical wall socket).
The price of Chromecast in its third version is around 39 euros. It can be purchased on the Google store or at other authorized retailers (online and offline); it could also return to Amazon soon.
The Chromecast 3 key (presented in October 2018) is 15% more performing than the previous model thanks to the updated hardware; it can stream 1080p content at 60 fps, ensuring smooth and less “jerky” images than previous “incarnations”.
For those who want to stream 4K UHD video, the most current Chromecast version is Chromecast Ultra (launched on the market in 2016), whose price is around 79 euros.
How to set up Chromecast
The Chromecast key is very simple to set up, even if it is appropriate to keep some essential aspects in mind.
First of all, if you had purchased Chromecast from another user (for example, a colleague or friend who no longer needs the key), it is essential to proceed with the factory reset.
After connecting Chromecast to the TV, you will have to press and hold the button on the side of the device. The LED will turn orange and start blinking; as soon as the LED becomes white, the button must be released. This will start the new device initialization procedure.
1) Download and install the Google Home app on an Android smartphone (Google Play Store) or iOS (Apple App Store).
2) Connect Chromecast to the TV by inserting it into a free HDMI port, then power the key via USB or an electrical wall socket.
3) As soon as a welcome message appears on the TV screen, the name assigned to the Chromecast device will be read at the bottom. It is generated randomly and is of the ChromecastXXXX type.
4) In this phase, Chromecast becomes a sort of WiFi hotspot, visible to other wireless devices, and able to accept incoming connections. At this point, it is necessary to have an Android or iOS smartphone with an active WiFi module.
However, there is an important difference between the first generation Chromecast sticks (they have a narrow and long shape) and those of the second and third-generation (both in the shape of a “disc”). Chromecast 1.0 did not support Bluetooth, so the only way to connect was to access the WiFi settings on the mobile device and then choose the name corresponding to the key and taken from the webcam
e screen on the TV.
With Chromecast 2.0 and 3.0, the first connection and subsequent configuration occur via Bluetooth: make sure that the Bluetooth module is active on the Android or iOS smartphone.
Suppose the connection via Bluetooth fails, even with the second and third generation. In that case, you can connect to the key via WiFi (you will need to select the WiFi network corresponding to the key to configuring the device).
5) After the connection between Chromecast and mobile device is successful, you will have to start the Google Home app on the same smartphone. Usually, the Chromecast configuration procedure is automatically started; otherwise, just tap the icon at the Google Home app’s top right.
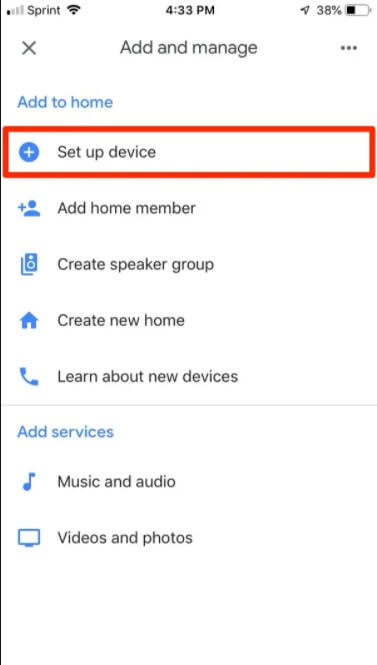
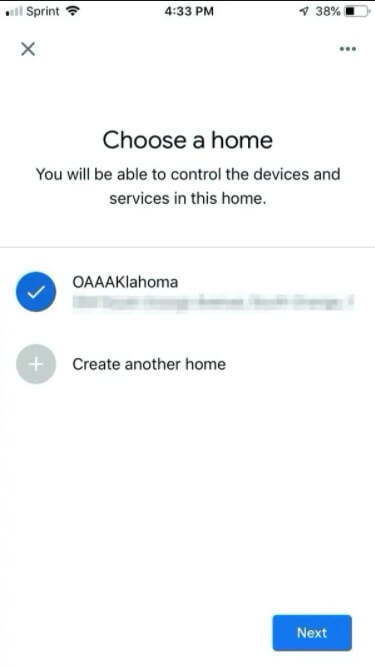
If you have already added other Google Cast compatible devices, just choose to Add then Configure the device and finally Configure new devices at home.
6) Confirm the Chromecast key to be configured then, on the phone, inform Google that the code shown is the same as the one displayed on the TV. This is a simple safety measure to make sure you set up the right Chromecast dongle.
7) The next steps consist of indicating the country in which you are using Chromecast. Therefore, you will have to assign a name to the key, replacing the one proposed initially, and you can avoid the transfer of statistical data to Google.
The guest mode can normally be disabled: enabling it can be useful if you want to put other users in the condition to play audio-video content without being connected to the same WiFi network (therefore without even providing them with the corresponding password).
As a final step, you will have to choose the wireless network that Chromecast will automatically connect to. It is essential to connect the device to the WiFi within which you plan to stream content.
8) At this point, the Chromecast key is ready to receive content from other devices. You can stream audio and video from compatible apps that show the Chromecast icon or use applications such as Local cast, apps to stream content from your smartphone.
All the applications mentioned allow access to shared resources on the local network (for example, via SMB or DLNA): the smartphone becomes a sort of “remote control” to choose the files to be played on Chromecast. They don’t have to be saved on the local device, but it is possible to draw from a smartphone to any shared resource on the LAN.
Anyone wishing to set up a media center on their device can use Kodi and transfer the streaming audio-video stream, for example, with BubbleUPnP (see How Kodi works and how to stream video on Chromecast and Kodi on Android: how to install and best configured ).
In case you want to transmit on the TV, via Chromecast, what is displayed on the smartphone (for example, when an app does not directly support the Google key and does not show its icon), you can adopt the expedient of screen mirroring: Mirroring screen, how to switch smartphone contents to TV.
9) The streaming of contents to the Chromecast key can also be arranged from a PC. The Chrome browser integrates everything necessary to send single videos published on web pages to Chromecast and allows you to transmit what is displayed in the browser window or even on the Windows desktop.
By right-clicking in a free area of any page then selecting sources, you can choose whether to transmit the single tab open in Chrome, the PC desktop (in fact, the content of all open windows), or a multimedia file saved in any path.

In this regard, we also suggest reading the article Chromecast jerky from PC: how to solve.
10) It is, however, good not to place Chromecast too far from the WiFi router; otherwise, the performance could be adversely affected.
For our part, we suggest that you always disable UPnP support on your WiFi router despite Google still advocating its use.
I’m Mr.Love . I’m admin of Techsmartest.com


")


")

