These days some reports refer to the blue screen’s appearance with the Inaccessible Boot Device error: let’s see how to fix it without reinstalling Windows.
In recent times there have been reports referring to the appearance of a blue screen when Windows starts. Often the problem occurs after the successful installation (automatic in Windows 10) of some updates for the operating system.
Recently, for example, the Inaccessible Boot Device error occurred following the installation of patches against processor vulnerabilities known as Meltdown and Specter.
If the Inaccessible Boot Device error appears when Windows starts, the first suggestion is not to lose your temper and not take for granted the need to reinstall the operating system.
Resolve the Inaccessible Boot Device error
To make the blue screen with the Inaccessible Boot Device error disappear and start Windows again normally, it is good to keep in mind some important aspects.
First, we suggest you reboot the machine at least twice. After a double appearance of the blue screen, the most recent Windows versions will boot the system from the recovery console showing the message Preparing for automatic recovery when starting the machine.
Access to the recovery console will only occur automatically after at least two failed Windows starts.
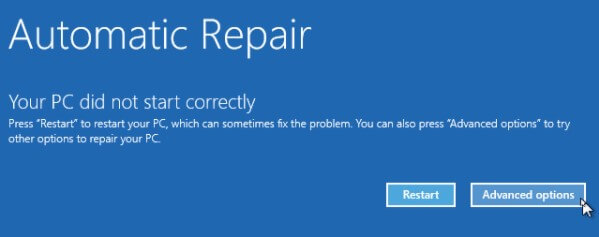
When the screen shown in the figure ( Automatic recovery ) appears, you will have to click on the Advanced Options button, then on Troubleshoot, Advanced Options, and finally on Startup Repair.
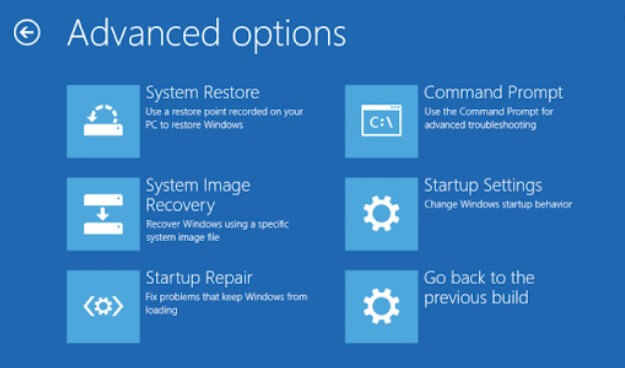
The recovery routine will attempt to resolve the most common problems that prevent Windows from starting normally.
We suggest repeating this procedure three times because problems are rarely remedied with a single “swipe”.
If the blue screen with the Inaccessible Boot Device error continues to appear, we, therefore, suggest you proceed as follows:
1) Return to the Windows recovery console by rebooting the machine twice until the message Preparing for automatic recovery is displayed. Boot.
You will have to click on Advanced Options, Troubleshoot, Advanced Options, Command Prompt .
Alternatively, using a PC that does not have problems can generate the Windows installation media by saving it to a USB key and requesting to start from this tool. The Windows installation media can be created by following the instructions in the articleDownload Windows 7, Windows 8.1, and Windows 10 from Microsoft servers.
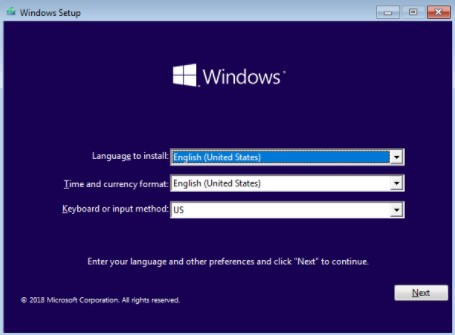
After booting the Windows installation media system, pressing the SHIFT + F10 key combination when the screen in the figure appears, the command prompt will open.
2) Make sure, by performing in sequence the commands dir C: , dir D: , dir E: and so on, the drive letter corresponding to the unit volume where it is installed on Windows (check the folder’s presence in Windows ).
3) At the command prompt, type:
reg load HKLM \ temp C: \ windows \ system32 \ config \ software
Instead of C: the drive letter identified in the previous step must be indicated.
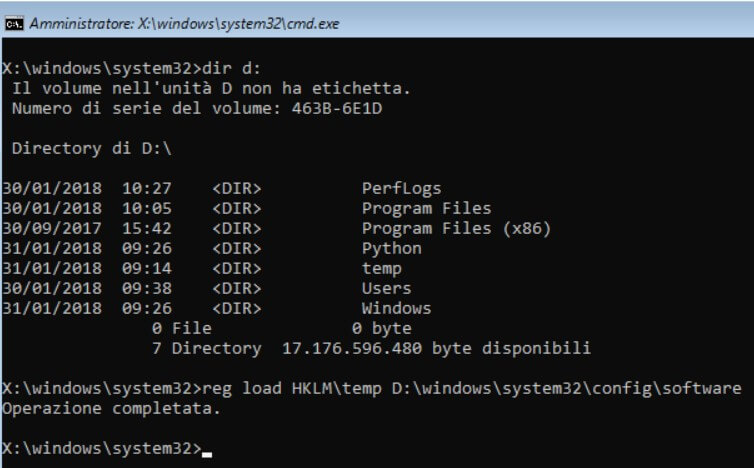
4) By typing the following, you can delete the information saved in the registry relating to the installation of updates in progress:
reg delete “HKLM \ temp \ Microsoft \ Windows \ CurrentVersion \ Component-Based Servicing \ SessionsPending” / v Exclusive
In case the deletion of the key should not take place, you will have to manually start the Registry Editor by typing regedit at the prompt, then go to the key HKLM \ temp \ Microsoft \ Windows \ CurrentVersion \ Component Based Servicing and delete the SessionsPending value in the right panel, if present.
5) Finally, you will have to type:
reg unload HKLM \ temp
6) The last step is to proceed with the uninstallation of the latest updates loaded in Windows.

A tech-savvy writer with a knack for finding the latest technology in the market, this is what describes John Carter. With more than 8 years of experience as a journalist, John graduated as an engineer and ventured soon into the world of online journalism. His interest includes gadget reviews, decoding OS errors, hunting information on the latest technology, and so on.


