People choose Kodi for its versatile features, quick setup method, and huge library of plugins and add-ons. In addition, it has a superb interface that is streamlined and smooth. However, all these too-good-to-be-true things may seem slow after a while, making you wonder what caused them. It may even be frustrating to use Kodi after a while because of this dilemma. The most common reason is the accumulated cache. Read on to find out how to clear cache on Kodi in this guide.

Cache on Kodi: The Culprit Behind Buffering and Slowdowns
When you start using Kodi, everything will run smoothly and at the peak of its power. However, over time, Kodi tends to slow down its pace, which causes various problems like too much buffering and not being able to use all the features in general. All these are most probably due to junk in the cache, which is taking up space and not letting features run smoothly.
So, it needs to be emptied to retrieve the lost speed and clear the storage area. Although you don’t need to do this as often as on Android devices, it can help a lot when your Kodi slows down to the point where you are unable to move around normally. Clearing the cache on Kodi can fix minor problems and improve playback and functionality.
Once you clear the cache, it will give the add-ons more space to run the applications without buffering. You can use various methods to clear the cache on Kodi. The simplest ones are detailed in this article.
How to Clear Cache on Kodi?
If you use or have used an Android device, you probably know how to clear the cache. But the process is a bit different on Kodi because you need to download an additional plugin to make it work. The first step before adding a plugin is to install a repository. If you regularly use Kodi, you probably know how this works, but if you don’t, here’s how you can do it.
Install SuperRepo Addon Repository
Follow the steps below to install the SuperRepo repository.
Step 1: Click the gear icon on the left and go to the Settings Menu. The internal file browser that you need for adding repositories is available in the settings. You can also add third-party plugins from here.
Step 2: Choose the file manager, double-tap Add Source, and select None. This will open the text field.
Step 3: In the text field, type in http://srp.nu. Now type SuperRepo as the name for the new repository. Tap Okay, and it will add the source.
Step 4: Once you have downloaded Super Repo, it’s time to install it. For this, navigate to the Kodi home screen. On the left side, choose Add-Ons from the menu. Tap on the packaged item that you see in the upper left corner.
Step 5: Choose Install from Zip File. Now scroll down on the screen to choose SuperRepo.
Step 6: Select Krypton and then choose All. After this, you need to choose superrepo.kodi.krypton.all-0.7.04.zip. (This name may change over time. However, look for .zip with SuperRepo, Kodi, and Krypton written together. Also, the directory will have just one zip file, so it is obvious anyway.)
Step 7: Select OK, and it will extract the SuperRepo file.
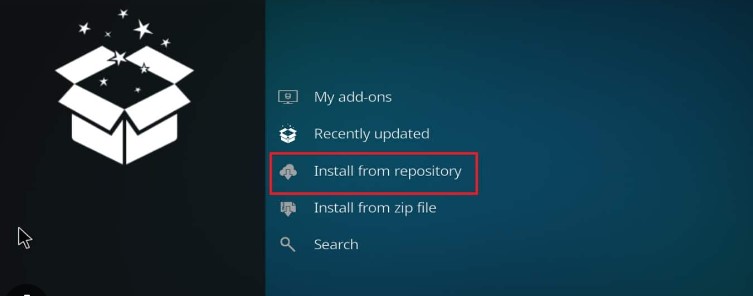
Step 8: Click Install from Repository on top of the Install from Zip file.

Clear Cache
As you have installed SuperRepo Repository, it will help you clear the cache on Kodi. Here is how to do it.
Method 1: Using SIMTECH WIZARD
As you have installed SIMTECH WIZARD, it will help you clear the cache on Kodi. Here is how to do it:
Step 1: Tap Super Repo All. This will give a list of categories from which to choose the add-on. Choose Program Add-ons. Now select SIMTECH WIZARD and then click Install.
Step 2: Choose SIMTECH Maintenance Tools and select Clean/Wipe Options.
Step 3: Click Clear Cache and select Delete on the confirmation prompt.
After confirming, you will see several prompts pop up, asking you to delete specific directories. You can delete them all, and the cache for your Kodi streams will be cleared automatically.
Method 2: Using MERLIN WIZARD
Here is how to use MERLIN WIZARD to clear cache on Kodi.
Step 1: Click Super Repo All. This will again take you to a list of add-ons. Now select MERLIN WIZARD from the list, and then click Install.
Step 2: When the installation is done, click Open. This will make the MERLIN WIZARD start its process. Wait until it’s complete.
Step 3: Once the process is complete, select Tool Box from the top of the page.
Step 4: You will see several options on the page. Tap the Clear Cache option, which has PENDING written under it. Once the cache is cleared, it will change to HEALTHY.
Step 5: Select Delete Packages and Delete Thumbnails to free up more space. However, deleting thumbnails will force Kodi to close.
Step 6: Tap the Exit option twice after finishing.
So, you have now cleared all the caches on Kodi.
Clearing Cache on Kodi Using Other Add-On Repositories
Just like SuperRepo, you can use other repositories. Some examples are Indigo, Rock Clean, and Ares Wizard.

How to Clear Cache on Kodi with Indigo?
The installation process for Indigo is the same as for SuperRepo. However, you have to use http://fusion.tvaddons.co for this one. You can follow the rest of the steps as mentioned in the SuperRepo process. Once you have installed it, continue with the steps below:
Step 1: Click Add-Ons.
Step 2: Navigate to Program Add-Ons. Choose Indigo Add-On.
Step 3: From the various options given, choose Maintenance Tools.
Step 4: Select Clear Cache and choose Clear in the confirmation prompt. Once done, it will show a notification on your screen.
How to Clear Cache Using Rock Clean?
You have to follow the same steps as the SuperRepo add-on. However, use http://rockodi.com in this case. After installation, follow the steps below.
Step 1: Choose Add-ons.
Step 2: Navigate to Program Add-ons and choose ROCK CLEAN. This will show you various options.
Step 3: Choose Clean All to clear cache, packages, thumbnails, and add-on data.
Step 4: Click Yes on the confirmation prompt to clear everything.
How to Clear Cache Using the Ares Wizard?
To clear the cache using Ares Wizard, follow the same steps as the SuperRepo add-on. However, use http://androidaba.com/addons and follow the rest of the steps. After installing the add-on, continue with the steps mentioned below.
Step 1: Go to Add-Ons and choose Ares Wizard.
Step 2: It will show several options at the top. You need to select Maintenance to clear the cache.
Step 3: After this, you will see all the cache, temporary files, thumbnails, and packages.
Step 4: Click Delete under the cache. If you want, you can also delete thumbnails and packages.
Once everything is deleted, the speed of your Kodi will improve, and you will have a better experience using the device.
How to Clear Cache on Kodi Using Other Methods?
As an alternative to the repository and add-on option, you can clear the cache using other methods. Below are the three simple ones.
Method 1: Firestick
Follow the steps below to clear cache using Firestick.
Step 1: Go to the top of the home screen of the Firestick and tap the Settings option.
Step 2: Choose Applications in the Settings.
Step 3: Select Manage Installed Applications under Applications.
Step 4: Select Kodi from the given options.
Step 5: Click Clear Cache and confirm the step in the prompt.
Method 2: Exodus
Follow the steps below to clear cache using Exodus.
Step 1: Go to the add-on section on Kodi’s main screen and choose Exodus.
Step 2: Choose Tools from the menu under Exodus.
Step 3: The tools will have Cache Functions at the bottom. Click on it.
Step 4: The Cache Functions will give you several options to clear the cache. You can alternatively choose Clear All Cache.
Step 5: Click Yes on the prompt asking for your confirmation.
You will receive a notification on the screen once everything is done. The last step will clear all the cache on your Kodi and make it run better.
Method 3: Covenant
Follow the steps below to clear cache using Covenant.
Step 1: Navigate to the add-on section on Kodi’s main screen and choose Covenant.
Step 2: Select Tools from the menu under Covenant.
Step 3: You will see several Covenant options.
Step 4: Choose Clear providers, Clear search history, and Clear Cache separately.
Step 5: Click Yes on the prompt asking for your confirmation. It will free up all the space on your Kodi.
Winding Up
Clearing the cache on Kodi helps enhance the speed and functionality of the device. It can tackle minor issues with performance and make the interface manageable. Although it is not similar to clearing the cache on other devices, it is not that hard to understand and apply.
Simply follow the steps in this guide to learn how to clear cache on Kodi and make your experience better than before. You should know that some repositories may not be right or safe. Exercising caution is the best way to prevent unforeseen circumstances.

Nancy is a journalist with passion for technology. In her 12 years of experience, she has crafted some of the most detailed pieces that describe the importance, benefits, and progress happening in the technology world.


