How to install Chrome OS on PC without changing the hard drive or SSD configuration?
Chrome OS is the operating system that Google pre-installs on Chromebooks, devices designed to be almost always connected, and take advantage of cloud services.
If you are a Google user and consistently use tools such as Google Drive, Google Photos, Gmail, Calendar, Keep, and so on, it might be useful to boot your PC from a key on which Chrome OS is installed. In case you are wondering how to use or connect a fiber modem, this guide will help you.
Installing Chrome OS on a PC is possible in several ways. For example, the Neverware company has created Cloudready, an application that allows you to install Chrome OS on your computer, with the possibility of configuring it even in dual boot, therefore without uninstalling the operating system already present and without overwriting the data on the disk. We talked about it in the article: Recovering an old computer with Cloudready. If you want to remove data from your disk that is not needed anymore, using delivery optimization file is the key.
Cloudready can also be installed and run from a large 8 or 16 GB USB stick.
Please install the latest version of Chrome OS and start it from the USB stick.
Alternatively, another simple procedure is to try Chrome OS and run it from a USB stick without installing anything on the PC.
Google does not offer an official way to do this. Still, several independent developers have presented the steps to make up for it on Windows, macOS, and Linux machines without changing anything of the configuration of the operating system installed on the hard disk or SSD.
Here are the simple steps to follow:
1) Download Chrome OS
Google does not offer an official repository from which to download Chrome OS (actually Chromium OS, the development version – opensource – of the operating system). This website can, therefore, be used for this purpose. The updated images of the Chrome OS operating system are loaded here (almost) daily.
It is good to keep in mind that the daily versions may not work with some hardware configurations (therefore blocking immediately after booting from a USB key).
On systems equipped with an x86-64 processor, both Intel, and AMD, you can download the latest file with the prefix Camd64OS-.
2) Extract the contents of the compressed file
The next step is to extract the .img file contained in the Chrome OS compressed archive.
You can extract the image file to a folder of your choice using the 7-Zip program.
3) Format a USB stick and insert the Chrome OS image into the USB stick with Rufus
To accommodate Chrome OS, you need to use a USB stick with a capacity of at least 8 GB and format it with the FAT32 file system, finally loading the image content .img.
Rufus is an excellent program that allows you to make USB sticks bootable and insert image files that allow you to boot any operating system when you turn on the PC.
The application is completely free and can be downloaded from this page (in the article Rufus, a guide to using the program to create bootable media, the principles that govern its operation).
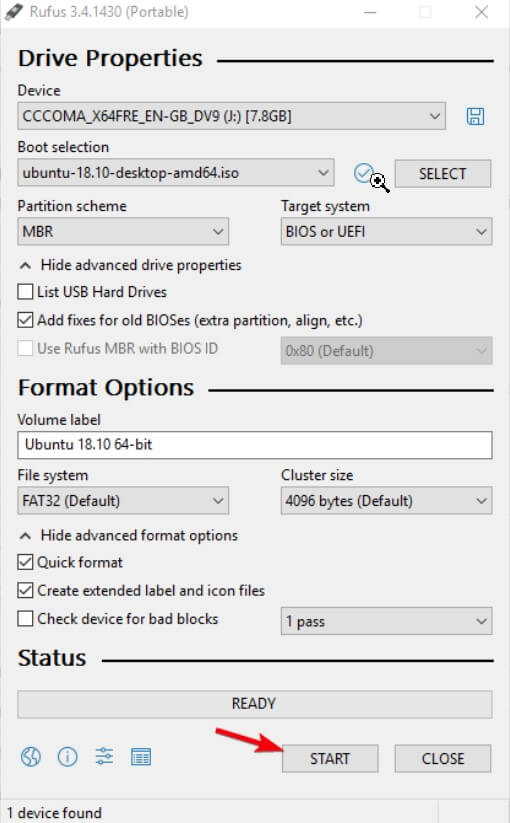
After starting Rufus, its interface will have to be set up, as shown. By clicking on “SELECT,” then choosing the Chrome OS .img image, the FAT32 file system should be automatically set.
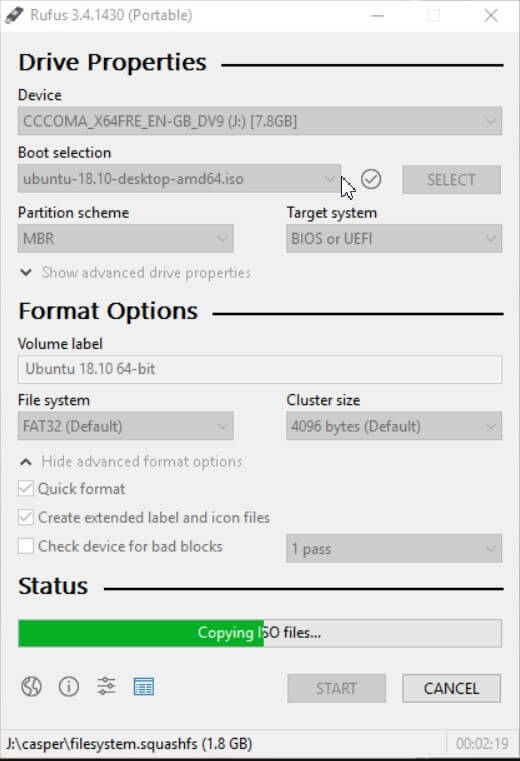
By clicking on the Start button, Chrome OS will be automatically installed on the USB stick, which will be made bootable. At the end of the operation, click on Close.
Alternatively, the contents of the Chrome OS .img image can be inserted into the USB stick with Etcher, a utility compatible with Windows, macOS, and Linux.
4) Restart the computer and access the boot settings in the BIOS / UEFI
When restarting the PC, you will need to check that the external storage drives (such as USB sticks) are booted first compared to the hard drives and SSDs installed internally.
To verify this, you will need to press the DEL key (or F2 / F10 depending on the BIOS / UEFI used by the motherboard) to access the BIOS / UEFI.
You will have to check that the removable drives are booted at the Boot sequence before the hard disk and SSD.
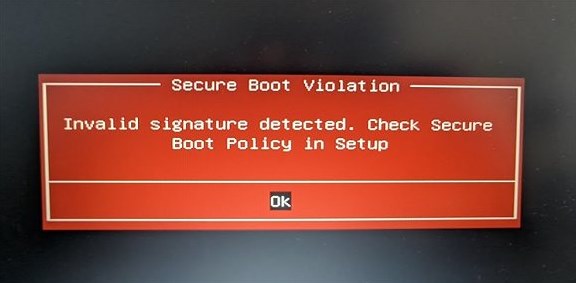
You will also need to temporarily disable the Secure Boot feature in UEFI.

Otherwise, you will receive an error message similar to the one shown in the figure ( Invalid signature detected ):
Saving any changes, exiting the BIOS or UEFI, and restarting the system, should boot from the Chrome OS installed on the USB key.
5) Start and configure Chrome OS
At this point, leaving the USB key containing Chrome OS inserted, the operating system should boot regularly (instead of the one installed on the hard disk or SSD).
As a first step, Chrome OS will ask you to set your preferred language and keyboard layout and then propose a desktop similar to Windows.
The difference is that there will be explicit references to Google’s cloud applications in the taskbar at the bottom.
The advantage is that the USB stick with Chrome OS, once configured, will allow you to access your data comfortably from any computer.
In fact, you will not have to change the PC configuration to access your data: connect the USB key with Chrome OS and boot the system from this support.
Install Android apps on Chrome OS
As announced some time ago by Google, on Chromebooks, it has been possible for some time to activate the Play Store by following the procedure on this page. In this way, you can install the same apps you use on your Android devices and use them from your PC.
On Chromium OS, it does not seem possible to do the same, but it should be very short of installing the Android apps on the operating system inserted in the USB stick as per the procedure described above.

A tech-savvy writer with a knack for finding the latest technology in the market, this is what describes John Carter. With more than 8 years of experience as a journalist, John graduated as an engineer and ventured soon into the world of online journalism. His interest includes gadget reviews, decoding OS errors, hunting information on the latest technology, and so on.
 Extender for Their Networks")


 Extender for Their Networks")


