The SSD or solid-state drive is a great choice for a high-tech system. Since it is 5 times faster than HDD, replacing a hard drive with an SSD is one of the best strategies you can follow to speed up a machine.
In a traditional hard disk (magneto-mechanical), there are several rotating platters to read and write data the data. On the other hand, an SSD looks like a set of integrated circuits, where memory modules are provided to host the data.
The memory modules are nothing more than NAND flash chips that use the so-called tunnel effect to change the cells’ electronic state. It is, therefore, no longer necessary to rely on magnetic and mechanical solutions.
The disadvantage deriving from the use of SSDs is that they are characterized by a finite number of write cycles using flash memories. Thanks to the use of particular algorithms that allow you to distribute writing and erasing more evenly on the memory cells, modern SSDs can be used for several years without any problem.
However, it is good to limit as much as possible the number of writes on SSD drives, avoiding using them for continuous storage and intense updating of the data present.
In other words, SSD can revitalize a machine by moving the operating system there; it can be used as a storage unit but should not be used to store information that needs to be updated frequently.
However, compared to a traditional hard disk, an SSD is generally more durable, offers higher read and write speeds, allows a much faster system boot, file fragmentation has a much less impact on performance, much less noisy, and is characterized by lower energy consumption.
Replace hard drive with SSD: move the operating system without reinstalling.
We said that replacing the hard disk with an SSD is one of the hardware upgrade operations that allow you to immediately obtain tangible results in terms of performance improvement.
In the past, cloning the contents of a hard drive to SSD has never been easy. SSD disks are usually less capacious than traditional hard disks. Therefore, it was necessary to carry out many “acrobatics” to switch to a solid-state drive.
To replace a traditional hard drive with an SSD, we suggest using AOMEI Backupper, disk imaging software (which allows you to create the image of the content of entire disks and partitions) that we have presented several times.
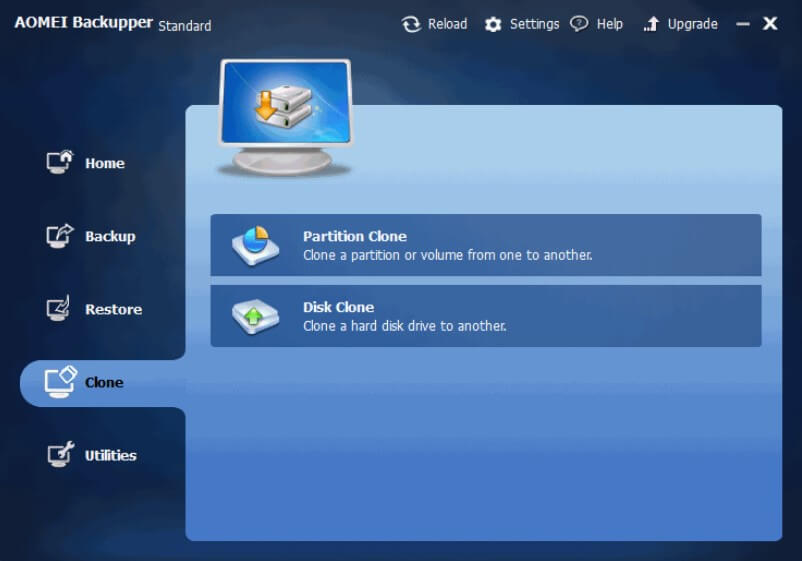
To clone SSD disk to SSD drive, simply select Clone from AOMEI Backupper interface, then Disk clone.
The target SSD does not need to be larger than the traditional hard drive – the SSD just needs to have enough capacity to accommodate the old hard drive’s data.
By choosing a Partition clone, it is possible to copy only the operating system, and in particular, the partition in which it is installed to the SSD.
It is interesting to note that the cloning procedure of the partition containing the operating system can be started without leaving Windows, directly from the AOMEI Backupper interface: in fact, the application will restart the system, if necessary, to correctly copy all the data from unity to the other.
Clone the operating system to SSD
Before starting the cloning of the operating system to SSD, it is necessary to connect that drive to the system in use.
After shutting down the system, install the SSD by connecting it to a free SATA connector on the motherboard. Alternatively, you can temporarily connect the SSD to the system using a USB-SATA adapter – in this case, however, the data copy operation will be much slower (if your system is equipped with a USB 3.0 port, make sure you are using a USB 3.0 adapter).
Once the SSD is connected, you can restart the system and start AOMEI Backupper.
After clicking on Clone, and then on Disk clone, select the source disk containing the operating system (usually, it contains a partition marked with the identification letter C :).
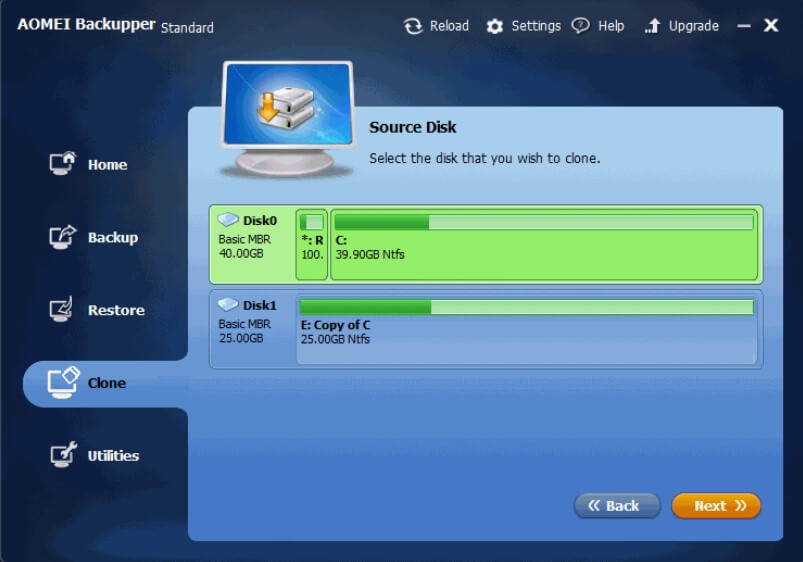
It is interesting to note how there is a small 100 MB partition (“system reserved partition”) on top of the source drive: we talked about it in the article Reserved partition for Windows 7 system: what it is, what it is for, and how it can be eliminated.
By clicking on Next, you will then need to choose the destination SSD.
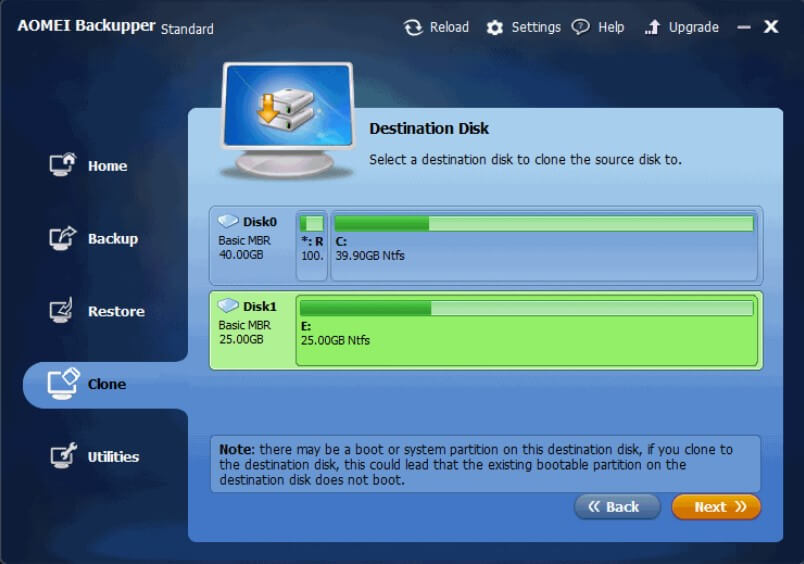
The last screen offers a report on the cloning activity that will be carried out by clicking on the Start clone button.
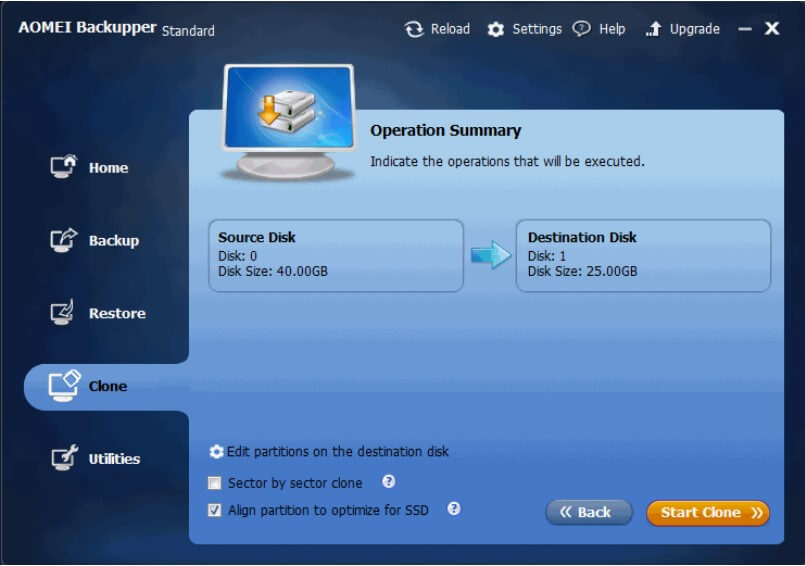
When switching from a traditional hard drive to an SSD, it is important to activate the Align partition to optimize for the SSD box. The alignment of an SSD is an operation that must be performed only once, that is, when you install the operating system, or when you clone an already existing partition.
The SSD alignment procedure ensures that a logical sector begins exactly at the beginning of a “physical page” of the solid-state drive. By avoiding alignment, the sector can overstep the page boundaries (implying an additional write in the case of write operations) and reduce the SSD’s performance.
The key to achieve optimal alignment is to skip the first physical block, usually called “erase block size “: this is the minimum size of the data block that the disk controller intervenes on when moving information.
Usually, the value of 1024 KB is used because it is generally “safe”.
By activating the Align partition to optimize for the SSD box, AOMEI Backupper will align the SSD drive.
AOMEI Backupper takes care of creating partitions on the target SSD, reducing its size compatibly with the available space and the amount of data to be stored.
The partitions present in the source disk are proposed again in the SSD, proportionally adjusting their size.
If there is a reserved partition for the system, we suggest you click on Edit partitions on the destination disk, select Edit the partitions on this disk and then reduce the reserved partition size to 100 MB.
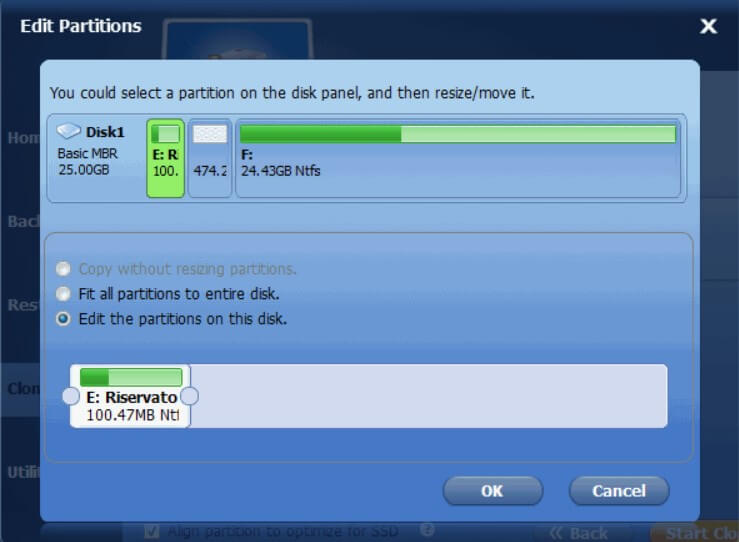
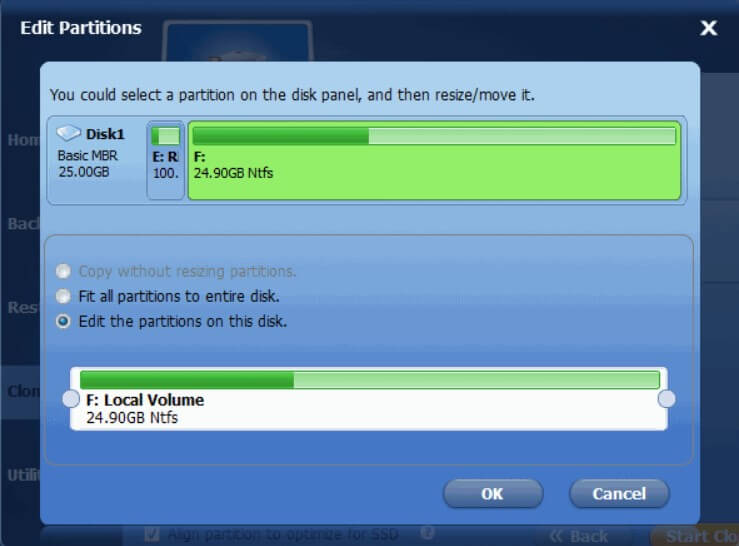
The other partitions’ size must then be manually adjusted by acting on the appropriate “handles” so that there is no unallocated space left on the drive.
After clicking on the OK button, you can start the actual cloning operation ( Start clone button ).
As soon as the data copy is completed, AOMEI Backupper will show a message confirming the operation’s success.
At this point, to conclude the procedure, it will be sufficient to disconnect the old hard disk and connect the data cable of the SSD to the SATA port.
The old hard disk can be connected to a free SATA port so that it can still be used for data storage.
Restarting the system, Windows should boot from the SSD: therefore, read and write performance should be immediately improved.
Once you have checked that everything works correctly, you can delete the contents of the old hard disk and create one or more partitions for storing data.
To do this, you can use the Windows Disk Management utility, which can be booted by typing disk management in the Search programs and files box on the Start menu or searching for the Windows 8 and Windows 8.1 charm bar.
From the Windows window, which allows the management of partitions, you can delete the volumes on the old hard disk and create new ones. Before proceeding, however, we suggest checking that the cloning is successful.
Replace a laptop hard drive with an SSD drive
Nothing prevents you from replacing the hard disk of a laptop with an SSD: in this case, of course, it will be necessary to act with a little more attention, but the procedure is far from impossible to put into practice.
First of all, it is necessary to have an adapter similar to this one that allows you to connect the notebook hard disk to a desktop computer.
To remove the magneto-mechanical hard disk from the laptop, it will be necessary to turn it off completely, remove the battery, check under which “door” the hard disk is mounted, and open the “door” by removing the screws.
The disc is removed by sliding it in the opposite direction to the contacts and then leveraging the plastic tab (pulling upwards).
At this point, using AOMEI Backupper, you can create, on the desktop system, an image of the entire contents of the 2.5-inch disk, unmounting it from the notebook ( Backup, Disk backup ).
After connecting the new 2.5-inch SSD to the desktop system through the adapter, you can restore the backup image created with AOMEI Backupper.
Finally, by connecting the new SSD in the housing inside the laptop, reconnecting the battery, you will be able to enjoy a much more performing system.
AOMEI Backupper
Download: aomeisoftware.com
Compatible with: Windows XP, Windows Vista, Windows 7, Windows 8, Windows 8.1
License: Freeware (both home and business)

A tech-savvy writer with a knack for finding the latest technology in the market, this is what describes John Carter. With more than 8 years of experience as a journalist, John graduated as an engineer and ventured soon into the world of online journalism. His interest includes gadget reviews, decoding OS errors, hunting information on the latest technology, and so on.


