Windows 10 has a handy Miracast-based feature that allows you to duplicate your screen by mirroring it and extending your display. Here’s how it works.
Windows 10 integrates a convenient feature that allows you to extend the notebook screen or duplicate it (then perform the so-called mirroring ) on another wireless device. This approach’s advantage is that you can project the Windows 10 screen onto a notebook, TV, tablet, or convertible or use the other device’s display as an extension of the one already in use.
The Windows 10 screen’s projection is, in fact, the streaming, to another device, of what is shown on display. For example, by extending the screen, you can move windows – with a simple drag operation – from one display to another.
Condicio sine qua non to ensure everything is working properly, it is necessary to have Windows 10 devices that support Miracast.
The standard Miracast can be thought of as the wireless equivalent of the HDMI cable: to project or extend the screen with Windows 10, both devices must be connected to the same wireless network.
In the article Miracast, what it is and how it works. Using the TV as a wireless screen, we have seen what Miracast is and how to check if the device in use supports the standard or not.
Press the Windows + R key combination, type dxdiag, click Save All Information, then open the generated text file and search for the term Miracast is a great strategy to check if your PC supports the standard.
In newer versions of Windows 10, just type Projection Settings as well. The appearance of the message in the figure means that Miracast is not supported.
Configure the Windows 10 PC on which to project or extend the screen
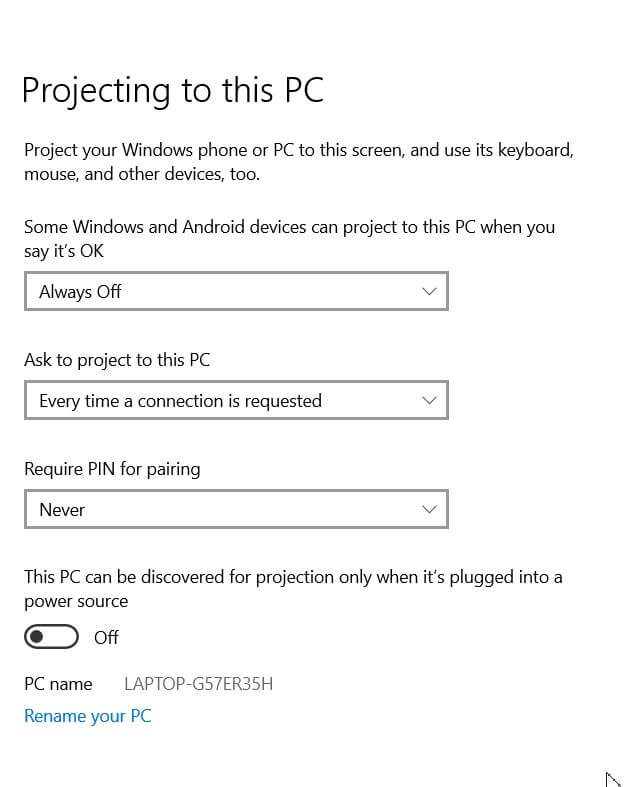
After verifying the effective availability of Miracast support, we suggest typing Projection Settings in the Windows 10 search box on the PC that will receive the streaming video stream.
The three drop-down menus allow you to define when the PC should be made available as a streaming destination via Miracast ( Always Off, Available Anywhere or Available Anywhere in Secure Networks ), when content projection should be requested, and if Windows 10 – for more security – you need to enter a PIN code.
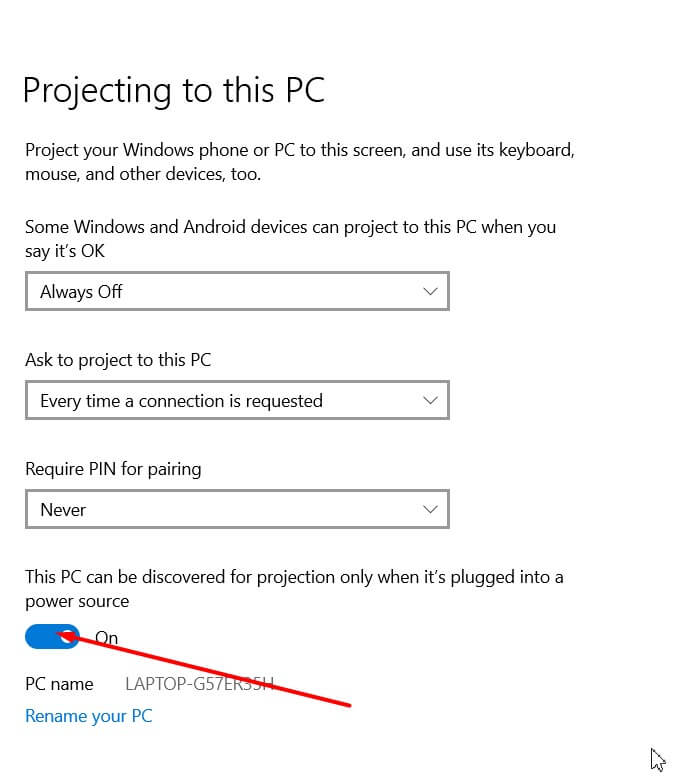
By acting on the Activated “switch” , you can establish whether the Windows 10 PC should be usable and ready for projection only if connected to the mains (power source).
Under Some Windows and Android devices can project to this PC when allowed, it is also possible to leave the option Always disabled selected. This does not preclude the possibility of activating streaming reception from another device connected to the local network at the user’s explicit request.
In this case, we recommend selecting the setting Every time a connection is requested from Request projection on this PC and Never from the drop-down menu Require PIN for pairing.
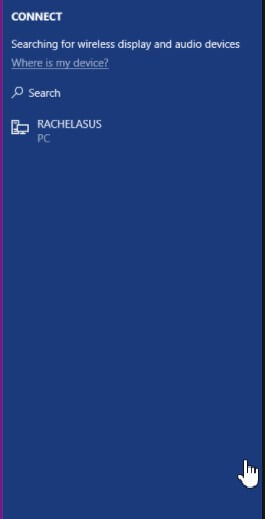
The next step is to write Connect in the search box of the Windows 10 Start button. A window similar to the one shown in the figure will be shown.

If necessary, by pressing the button with a double arrow in the title bar, you can make the Connect window full screen.
Set the device that projects the screen
On the Windows PC, to project the screen, simply press the Windows + P key combination and then click Duplicate or Extend, depending on whether you want to create a copy of the screen content in use or if you want to extend it horizontally.
To start streaming content on the other device, you will first need to search for it by pressing Connect to the bottom’s wireless screen. What is interesting to highlight is that – once the Miracast compatible target device has been selected from the list – you can check the box Allow mouse, keyboard, touch, and pen input from this device. This means that you can use both devices’ input devices to interact with the operating system and its interface.
Keep in mind that if you choose Extend, you will have a single, larger screen that extends horizontally.
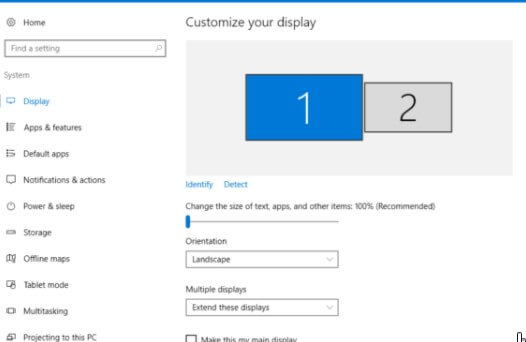
As it is easy to verify by typing Change display settings in the Windows 10 Start menu’s search box, the leftmost part of the screen is formed by the main PC display; the one on the right from the screen of the PC you are connected to.
If you move the mouse pointer over the main screen’s right edge, you will see it appear on the other device. Similarly, dragging any window from left to right will see it appear on the other display.
The displays’ position can still be changed from the Windows 10 interface, and it is also possible to define, which is the main screen.
Alternatively, you can press the key combination Windows + A; eventually, click on Expand at the bottom and finally on the Connect button. You can then choose the PC previously configured as the device that will receive the video stream.
The disconnection of the device that receives data via Miracast is possible by pressing Windows + A again, clicking the Connect button then Disconnect.
Screen projection of Android device on Windows 10
The Wireless Display feature integrated into Android allows you to send what is displayed on the mobile device display to a Windows 10 system configured as in the previous paragraph Configuring the Windows 10 PC on which to project or extend the screen.
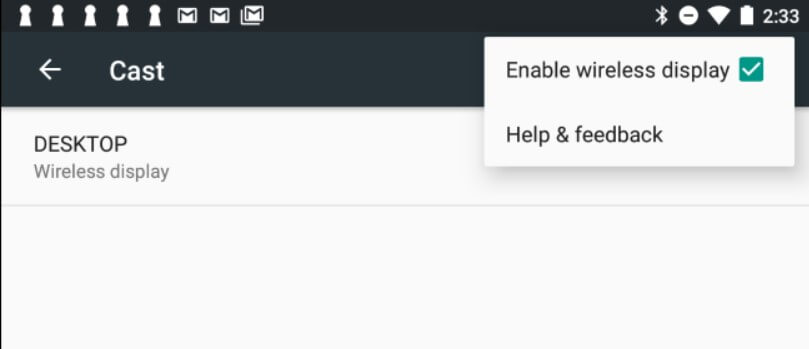
From the Android wireless screen, simply select the Windows 10 system name on which the Connect screen has opened. After a few moments, the Android screen will be replicated on the Windows 10 system.

Turn off screen projection completely in Windows 10
Those who are not interested in the screen projection feature of Windows 10 can disable it completely (Pro version of the operating system and later) by pressing Windows + R, then typing gpedit.msc and going to Computer Configuration, Administrative Templates, Windows Components, Connect.
By double-clicking on Do not allow this PC to be projected on than choosing Enabled, the screen sharing feature will no longer be usable.
Alternatively, just open the Registry Editor ( Windows + R, regedit ). Go to the HKEY_LOCAL_MACHINE \ SOFTWARE \ Policies \ Microsoft \ Windows key, create a Connect subkey if absent, then add the DWORD value AllowProjectionToPC and set it to 0.
To reactivate the functionality, simply assign 1 to the same value or cancel AllowProjectionToPC.
For other alternative techniques and strategies, which can also be used with different Windows versions, we suggest you refer to the article Connecting two monitors to the PC: how to do it?

A tech-savvy writer with a knack for finding the latest technology in the market, this is what describes John Carter. With more than 8 years of experience as a journalist, John graduated as an engineer and ventured soon into the world of online journalism. His interest includes gadget reviews, decoding OS errors, hunting information on the latest technology, and so on.


. What are the news of the new format for images")


. What are the news of the new format for images")

