Today we bring you a small guide so that you understand HDR photography on your mobile, explaining what it is and what it is not, since it is a concept that has ended up being greatly distorted on social networks. HDR is something that will help you make your photos more realistic when there are many light contrasts, capturing more details in lights and shadows.
We will start by explaining what exactly HDR is, and how your mobile phone manages to do it. Then we are going to tell you how to use HDR in your photos when you should and should not do it, and we will end with eight little tricks to get the most out of it.
What exactly is HDR
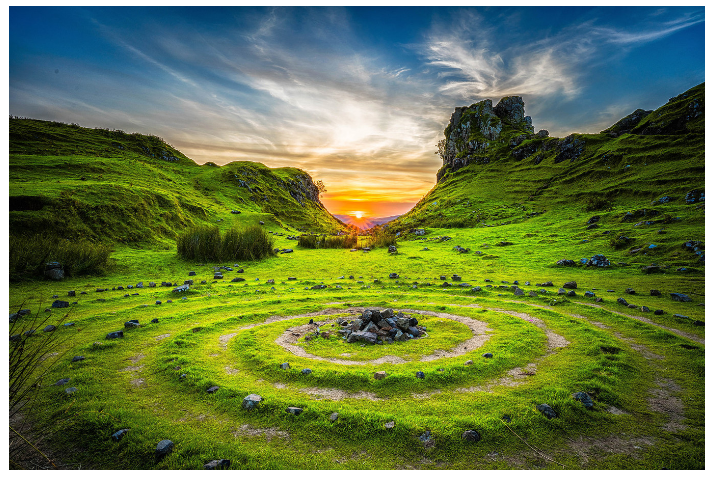
The main problem with HDR, the real one, is that it has nothing to do with what you usually see on social networks. Generally, when we talk about HDR or HDR photos, those images that are uploaded to Instagram and other networks come to mind, and they look more like a painting or drawing than a realistic photograph. In these cases, HDR is abused so much that its meaning is diluted and modified, falling far short of the initial objective of this technique.
HDR is short for High Dynamic Range or High Dynamic Range, which means that to understand it you have to know what this term means. Dynamic range is the camera’s ability to capture detail in the highlights and shadows of the same image. Come on, the brightest content is displayed well, but also the one that is darkest in a photo, all of this while maintaining intermediate values.
Therefore, the objective of HDR is to try to obtain the greatest possible dynamic range with your mobile camera, treating lights and shadows in the best way. With this, it is intended to be able to give a little more light to the dark areas of the photos to better see what is in them and avoid other illuminated parts that look burned or white.
What you must be clear about is that HDR does not consist of leaving the shadows and lights at the same level of lighting, but rather trying to help the mobile take photos that are as natural as possible. This means that you have to let there be lighter and darker areas in the photo, just trying not to lose the details that are in it due to the limits of the camera.
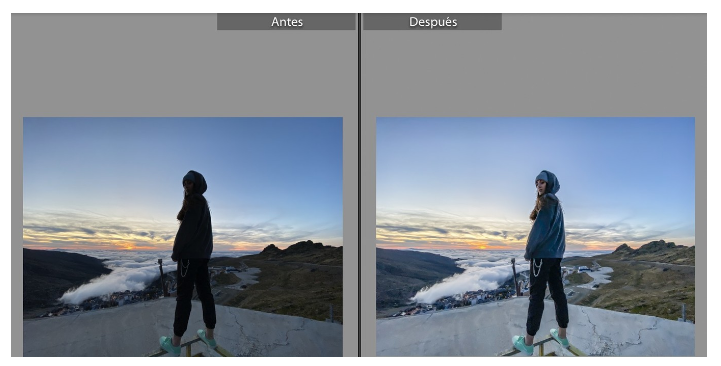
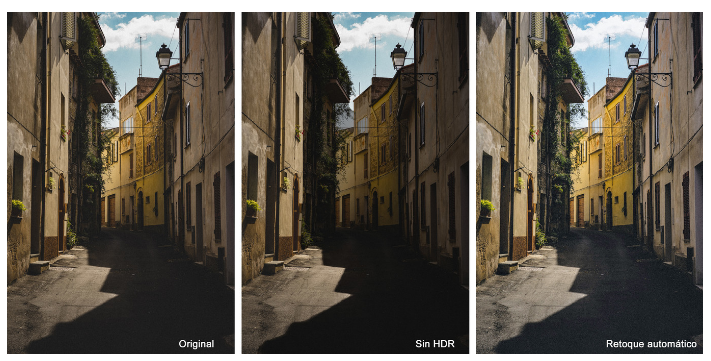
In this image from Xataka Android, you can see an example of what a well-done HDR looks like. On the left you have the photo before HDR, and on the right the photo after applying it. In it, you can see that yes, the photo has a greater exposure and more information is seen than what is in the shadows, but it is done trying to respect the information of the brightest areas such as the sun in the background.
In other words, HDR has kept the information of the brightest areas, so they look almost the same as without HDR. But its effect has been noticed by recovering more information from what appears in the shadows. Sometimes it may be aesthetic that the shadows remain black, but if you apply HDR it is so that you can see what is in them without altering the illuminated areas.
How your mobile gets the HDR effect
If you ask a professional photographer or consult guides in specialized media such as Xataka Foto, they may answer that the traditional method of taking an HDR photograph with a traditional camera is to take at least two or three photos. One does it exposing the lights well, another exposes the shadows, and the third at an intermediate point to serve as a transition. Then combine all three shots with a good photo editor to get a good result.
When you take a photo with your mobile, and your device has HDR activated, it essentially does the same thing but automatically. It automatically takes several photos with different exposures, and combines them, extracting the maximum possible information from each scene, generating a photograph that uses that information obtained.
This is why when you have HDR enabled on mobile, it takes a little longer for your phone to get the photo. What you are doing in the time it takes is taking out several instead of one, the amount depends on each manufacturer, and combining them. The result is usually a photograph that is more like what you are seeing with your eyes than what your mobile camera is seeing.
But the final result can vary a lot depending on the mobile you do it on. This can be due to several things, such as the algorithms that each manufacturer uses in their photographic application. It also depends on the processing capacity of each phone, and the information that each of them manages to obtain from each photograph.
The devices can also take more or less to obtain the HDR photo depending on factors such as the information they manage to extract from each photo and their processing capabilities. The more information obtained, the more processing capacity they need. There are also manufacturers who, to speed up the process and not take so long to obtain the final photo, dedicate RAM exclusively to image processing.
It is because of these requirements that you can notice quite a difference between high-end mobiles and lower-end ones. Not only because of having better or worse cameras, with more or less worked algorithms but also because of the differences in hardware and the processing capacity that they achieve with it.
When to use HDR in your photos
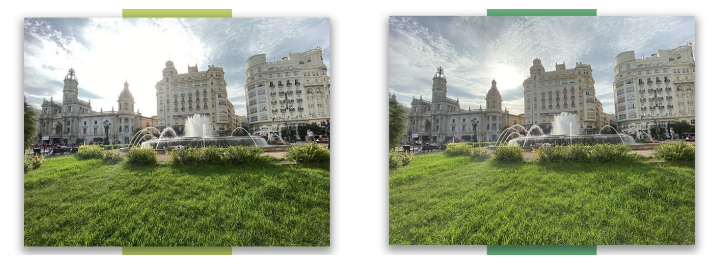
HDR is intended to be used at times when the difference in brightness between the highlights and shadows is greater than the dynamic range of your camera. This is something that you may notice right away, when taking a photo you see that there is a part that is too dark, or that other bright parts are burned to, ultimately, end up not showing the details that are in one lighting or another well.
Mobile manufacturers design their HDR so that your photos look better in certain situations. One of the classic situations is when taking pictures of large landscapes, which generally have a high contrast between the lighting of the sky and the ground. With HDR, you can take a photo in which details in the sky are preserved without obscuring the land area, and vice versa.
Another classic case is when taking portraits in sunlight, with background lighting that sometimes makes the faces too dark. Especially when it is very sunny or there are bright reflections. In these cases, the HDR of your mobile will match these levels, keeping the background illuminated but making your face look good. And in short, almost whenever there are a lot of backlights, HDR can help that what remains in the foreground is better illuminated.
But there are also times when it’s better to never use HDR. For example, when there are moving elements, the possibility of blurry photos is increased by having to take several photos and combine them. If the objects move between the photographs that the mobile uses, the final result will not be as good.
It is also not recommended to use this mode in scenes with high contrasts. There are times when it’s okay for your face to be illuminated, but if you want only a shadow to be seen against a backlight, HDR will lessen this difference between light and dark. And of course, although HDR can recover colors in scenes that are too light or dark when you are photographing elements with colors that are already very vivid, the effect can be the opposite, and these colors can lose intensity.
8 tips to take advantage of the HDR of your mobile
And once you know exactly what HDR is and what its purpose is, we are going to give you a series of tips so that you can get the most out of it on your mobile phone. You should keep in mind that Android has a thousand and one possibilities and that depending on the camera that the manufacturer has put on your mobile, some of these tips may not be so useful.
1. Run away from automatic mode
The automatic HDR mode helps all of us who do not have great photographic knowledge not to think too much when deciding when to use this mode or not. However, especially on lower-end mobile phones, these automatic modes are not always well adjusted, and you can end up using HDR when it is not necessary, giving the photo a more unreal aspect than it should.
In general, whenever possible, it is recommended to resort to HDR mode manually when you see that there are large contrasts of light. For example, when you are going to take photos against the light or close-ups that are in the shade or have a background that is too bright, you already know that you will almost always need this mode.
2. If there is time, try without HDR first
Do not underestimate the photographic processing of your mobile. As long as you’re not in too much of a rush and can afford it, try taking a photo without HDR first. Then, you can see if the dynamic range is adequate or not, and decide whether or not to use HDR.
As we explained to you at the beginning, the dynamic range is the ability of the camera to capture detail in the lights and shadows of the same image. Therefore, if you take a normal photo and see that an area is too dark for your liking or another is too bright, then you already know that the dynamic range of your mobile is not enough, and then you can start using HDR.
3. Do not exaggerate the effect of HDR
There are mobile photo editors, like Snapseed, that can tone or boost the effect and intensity of HDR. If you turn it up, you’ll end up making the capture look more like a drawing or painting than a photograph. Here, remember that the grace of HDR is precisely that the photo is as realistic as possible.
4. Autofocus can help you
Regardless of whether you use Auto HDR mode or just activate it manually, there is a little trick that can help you from time to time. There are mobiles such as iPhones in which HDR is sometimes poorly adjusted and a photo that is too bright or burned ends up appearing. The trick here is to tap on the bottom of the screen to make it reanalyze the photo and adjust the exposure.
It is good, for example, to click on the brightest areas such as the sky in the background. Then, the mobile will take it as a reference and it will lift the shadows well with the HDR. This is a trick that does not work on all devices, and if you see that it does not work well on yours, you better forget it.
5. If you can, also save the original photo
Some camera apps allow you to save the original photo you’re taking alongside the one where HDR is applied. If your mobile has this possibility, it is highly recommended that you always activate it.
In this way, you can always recover the photo without high dynamic range processing and even compare which one looks better. This is especially useful when you don’t have time to stop and take more than one photo with or without HDR. You take a photo that saves both captures and then when you have time you compare to see which one is better or which one you prefer.
6. At night it is better to disable HDR
HDR and night photography hardly mix, so it’s generally best not to use it. If you do, it’s easy for the mobile to increase the watercolors when you force the exposure. This means that you will lose detail in the objects that appear in the photographs and that the edges may be somewhat undefined or blurred as if you had painted them.
By using these modes at night, you can also cause the appearance of noise in the photo, which is that kind of graininess that appears at night and when there are few lights. There may also be excesses of contrast that make the photo not look too good. Some mobiles have a good HDR at night like the Google Pixels, but if you don’t have a high-end mobile, forget it.
7. The mobile is well secured, and no moving objects
As we have told you before, your mobile will take several photographs to analyze them and compose the result of the HDR mode with them. This means that you must be careful with moving objects, because if the object is moving and your mobile shoots slowly even during the day, trails may appear in the photo.
Therefore, two tips. The first is that you forget about HDR when you are going to take pictures of moving elements, and the second is that you try to have the mobile phone as stable as possible. To find the best possible HDR effect, try to hold the mobile well, and do not rule out using a tripod.
8. For best results, use the PC
If what you are looking for is the greatest possible perfection, it is advisable to resort to PC software. In these cases, take photos manually (and with a tripod) varying the exposure, and then use an application with an HDR editor to process these photos.
The photos have to be the same and nothing has to move, hence recommending the tripod. It is advisable to take at least two or three photos, exposing the lights well in one, and the shadows in another, and take a third, more neutral photo to act as an intermediate point when editing them.

Sharlene Meriel is an avid gamer with a knack for technology. He has been writing about the latest technologies for the past 5 years. His contribution in technology journalism has been noteworthy. He is also a day trader with interest in the Forex market.


