A simple guide to change DNS quickly in the main operating systems, together with some insights.
DNS servers are responsible for resolving domain names, every time you type a mnemonic address (such as www.google.), the DNS takes care of communicating to the browser the public IP address on which it is installed, and is responsible for providing the requested pages.
The domain name resolution system recieves queries from the client’s machine through applications installed such as web browser.
The Google DNS is the most famous one: like all those “foreigners” that allow the proper resolution of all domain names, even those stuck: (Google DNS, here’s how they work and why they are useful).
Just to name a few, there are also extremely performing alternative DNS servers such as those of Cloudflare and the excellent Quad9. They also take care of blocking browsing to malicious or compromised websites (recently Cloudflare also launched its DNS with built-in filtering features).
OpenDNS servers are perhaps the best in this sense because they also offer users the ability to customize the types of sites that needs to be blocked and, after registering, prevent the visit of specific pages.
DNS servers that support the DNS-over-HTTPS protocol also allow you to send domain name resolution requests (and receive their responses) in encrypted format rather than clear form.
This is the problem while all the insights on DNS-over-HTTPS are available on these pages.
Below we summarize the procedures to change DNS on the router in Windows, Linux, macOS, and Android.
How to change DNS on the router
By default, each router also receives information from the telecommunications operator which DNS servers to use.
The Internet provider provides the addresses of its DNS servers in IPv4 format or even (or only) in IPv6 when the network is configured to support the latest version of the Internet Protocol: see IPv6 What it is and why it is important from an Internet perspective Delle Cose.
In turn, the router will communicate the IP addresses of the provider’s DNS servers to all client devices connected downstream. The transmission of this information occurs through the DHCP protocol, which is commonly used to automatically assign private addresses to all devices that explicitly request them and, in general, the correct network configurations (including DNS servers).
Those who decide to change the router’s addresses should ensure that the manually set DNS servers are subsequently transmitted to each client device via DHCP.
To change the DNS addresses used on the outer side, just connect to the device’s administration interface and then look for information on the LAN setting.
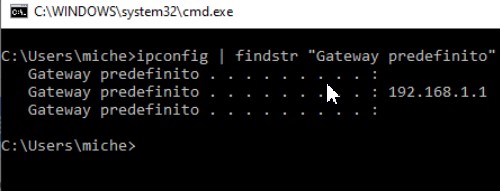
To find the router IP just, in the case of Windows, press the key combination Windows + R, type cmd, then ipconfig | findstr “Default gateway.”
Next to the Default gateway, you will read the router’s IP address to be typed in the address bar of the browser to access its administration interface after entering the user name and password.
Change DNS in Windows
1) Press the Windows + R key combination, write ncpa.cpl, and press Enter.
2) Click on your network interface (Ethernet or WiFi), then click Properties.
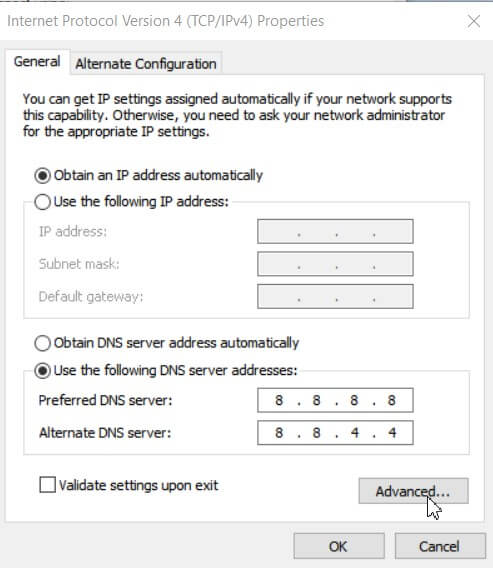
3) Select the Internet Protocol version 4 TCP / IPv4 item, then click on the Properties button .
4) Select the option. Use the following DNS server addresses, then specify a primary and secondary DNS server in the appropriate boxes.
5) Confirm by pressing the OK button repeatedly.
6) From the command prompt ( Windows + R, cmd ), type ipconfig / all and check that the set IPs are indicated next to DNS Server.
Alternatively, from the Windows command prompt opened with administrator rights, you can type:
netsh interface show interface to get the list of network interfaces in in use. Having checked the name, you can use the following command:
netsh interface ipv4 add dnsserver “Ethernet” address = 8.8.8.8 index = 1
Ethernet is the name of the network interface (replace if necessary), and 8.8.8.8 must be changed to the DNS server’s IP to use.
To set up a secondary DNS server, you can type:
netsh interface ipv4 add dnsserver “Ethernet” address = 8.8.4.4 index = 2
In this case, you have set the Google DNS on your Windows machine.
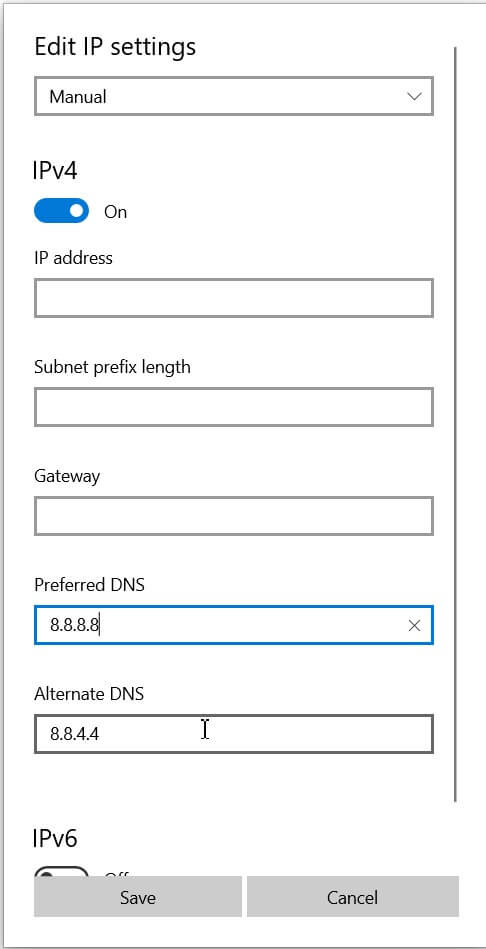
Still, alternatively, on Windows 10 May 2019 Update (version 1903) and subsequent releases of the operating system, to change the DNS used by the network connection in use, just type Network Status in the Windows 10 search box, click on Edit connection properties then click Edit under IP settings.
Here, as you can see, you can limit yourself to specifying only the DNS to be used on the single Windows 10 machine or assign a static IP address (also specifying the subnet mask and gateway IP address ).
If all the fields are empty, the system will receive the private IP to be used within the LAN from the DHCP server (usually installed on the router).
Changing DNS servers can also be done using Windows PowerShell: just press the Windows + X key combination, then choose Windows PowerShell (administrator).
By typing Get-NetIPConfigurationyou, get information on the configuration of the various network interfaces present. By writing down the number corresponding to the interface to be configured, using the following command, you can set primary and secondary DNS servers:
Set-DnsClientServerAddress -InterfaceIndex INTERFACE_ID -ServerAddresses PRIMARY_DNS , SECONDARY_DNS
Change DNS in Linux
1) Open a terminal window, then type sudo nano /etc/resolve.conf
2) Type the password associated with the root account.
3) Add nameservers followed by the IP address of the DNS server to be used (example: nameserver 1.1.1.1 )
4) Repeat the operation for the various DNS servers to be used and save the file.
Some Linux distributions, by accessing the settings, allow you to modify the DNS through a graphical interface but the modification on the /etc/resolve.conf file is still very fast.
Change DNS on macOS
1) Access the system preferences of macOS, then go to the section relating to the network.
2) Select the interface in use (Ethernet or WiFi), then press Advanced.
3) Click on the DNS tab and remove any existing servers if necessary.
4) Press the “+” button to add the DNS servers you intend to use.
Change DNS in Android
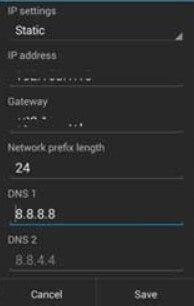
1) In case the Android device connects to the WiFi network to surf the Internet, simply go to the operating system settings, select Network, and Internet, touch the WiFi connection in use, the icon depicts a small gear, choose Advanced, tap the pencil at the top right, select Advanced options then indicate Static instead of DHCP.
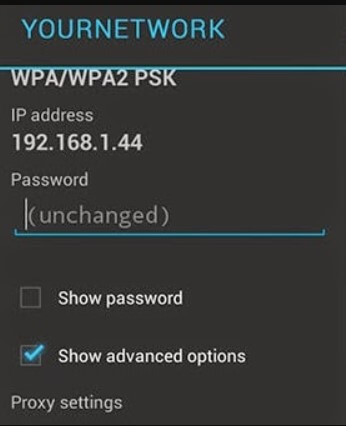
2) At this point, you will have to assign a private IP address to the mobile device other than those automatically set by the router’s DHCP server (you can use the IP and MAC binding technique to avoid conflicts).
Subsequently, you can indicate the addresses of the DNS servers in the appropriate boxes.
3) This intervention modifies the DNS servers used when connecting the Android device to any WiFi but does not affect while using the mobile operator’s data connection.

A tech-savvy writer with a knack for finding the latest technology in the market, this is what describes John Carter. With more than 8 years of experience as a journalist, John graduated as an engineer and ventured soon into the world of online journalism. His interest includes gadget reviews, decoding OS errors, hunting information on the latest technology, and so on.
 Extender for Their Networks")


 Extender for Their Networks")


