As is known, the Windows operating system is available and marketed in both 32 and 64 bit versions. To install and run Windows (Windows 7 to Windows 10), Microsoft has set the following minimum RAM requirement: 1 GB of RAM for 32-bit releases, 2 GB for 64-bit releases.
However, on this page, Microsoft highlights the maximum amount of memory supported by the various versions and editions of Windows.
Why, then, and when should you switch from 32-bit to 64-bit Windows?
Difference between 32bit and 64bit in Windows
All 32-bit versions of Windows (except the Starter ) can support up to a maximum of 4 GB of RAM.
If larger amounts of RAM are installed, the 32-bit versions of Windows will only handle 4 GB.
The 64-bit versions of the Microsoft operating system, on the other hand, support the use of well over 4 GB of RAM.
For example, while the 32-bit versions of Windows 8.1 support a maximum of 4 GB of RAM, the similar 64-bit versions even allow you to go up to 128 GB or 512 GB (in the case of the Professional and Enterprise editions).
The most expensive Windows 7 (Professional, Enterprise, and Ultimate) 64-bit allows you to reach 192 GB, the Home Premium 16 GB, the Home Basic 8 GB.
In the articles How to increase the RAM memory on a PC, we have seen how important it is to evaluate whether you are running a 32 or 64 bit version of Windows before considering expanding the RAM memory installed on your system.
Switching from Windows 32-bit to Windows 64-bit can mean, for many, being able to make a significant “qualitative leap”.
If the processor installed on the machine was 64-bit (or in any case, you had recently replaced it with a 64-bit one, compatibly with the motherboard’s hardware specifications), but you are using a 32-bit version of Windows, switch to 64-bit Windows will bring significant benefits.
Verify what type of processor you are using
First of all, before checking the type of processor you are using on your machine, we suggest you check the version of Windows actually in use.
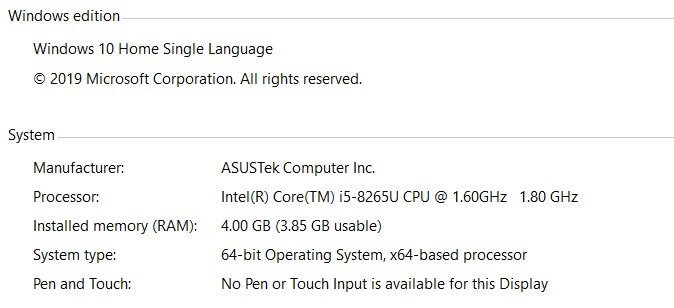
To proceed, simply click on the System icon in the Control Panel or right-click on Computer or This PC and then choose Properties.
In correspondence with the entry System type, regardless of the processor (CPU) installed, the indication 32-bit operating system or 64-bit operating system returns the information sought.
As explained in the article How to increase the RAM on a PC, Windows uses PAE ( Physical Address Extension ) technology, which allows you to extend the amount of memory supported in x86 processors from 32 to 36 bits, only on Server editions of Windows.
The 32-bit editions intended for client systems, on the other hand, cannot use more than 4 GB. This quantity, then, typically tends to decrease further because a small part of the total is destined for use by the BIOS, the video card, or other drivers. Usually, on 32-bit Windows systems equipped with 4 GB, you will find 3.2-3.8 GB usable.
Where possible, therefore, switching from 32-bit Windows to 64-bit Windows will allow you to go beyond 4GB of RAM.
Referring to the same System screen, you also need to make sure you are using a 64-bit processor. A more thorough verification can be done using the excellent CPU-Z diagnostic software.
In addition to supporting more memory, moving from Windows 32-bit to 64-bit means you can rely on better performance. For operations that put a strain on the processor (eg audio/video editing, processing of encrypted files and containers, …), the difference between a 32-bit and a 64-bit system becomes evident.
The applications used must also be 64-bit to take advantage of the performance benefits.
Even less hardware-intensive applications can still benefit from the 64-bit architecture for the simple fact that they can address and use more RAM.
This is why, for example, where possible, on a 64-bit system, you should preferably use a 64-bit browser (we talked about it at the time even in the case of the release of the final version of 64-bit Chrome: Google Chrome embraces the 64 bit in Windows.
The 64-bit versions of Windows divide the 32-bit and 64-bit apps installed into two different folders: the former is stored in the C: \ Program Files (x86) folder ( C: \ Program Files (x86) ) while the latter in C: \ Program files ( C: \ Program Files ).
Even the Task Manager (Window Task Manager ) allows you to recognize at a glance what programs are 32-bit and 64-bit.
Just press the key combination CTRL + SHIFT + ESC and check what is reported in the first column on the left ( Processes tab ).
Are you switching from Windows 32-bit to 64-bit: the Product Key?
The Product Key associated with your Windows license is valid for both the 32-bit and 64-bit versions, as long as the edition (Home, Professional, …) does not change.
Therefore, starting with Windows Vista, there is no problem switching from the 32-bit version of Windows to the 64-bit version. The important thing is that you install the same edition as the 32-bit version and that the hardware is compatible.
Before proceeding with installing the 64-bit version of Windows, it is important to write down your product key. This product key can be applied to a sticker on the computer’s side, back, or underneath (for notebooks) or stored in the UEFI BIOS (see Find Windows 8 and 8.1 product key in the UEFI BIOS ).
Prepare 64-bit drivers for the hardware you are using.
Again, before installing 64-bit Windows on systems where this is possible, it would be good to check the websites of the manufacturers of the hardware installed on the personal computer for the availability of 64-bit drivers.
It is highly likely that by installing a recent version of Windows (Windows 7, Windows 8.1, or Windows 10), you won’t need to manually load any 64-bit drivers. The operating system should recognize and auto-configure the vast majority of hardware.
For example, after installing a 64-bit edition of Windows, it would be rather unfortunate to find yourself unable to access the Internet due to a problem with the network card driver. That connectivity works, in fact, Our advice, therefore, is to take precautions in time and save the 64-bit drivers in an external drive (for example, a USB stick). Likely, they will not be needed; otherwise, you will know where to find them.
The most important drivers are those for the chipset and those for LAN / WiFi cards, the video card, and, finally, the sound card.
Create a 32-bit Windows installation backup image
Before switching to a 64-bit version of Windows, we suggest copying your data elsewhere (backup to an external drive, NAS server, cloud, …) and creating a complete system image.
We recommend creating a complete backup of the system configuration with AOMEI Backupper, free software that is very practical to use and extremely versatile.
There are many flagships of AOMEI Backupper: the program allows creating the system image even while Windows is running (so not only from the boot media).
Furthermore, AOMEI Backupper allows you to create support for booting in emergency conditions that will allow you to restore the system even if the installed copy of Windows is no longer able to load correctly.
The software also offers a useful function ( Explore image) which allows, at a later time, to “mount” the contents of a backup archive so that it appears as a normal disk drive, complete with an identification letter (therefore accessible from the operating system and all installed applications).
Finally, and this is also a far from a negligible feature, the disk images created with AOMEI Backupper can be saved not only on external drives but also within shared paths in the local network (therefore, for example, on other computers connected in LAN or on NAS servers; NAS and cloud servers: differences and what to choose ).
Switch from Windows 32-bit to 64-bit
It is not possible to directly upgrade a 32-bit Windows installation by loading the corresponding 64-bit edition. Instead, it will be necessary to reinstall the entire operating system from scratch.
In the case of Windows 8.1, it is possible to conveniently generate the installation media for the 64-bit versions using the free software Media Creation Tool :
To download the Windows 10 ISO in Italian from Microsoft servers, it is sufficient to refer to this page (paragraph Windows 10 ISO Downloads ).
After having generated the ISO file (which can be burned on DVD media) or which can be inserted into a bootable USB key or prepared a USB key with the Media Creation Tool, the system can be booted from this medium, making sure that the 64-bit version of Windows (pay attention to the correct edition).
***
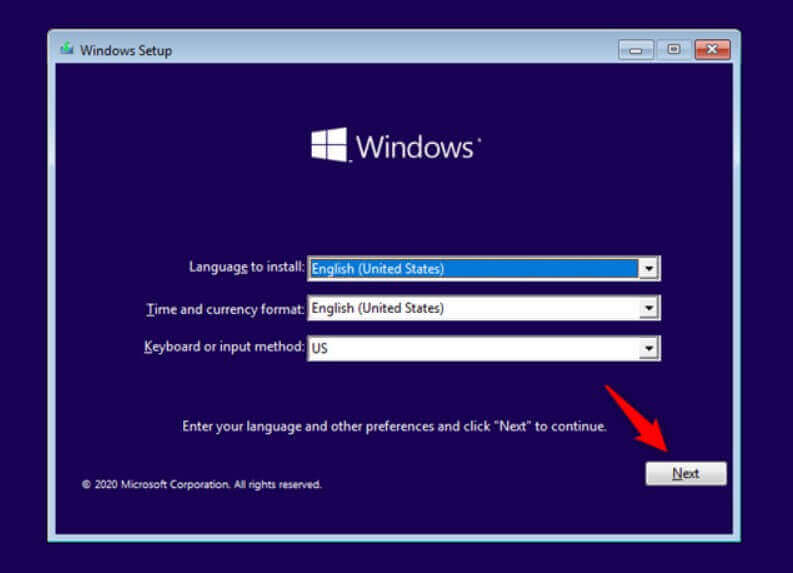
Keeping in mind that you are about to overwrite the current 32-bit Windows installation, as soon as the following screen appears when you boot the system from the inserted media (DVD or USB), you will need to confirm the language, keyboard layout, and press Next.
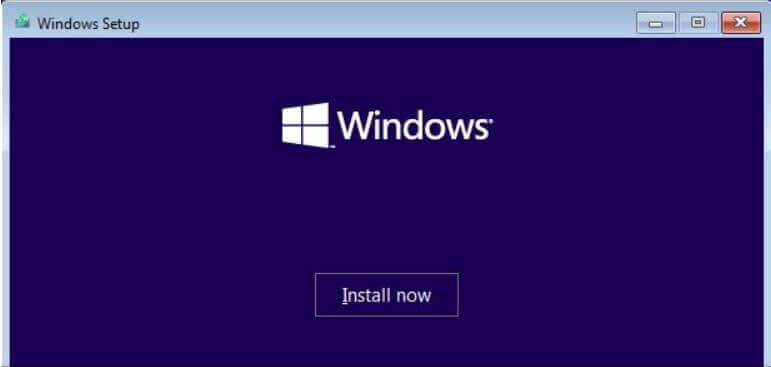
You will then have to click on the Install button .
If required, you will have to type in your product key ( except for a Windows 10 64-bit installation on a Windows 10 32-bit system upgraded for free starting with Windows 8.1 32-bit or Windows 7 32-bit.
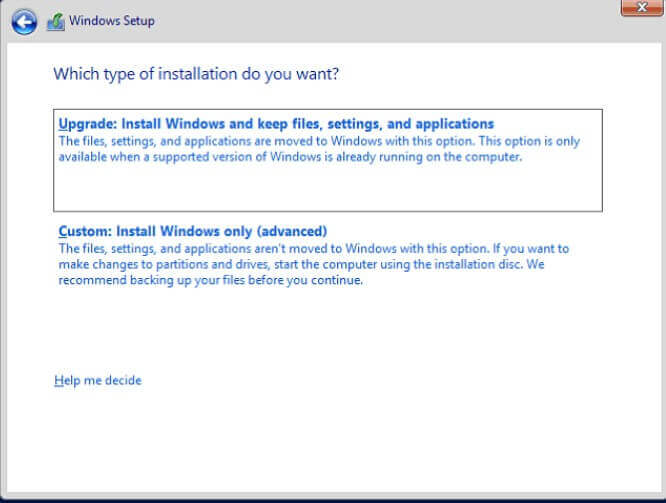
Hence, you will have to opt for a Custom installation .
At this point, you can select the partition where the 32-bit version of Windows is currently installed and then click Format .
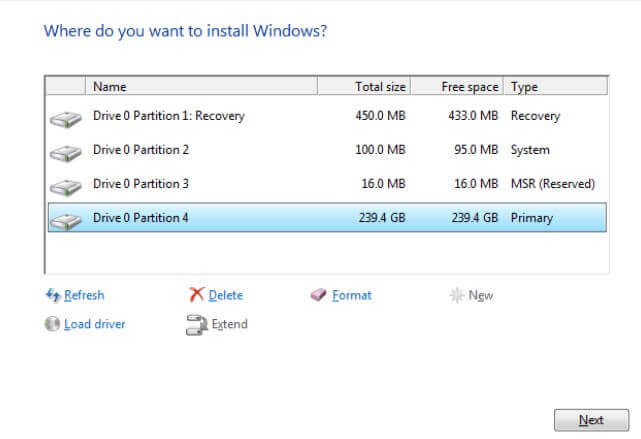
Formatting will delete all the partition contents, so make sure, over and over again, that you have an integral image of the system and that you have backed up your data.
Once the format is complete, simply select the same partition and click the Next button to install 64-bit Windows.
Switch from 32-bit Windows to 64-bit Windows 10
A note about the transition from Windows 8.1 32-bit or Windows 7 32-bit to Windows 10 64-bit .
In this case, it will first be necessary to upgrade from Windows 8.1 32 bit or Windows 7 32 bit to Windows 10 32 bit by following.
Only in this way will you first get a copy of Windows 10 32-bit regularly activated.
After ensuring that the Windows 10 32-bit installation has been activated correctly (type Activation in the new Windows 10 search box), you can generate the Windows 10 64-bit installation media and use it for setup.

A tech-savvy writer with a knack for finding the latest technology in the market, this is what describes John Carter. With more than 8 years of experience as a journalist, John graduated as an engineer and ventured soon into the world of online journalism. His interest includes gadget reviews, decoding OS errors, hunting information on the latest technology, and so on.


. What are the news of the new format for images")


. What are the news of the new format for images")

