One of the most important problems that many of the electronic components installed inside a computer has to deal with is ‘heat dissipation’. If the hardware components (CPU, video card, motherboard, disk drive, power supply, etc) are subjected to excessive heat for a long time, their service period is significantly reduced.
In order to not land down yourself in a situation to change one or more hardware components of your PC soon, it is essential to ensure that the cooling system in use works properly and is not under powered. The cooling fans used in PCs that are available at cheaper prices are often made of plastic, have an element in constant rotation, and are sometimes not even well made.
A PC fan that is always on or a noisy PC fan is a symptom of some underlying problems that must be solved as soon as possible to avoid hardware problems. Resolving such problems at your earliest will also avoid headaches and problems during work when the noise coming from the case is loud and unsustainable.
PC fan always on
Unless liquid cooling systems are used, a traditional PC fan is always on. The one positioned on the CPU, in particular, is constantly kept in rotation to dissipate the heat developed by the processor during its work. When the fan installed on the CPU does not work properly, temperatures quickly rise.
If the fan seems to be spinning at high speed (maximum number of revolutions per minute or, in any case, much faster than normal), there may be a problem.
It would not be a problem, for example, if the fan were to increase rotation in the case of intensive processing. If, on the other hand, the fan of the CPU remains constantly spinning at or near full speed, then there is a problem.
The heat sinks are dust receptacles. Dust, in turn, over time, negatively affects the rotation of the fan, often causing anomalous operations and, ultimately makes it a noisy PC fan. When you start to hear the noise coming from the fans or one or more fans are always on (for “always-on” we refer to a rotation at high speed), it is always good to do your best to understand the cause of the problem and find out ways for its resolution.
1) Check the running processes
The first check to be carried out is on the software side. Pressing the CTRL + SHIFT + ESC key combination from the Windows environment, it is necessary to make sure that there are not one or more processes running that irregularly engage the CPU.
To proceed, simply click on the Processes tab of the Windows Task Manager window (or Task Manager ) then on the CPU column to sort the processes by the workload on the processor.
It will be necessary to click a second time on the CPU column of the Task Manager if the processes running on the system have been sorted by increasing workload on the processor.
You will need to make sure that you click the Show processes of all users button to check all running processes, not just those opened by the logged-in user.
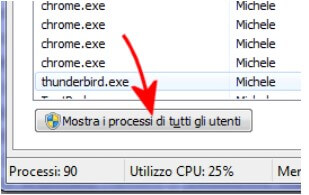
The best situation is when the System Idle Process is reported at 90-100%.
As explained in the article Monitor Windows processes and running programs, if the System idle process makes up the lion’s share, it means that the system is essentially idle; that is, there are no operations in progress that engage it significantly.
If, on the other hand, one or more processes were to constantly burden the processor for a long time, their nature and identity must be ascertained. One or more CPU intensive processes can raise the processor temperatures very quickly and, consequently, cause the fan to rotate more quickly to dissipate the heat developed.
A great online tool for understanding what running processes are for is Should I block it? Service we presented in the article Using HijackThis still makes sense?
Stopping processes linked to poorly developed programs or unwanted components will reduce the workload on the processor or may bring it back to zero.
The important thing is to carefully check the processes that cause problems, which program they belong to, and, if necessary, evaluate their un-installation.
On rather older systems, with hardware that does not encompass latest technologies,even keeping many tabs open with the web browser can generate workload that can stand to be irrelevant to the CPU. For example, a badly created Flash creative on a web page may be enough to occupy the processor at 100% or almost.
2) Check the temperature of the processor and other system components
Free software such as Speccy (but there are many others similar) allows you to check the CPU’s operating temperature, GPU, motherboard, hard drives, and so on.
In the image in the figure, the indication of the temperatures detected by Speccy drawing on the information released by the various sensors on an old PC:
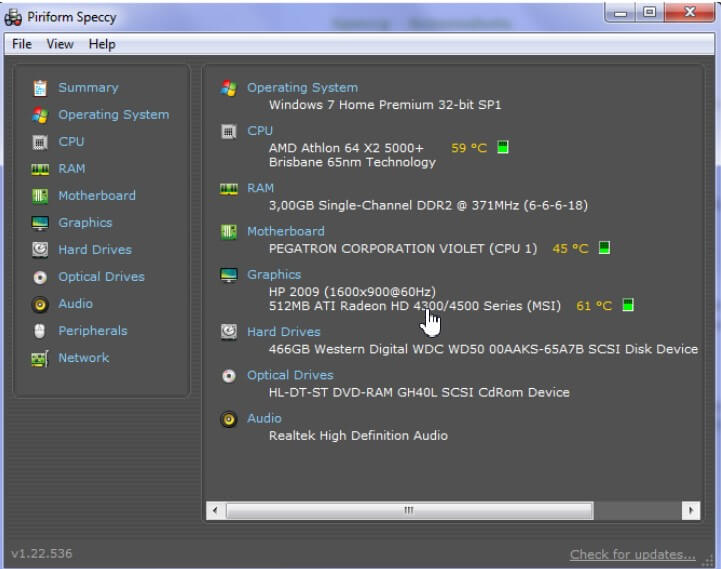
In general, a CPU shouldn’t go above 75 degrees (maximum desirable temperature: 70 degrees), while a GPU shouldn’t go above 80-85 degrees. Due to a temporary load of the CPU or graphics processor, a high peak is widely tolerable and sustainable. Still, it is not acceptable that temperatures are constantly high, especially when the system is not used ( idle ).
For each processor, the maximum and minimum temperatures within the range of which full functionality is guaranteed are indicated in the relevant specifications.
Having ruled out the software side’s problem, constantly high temperatures indicate insufficient or inadequate heat dissipation or an air circulation that is not up to the situation inside the case. Prolonged work at the maximum temperature indicated by the manufacturer (or beyond this value) can cause system instability problems and significantly reduce the hardware’s life.
The most modern processors integrate a special mechanism capable of modulating as needed, reducing the working frequency when high-temperature values are reached. Alternatively, the motherboard causes a complete system shutdown to avoid damage.
For each processor in the market, the CPU World site contains the maximum and minimum temperature values.
Speccy software can help you immediately determine what type of processor is installed on your PC.
Still in Speccy, by clicking on CPU then reading the value shown next to the Fan speed item, you can check the fan speed, expressed in revolutions per minute (RPM). You will notice how, as the heat to be dissipated increases, the fan speed (in normal operating conditions) is increased proportionally.
3) Clean the fans and evaluate their replacement
Dust is the worst enemy of the fans’ correct operation and, consequently, of heat dissipation. When the fans are particularly dusty, they will automatically become much louder than before.
In these situations, to help lower temperatures (and noise), one of the best interventions is to carefully clean all the fans.
Usually, a can of compressed air allows you to remove most of the dirt left between the fan blades. The important thing is to block the fan to prevent compressed air from compromising its operation by making it rotate at high speed. To block the fans, just temporarily insert a pen or similar object inside them, holding it with one hand.
The compressed air can never be used at a close range on electronic components. Of course, these operations must be carried out with the PC off and with the power cord disconnected.
If the noise coming from the CPU fan does not resolve itself, it is possible to evaluate the heat sink’s replacement.
Below we present the ones that, in our opinion, are the best by price range. It will be necessary to pay utmost attention to the compatibility aspect in choosing the new heat sink. It will be necessary to purchase a heat sink compatible with the CPU socket mounted on the motherboard.
Just check your motherboard’s technical specifications or check the abbreviation displayed in Speccy, in the CPU section, next to the Package item.
Cheap heatsinks (up to 30 euros)
Socket: Intel LGA 1366/1156/1155/1150/775 – AMD FM2 / FM1 / AM3 + / AM3 / AM2 + / AM2
RPM : 800-2200
Noise : 17-30 dBA
1.8W
Socket : Intel: 1366, 1156, 1155, 775 – AMD: FM2, FM1, AM3 +, AM3, AM2 +, AM2, 2600, 939.754
RPM : 900-2200
Noise : 26 dBA
2.64W
Socket : Intel: LGA 775, 1150, 1155, 1156, 1366, 2011 CPU (Core ™ i3, i5, i7) – AMD: FM2 +, FM2, FM1, AM3 +, AM3, AM2 +, AM2
RPM : 1000-2200
Noise : 29 dBA
2.2W
Heatsinks from 30 to 60 euros
Socket : Intel: LGA 2011-3 * / 2011 * / 1366/1156/1155/1150/775 – AMD: FM2 + / FM2 / FM1 / AM3 + / AM3 / AM2 + / AM2
RPM : 600-2200
Noise : 9-31 dBA
12V, 2.28W
– ARCTIC Freezer XTREME Rev. 2
Socket : Intel: 1366, 1150, 1155, 1156, 775 – AMD : FM2 +, FM1, AM3 +, AM2, 939, 754
RPM : 800-1500
Noise: 26 dBA
2.64W
Socket : Intel: LGA2011-0, LGA2011-3, LGA1156, LGA1155, LGA1150 – AMD: AM2, AM2 +, AM3, AM3 +, FM1, FM2, FM2 +
RPM : 300 -1500
Noise :
22.4dBA 0.6W
4) Check the BIOS or UEFI settings
Generally, BIOS and UEFI ( What is UEFI and what you need to know about the new BIOS ) contain some settings to adjust the behavior of the fans. Each manufacturer calls this feature differently, but it is usually found in BIOS / UEFI under the nickname fan control or similar.
The feature is usually found in the advanced settings of the BIOS or UEFI.
Alternatively, you can use the SpeedFan software, created by the Italian Alfredo Milani Comparetti, who, in addition to monitoring the fan’s temperatures and speed, allows alteration of settings wherever possible.
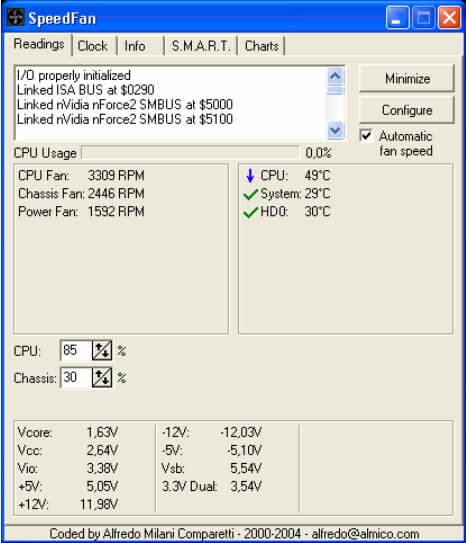
If the sensor chip allows it, SpeedFan allows you to directly change the speed of the fans.
The program is free, compatible with all Windows versions (including Windows 10), and can be downloaded from this page.
It is worth noting that BIOS / UEFI updates that are not properly optimized could heavily alter the logic with which the rotation of the fans is managed.
If you have installed a BIOS or UEFI update that negatively impacted the operation of the heat sinks (causing them to unnecessarily spin at higher speeds to maintain temperatures in the optimal range), then unfortunately we have not found motherboards that do not allow you to retrace your steps by restoring a previous version.
Rather, the procedure to follow to restore a previous version of the BIOS or UEFI is not documented, and it is necessary to work with a thorough search on the web to identify the right solution (often it is a question of acting on jumpers placed on the motherboard then re-performing the flashing operation ).
5) Check the installed drivers
If the GPU heatsink is spinning fast even when it is not needed, the problem may likely be caused by an incorrect video card driver.
Our advice is to check if, from BIOS / UEFI, the GPU cooler is spinning properly. If so, we suggest you try to update the graphics card driver or otherwise uninstall it completely and replace it with another version.

A tech-savvy writer with a knack for finding the latest technology in the market, this is what describes John Carter. With more than 8 years of experience as a journalist, John graduated as an engineer and ventured soon into the world of online journalism. His interest includes gadget reviews, decoding OS errors, hunting information on the latest technology, and so on.


