GIMP is free software that allows you to retouch any digital photograph. It is a multi-platform open-source program that allows you to meet the most diverse needs:
- Resizing and cropping photos.
- Changing the colors used.
- Merging or overlapping multiple images.
- Removing unwanted elements.
- Creating logos.
- Converting between different formats are some of the possibilities offered by GIMP.
Downloadable by referring to our sheet, GIMP is compatible with all Windows versions, even the most recent.
One of the most common needs, even among those, not expert graphic designers, is the need to “cut out” an image or separate the main subject from the background. Such an operation is often useful when, for example, product catalogs have to be created on the web or in paper form. How to simply separate an object from everything that is portrayed in the background in the photo?
GIMP comes to the aid by offering an excellent set of tools that will allow, in a few minutes of work, to reach the set goal.
For example, we have examined an image published on Flickr and distributed it under a Creative Commons license. The photo, which portrays a butterfly, is available on this page.
After opening the image containing the object to be “cut out” (in our case, the photo of the butterfly recovered on Flickr ), it will be necessary to select – from the GIMP Tools window – the “magic wand” otherwise called ” fuzzy selection “.
At this point, you will have to start selecting, by clicking with the mouse pointer, all the areas of the background that need to be removed. Before proceeding, it is good to check that the second small button is selected in the options area of the fuzzy selection tool, which is Add to the current selection. In this way, the background selected with the magic wand will automatically become larger as you choose new areas to delete. Choosing the Add to Current Selection option has the same effect as pressing the SHIFT button.

By acting on the Threshold bar, it is possible to vary the tolerance to color variations. However, by increasing the threshold value too much, there is a risk that together with the background, the elimination of portions of the image to be “cropped” is also proposed. If you have problems, you can always backtrack choosing Edit, Undo fuzzy selection, or simply by pressing the key combination Ctrl + Z.
Using the magnifying glass (zoom), you can make more precise selections of the areas you want to be removed later.
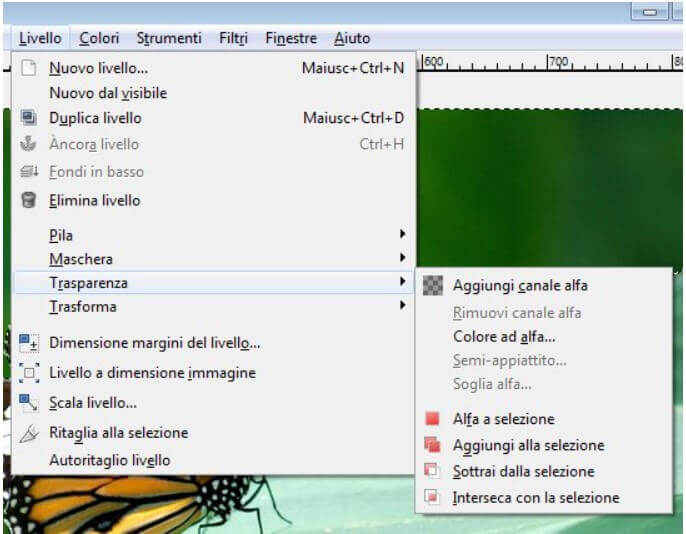
At this point, we suggest clicking on Layer, Transparency, Add alpha channel to set transparency as the background of the image.
The command makes it easy to add another background or paste the selection into another image.
By pressing the DEL key on your keyboard, you should have a transparent background highlighted with a mosaic pattern.
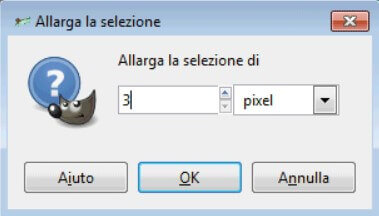
By saving the result obtained, you will get a poor-quality image because it is characterized by obvious “edges” and unnatural edges. To “smooth” the edges, it is sufficient to resort to a small expedient to enlarge the current selection by two or three pixels to eliminate any imperfection.
From the GIMP Select menu, simply choose the Enlarge item then type, for example, the value 3 in the dialog box:
The next step is to apply a Gaussian blur which will then be automatically applied to the image outline:

It is possible to save the result obtained by clicking on the File menu, Save as. Of course, if you select a format that doesn’t support transparency (such as JPEG), the transparent background will automatically turn white.

The latest version of GIMP can be downloaded for free by referring to this page.

A tech-savvy writer with a knack for finding the latest technology in the market, this is what describes John Carter. With more than 8 years of experience as a journalist, John graduated as an engineer and ventured soon into the world of online journalism. His interest includes gadget reviews, decoding OS errors, hunting information on the latest technology, and so on.


