If the printer does not print or the prints are slow (the printer takes a while before starting its work), the causes may differ. Apart from the most trivial, usually, the problem has to do with the drivers used or with the cable connection or via Ethernet / WiFi.
When the printer does not print, then the problem could be related to the print queue’s management.
The print queue
If the printer is connected and its configuration appears to be correct, one of the first steps is to check the Windows print queue.
A print spooler is a software that acts as a buffer memory (usually held temporarily in an area of the hard disk or solid-state drive) for data going to the printer. Windows allows you to spool documents sent to the printer by managing a queue of jobs transmitted to it.
If, after sending any document to the printer, from any application, the printer icon appears in the Windows tray bar, but nothing is printed, the suggestion is to double-click it to open the print queue.
In case you detect the presence of old documents previously sent to the printer, you can select them and remove them from the print queue. The Printer menu contains the Delete All Documents command to remove them quickly.
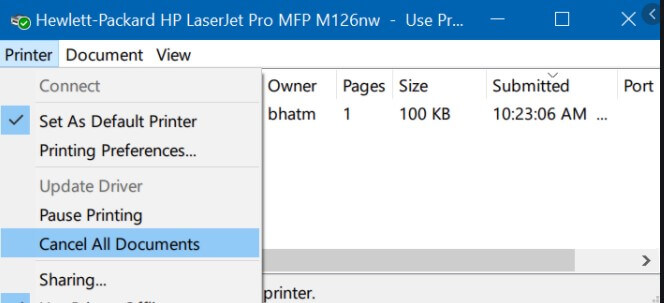
From the Printer menu, you must also check that the Use printer offline option is not selected.
The printer driver
The printer driver usually provides helpful clues as to why the printer is not printing.
If you are using a WiFi printer or, in any case, a network printer connected to the router via Ethernet cable, the problem may lie in an incorrect configuration of the network or of the printing device.
When the network connection is correct, the driver usually provides the private IP address assigned to the printer.
Usually, if you are using a WiFi or Ethernet printer, it would be good to assign it a static local IP address. This address would not change over time and would not be automatically assigned by the router via DHCP every time the printer is turned.
Suppose you suspect problems with the print driver. In that case, we suggest that you uninstall it completely from the Windows Control Panel and then download the latest version from the manufacturer’s official website. As the last step, you can proceed with the installation of the most updated version.
WSD, cross, and delight
Most modern printers also support WSD ( Web Services for Devices ). This technology allows you to announce the presence of a device within the local network so that it manifests itself to all compatible clients. WSD is a sort of improved Plug and Play that allows the printer to send all the software needed to use it to clients connected on the local network: and not just drivers but also utilities, management, and application programs.
In the articles Sharing a printer on the network: here’s how, we explained what WSD is and how to use it.
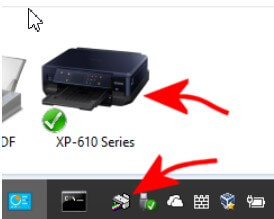
The driver’s successful installation is confirmed by the presence of an icon in the Windows tray bar area.
If you notice problems using WSD, you can try removing the WSD port and using the TCP / IP protocol.
You can press the Windows + R key combination, type control printers, right-click on the printer icon, and then choose Printer Properties.
From the Ports tab (by first clicking on the Change sharing options button in the Sharing tab ), you can remove the WSD box’s checkmark and enable data transmission via standard TCP / IP protocol.
In some cases, multiple icons may appear for the same printer, always referring to the Devices and Printers window ( control printers ).
This generally means that two print modes have been configured: one via a WSD port, the other via TCP / IP. Just refer to the context menu, click on Printer Properties, and then on the Ports tab, as seen above.
By clicking on the General tab and then, if present, on the Edit properties button, you can eventually rename the printer to distinguish the two configurations.
Network printers
If the network printer does not print, we first suggest checking which local IP address has been assigned.
If the IP had previously been statically assigned, you could generally refer to the panel available on the printer itself.
The static IP address assigned to the printer, we remind you, must be chosen among those not attributed to other devices connected to the local network and must be selected in the range unavailable to the router’s DHCP server.
An example. If the router has IP 192.168.1.1, a printer with IP 192.168.0.10 will not work.
If the router automatically assigns, via DHCP, IP addresses to clients who request them, for example, in the range 192.168.1.50-192.168.1.255, the printer can be assigned a static IP between 192.168.1.2 and 192.168.1.49 (making sure that other devices do not use the same address).
If you are not using a network printer but a connected printer (for example, via USB cable) to a client connected in LAN, it is obvious that to print, both the system and the printer must be switched on and working same time.
In the article Sharing a printer on the network: here’s how, in paragraph sharing a printer without network support, we have seen how you can share a printer that does not integrate network functionality (neither ethernet support nor WiFi support).
Default printer in Windows 10
Already with the first major update for Windows 10 that Microsoft distributed in November 2015, the mechanism used for configuring the default printer has changed.
The default printer is the one that is proposed by default in any installed application or, in any case, the one that is used when a program does not expose any window for choosing the printer to use.
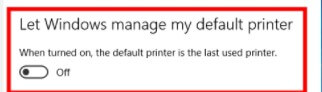
With the latest update, Windows 10 automatically defaults to the printer you used last.
To change this behavior and revert to the one common to all previous versions of Windows, simply type Printers and Scanners in the Windows 10 search box and then disable the Allow Windows to manage the default printer “switch”.
At this point, you can right-click on any printer (even virtual) in the list and then manually set it as default.

Taylor is a freelance SEO copywriter and blogger. His areas of expertise include technology, pop culture, and marketing.


