Run Windows 10 in a dual boot with Windows 7 or Windows 8.1 is an enterprise far from prohibitive.
Windows’s dual boot allows you to keep several different (or identical) versions of the Microsoft operating system installed on the same hard disk.
Once you have configured the dual boot when starting the machine, a special menu will allow you to choose which version of Windows to start.
Windows integrates a boot loader that has been improved with the release of various operating system versions. Such boot loaderit is nothing more than a program capable of inserting itself in the computer’s start-up phase, allowing the user to make his choice through a special screen called boot manager.
Before proceeding and installing Windows 10, Windows 8.1, or Windows 7 in dual boot “next to” the operating system already present on the machine, in a separate partition, we suggest creating a complete system image using, for example, a tool such as AOMEI Backupper.
The advantage of dual booting is that each Windows version installed on the system will work without performance degradation, as would be the case by installing the operating system in a virtual machine.
Furthermore, the Windows operating systems installed in the dual boot will not be separated: one will access the partition in which the other is installed and vice versa.
Windows in dual boot, how to do it in practice
1) Cleaning with the Windows Disk Cleanup utility and with Ccleaner
Before installing the second version of Windows in dual boot, we recommend doing some cleaning on the disk.
Typing Disk Cleanup in the Search for programs and files box in Windows 7, in the Windows 8.1 charm bar, or the new search box in Windows 10, a window similar to the following will appear.
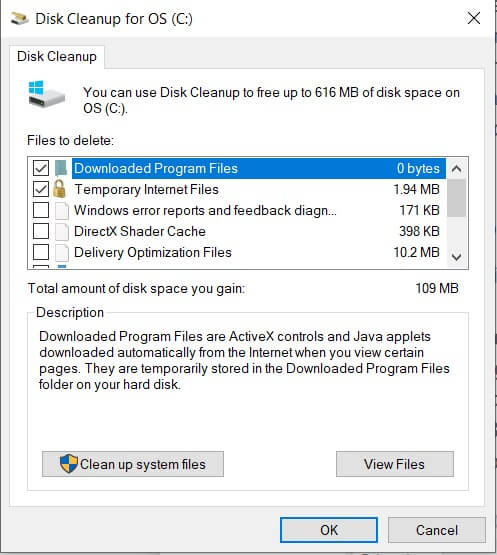
Clicking the System File Cleanup button will free the disk of unnecessary files.
A utility like CCleaner allows you to clean even more deeply by removing all unnecessary elements.
2) Make sure you have at least 30-40 GB of free space.
Using the Computer or This PC window, you can check the space left on the system partition where Windows is currently installed (usually C :).
3) Defragment the disk (not on SSD drives)
A further preliminary operation consists of defragmenting the hard disk to be carried out only on those drives that are not SSDs.
For the defrag, it is possible to use the disk Defragmenter built into Windows.
4) Resize the Windows system partition
Using the key combination Windows + R and typing diskmgmt.msc in the Open box, Windows will propose the Disk Management window.
You will need to right-click on the system partition where Windows is installed and then choose Shrink Volume.
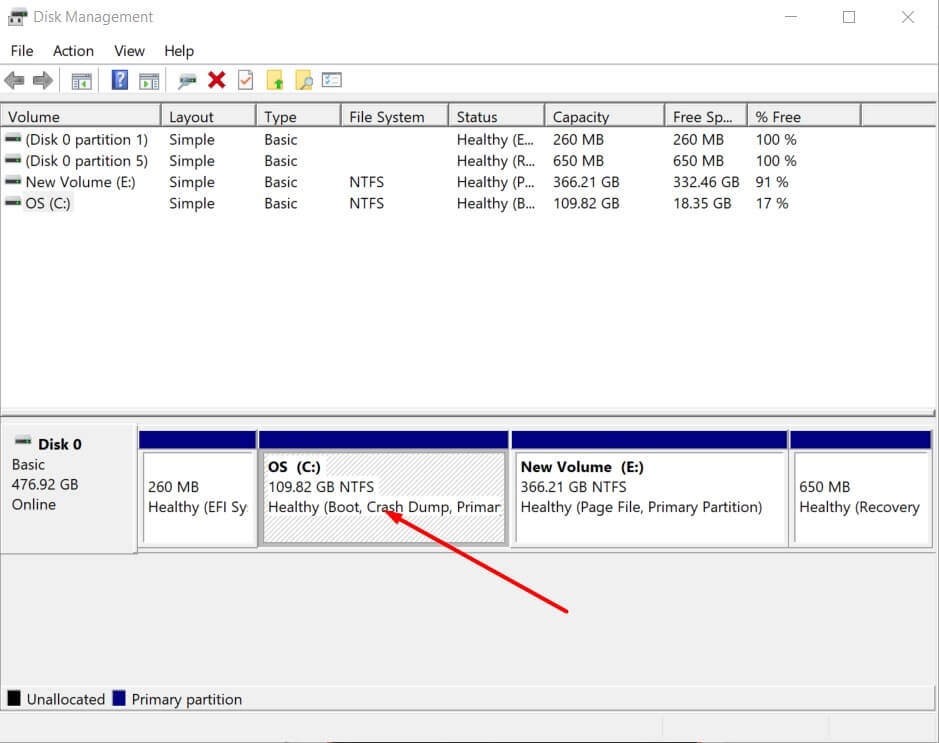
To install Windows 7 in dual boot with Windows 10 or to install Windows 8.1 in dual boot with Windows 10 on the same machine, it is necessary to free at least 20 GB of space by recovering it from the free space available on the system partition of the version of Windows already installed.
In reality, 16 GB of space is sufficient for 32-bit versions of Windows 7, Windows 8.1, and Windows 10, but it is always good to free up at least 20 GB (better yet, as indicated above, 30 or 40 GB).
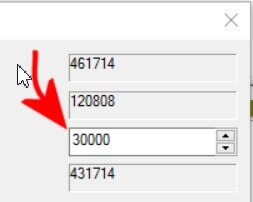
To use 30 GB of free space on the Windows system partition and allocate it to the accessory installation, in dual boot, of another version of Windows, just type the value 30000 in the Specify the amount of space to reduce box, in MB ( see figure).
After clicking on the Shrink button, the partition in which the only copy of Windows on the system is currently installed will be smaller. Next to it, in the Disk Management window, an Unallocated partition will appear (in our case from 30 GB).
5) Obtain or otherwise generate the installation media for Windows 7, Windows 8.1, or Windows 10
To install a second version of Windows on your system, you can download the corresponding ISO file from Microsoft servers (we also talked about it in the article How to switch from Windows 32-bit to 64-bit ) or use the official installation media (e.g. example, the DVD in the case of the retail versions ).
More information to download the various versions of Windows in ISO format can be found in the article Download Windows 7, Windows 8.1, and Windows 10 from Microsoft servers.
In the case of the Windows 7 ISO file, at the time of installation of the operating system, it will be necessary to enter your valid and regularly purchased Product Key (retail or OEM).
By removing the ei.cfg file from the contents of the ISO file, you will be able to allow the installation of other editions of the operating system.
We suggest using the free ei.cfg Removal Utility application, which can be downloaded by clicking here.
The Media Creation Tool for Windows 8.1 and Windows 10 (see Clean installation Windows 10: here’s how to proceed ) allows you to set up a bootable USB stick. Otherwise, you can use the ISO together with the well-known utility Rufus, already presented in the article Rufus, a guide to using the program to create bootable media.
Rufus, among other things, offers the possibility to automatically download the ISO files of Windows 10 and Windows 8.1 using the Download button integrated with the program.
In the article, Install Windows 10 on a PC using UEFI BIOS, configure Rufus, configure a bootable USB stick to install Windows 10 and Windows 8.1 on modern UEFI BIOS-based systems.
6) Reboot the machine from the Windows installation media
At this point, you can reboot the machine from the Windows installation media, whether you have a USB key or a DVD.
You will need to ensure that the system is booted from the USB drive or DVD media (set the boot sequence properly in the BIOS or UEFI).
7) Choice of customized installation
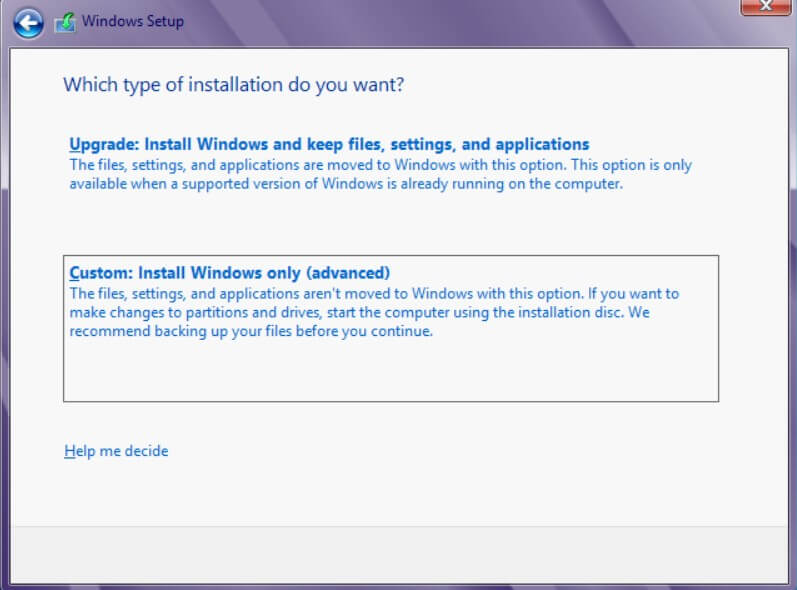
Once the files necessary for the installation of Windows 7, Windows 8.1, or Windows 10 have been loaded, language and keyboard layout choices, click on the Custom button: install Windows only or in any case Custom (expert users ).
On the Where do you want to install Windows screen? , you will have to identify the partition (in our case, the 30 GB, unallocated one) that was previously created ( Unallocated space of about 30 GB).
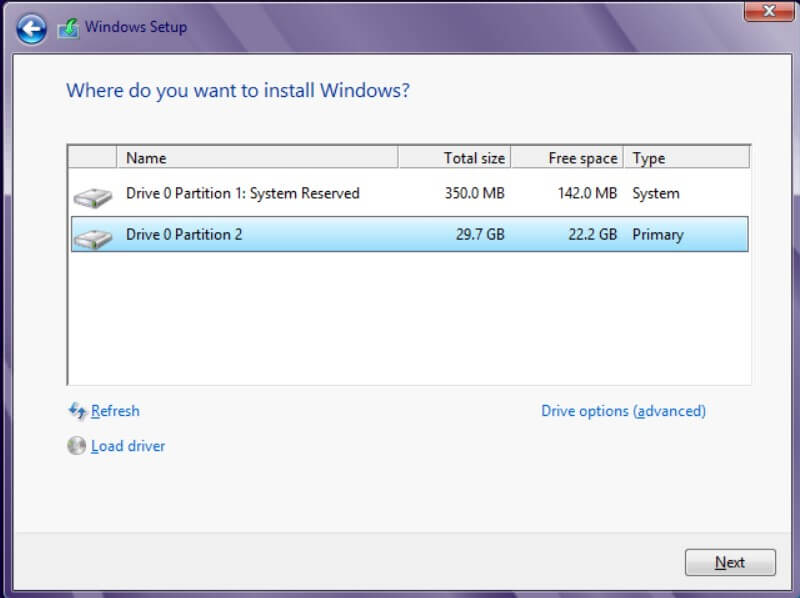
By clicking on the Next button, the other Windows version will be installed in dual boot with the one already present on the system in use.
If the installation procedure displays the error message, Windows cannot be installed on this hard disk space. The partition contains one or more dynamic volumes not supported for installation; we suggest referring to the article Convert dynamic disk to basic without losing data.
8) Dual boot menu
Once the installation in the previously indicated partition has been completed, the next time the system is restarted, a screen will be offered that allows you to choose which version of Windows you want to start.
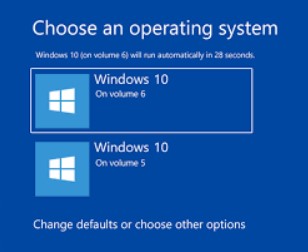
Whether Windows 10 was previously installed on the disk or Windows 10 was added as a second operating system (in the partition created previously), the Windows 10 dual boot menu will appear when the machine is restarted.
This is a completely renewed menu compared to Windows 7 and further renewed compared to Windows 8.1.
The Windows 10 boot menu also supports the use of the mouse and is displayed graphically.
From the Windows environment, you can then change the operating system chosen as default in the boot menu and increase or reduce the countdown for automatic startup.
To proceed, just press the Windows + R key combination, then type msconfigand go to the Startup tab.

In the case of Windows 10, you need to press Windows + R then type sysdm.cpl, 3 and click on the Settings button in the Startup and Recovery pane.
Here you can act on Default Operating System and View List of Operating Systems.
In case you experience problems starting, to restore the loading of the various versions of Windows, we suggest reading the article Windows 10 does not start and automatic repair does not work.

I’m Mr.Love . I’m admin of Techsmartest.com


