Some general information on the root of Android devices: How to proceed if you want to take full control of any device.
As we have repeatedly highlighted, in our opinion, giving users the possibility of rooting their device – once the consequences are well understood – should be an essential aspect. Instead, it is necessary for each Android device to follow different procedures, which is often absolutely not within reach of the normal user.
It is not just us who support it: the same position has been expressed several times, for example, by the “father of the Web” Tim Berners-Lee as well as by other analysts and experts.
Android’s root consists of acquiring those administrative privileges that the manufacturer never provides the user who purchases the mobile device. The result is that some system processes and applications can use the absolute widest privileges while the usea, in the default configuration, can never acquire root privileges.
Using the root system, a user on Android can perform any operation, including changing all the operating system settings and other installed software. This is why the acquisition of root privileges is frowned upon by both Google and many developers.
For example, Google does not accept on its Play Store the publication of any app capable of rooting the Android device (while it hosts without any problem those that need root rights to work).
Audio and video streaming services, online banking applications, and several other Android applications categories check the device’s configuration and refuse to work in case of successful rooting. Incidentally, it is not exactly nice on older Android devices that the user had to “unlock” to install a more recent version of the operating system (which is also very sensible from a security point of view).
We also suggest reading the article Changing an Android app, and altering its behavior to learn more.
It must be said that today rooting Android is strictly necessary for these situations or when using old Android versions that are no longer updated by the device manufacturer and, therefore, vulnerable. Installing custom ROMs by replacing the official firmware is, therefore, an excellent strategy to give new life to your Android tablet or smartphone, protecting yourself from potential security problems.
For each Android smartphone or tablet model, several practical guides in circulation allow you to reach the desired goal. The rooting procedure, as mentioned, varies from device to device even if usually the steps to follow are very similar, and it is possible to summarize the salient points.
Android root: the main steps to achieve the goal
Usually, the Android root starts with the bootloader’s unlocking phase, which is the program that loads the operating system kernel from flash memory during the device boot phase.
The bootloader avoids the loading of code that does not bear the device manufacturer’s digital signature because the simple procedure for acquiring root permissions would never be successful. We then present the essential steps for rooting your Android device below.
We suggest you read all the steps to the end because, in closing, we presented some free tools that automate the operations illustrated and, in some cases, make them possible with a simple click.
1)Create a full backup of your mobile device’s contents and note that rooting voids the warranty.
Rooting Android should only be done on low-cost or out-of-warranty devices. For example, in the situation above where the manufacturer no longer releases any updates, or official support is now withdrawn.
Indeed, bootloader and rooting can eventually be cancelled, but in many cases, it is possible to trace the past (with the warranty conditions that are no longer granted).
Furthermore, unlocking the bootloader as described below involves resetting the device to the initial settings with the consequent loss of all previously stored data: hence the need to make a complete backup or, in any case, information that cannot be lost.
2) Refer to the website or, in any case, to the manufacturer’s instructions to request authorization to unlock the bootloader. The main manufacturers provide a page through which the authorization to unlock is granted upon identification of the mobile device.
In some cases, unlocking the bootloader is not officially supported, and known bugs must be exploited together with “ad hoc” tools. We suggest referring to the XDA Developers forum to find the most up-to-date procedures for each Android device model.
3) Enable Developer Options in Android settings. Enable installation of applications from unknown sources. Going to the Android settings, you will need to tap Info on the phone or Info on the tablet, locate the item’s Build number and quickly tap it for at least seven times.
In doing so, the new Developer Options menu item will appear: when you go inside, you will have to activate the USB Debugging “switch,” also activating the installation of apps from unknown sources. If present, also activate OEM Unlock.
4) Download the ADB and Fastboot software. We suggest you download and install the following software on a Windows PC that will allow you to interact directly, from the command line, with the Android device via ADB ( Android Debug Bridge ):
5) Connect to the device via ADB. After restarting the system and connecting the Android device via USB, you will have to open the Minimal ADB and Fastboot folder (generally in C: \ Program Files (x86) or in C: \ Program files ) from the Windows interface. By holding down the SHIFT key and clicking with the right mouse button in a free area of the Minimal ADB and Fastboot folder, you will have to select the Open command window here or Open PowerShell window here.
In this second case, when the screen with a blue background appears, type cmd and press Enter.
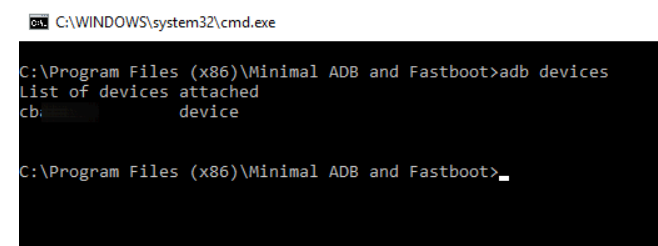
With the adb devices command, you can verify that the device has been recognized (the serial number will be shown).

Access to the Android device must be explicitly authorized from the device interface (if necessary, repeat the adb devices command until the unauthorized indication disappears ).
At this point, you can type the following to request the restart of the Android mobile device in fastboot mode :
adb reboot bootloader
When the fast boot screen appears, you can unlock the bootloader with the command fastboot OEM unlock or fastboot flashing unlock, valid for other devices.
The appearance of the OKAY message confirms that the bootloader has been unlocked. In the vast majority of cases, the procedure will not be successful because it is necessary to enter the authorization code obtained from the manufacturer.
After logging in on the manufacturer’s website and after activating a free account, you will be asked to type in your mobile device’s identification code.
With the Android device always in fast boot mode, you will have to write the fastboot oem get_unlock_data command. You will get something similar to what is reproduced in the figure:

The code obtained will be selected, copied in memory (from the Windows prompt, press the Enter key), and pasted into a text editor such as Notepad ++ CTRL + V.
The code will have to be “fixed” by eliminating the unnecessary parts (in the example, the prefix (bootloader) ) and “compacting” it on a single line.
By copying and pasting the code received from the Android device on the manufacturer’s website, you will finally receive the code for unlocking the bootloader.
It can be communicated to the Android device by typing the following:
fastboot oem unlock CODE_US_BLOCK_ OBTAINED
After receiving the OKAY confirmation message, you will have to confirm the will to unlock the bootloader by moving with the Volume keys.
However, we suggest that you refer to the XDA Developers forum to determine if specific alternative procedures for unlocking the bootloader applied to your mobile device.
6)Replacing the official recovery with third-party software. Once you have unlocked the bootloader, an important piece of road has already been accomplished. What needs to be done is to replace the recovery that is the tool that allows you to restore the device in emergencies implemented by the manufacturer with a third party.
Using the latter, it will be possible to access the device’s memory and install an alternative ROM.
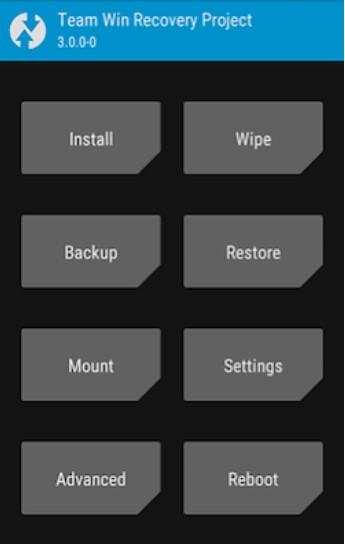
TWRP ( Team Win Recovery Project ) is a very popular environment for advanced mobile device management that allows you to install third-party ROMs that backup, and restore system images as they are created and, of course, acquire root rights.
The advantage is, therefore, not only that of being able to switch, as needed, to different and more up-to-date Android versions but also of creating backups of the operating system installation, which can be easily restored in case of need.
TWRP can be downloaded in the version developed for your Android smartphone model. At this address (refer exclusively to the links indicated under the word Download links to download the most updated software).
The image in .img format will need to be renamed as twrp.img and copied to the Minimal ADB and Fastboot folder.
The following command to install TWRP on the mobile device and configure it as a new recovery :
fastboot flash recovery TWRP.img Once the
The procedure is completed. To start TWRP, you will have to hold down the Volume up key and, at the same time, keep the power button pressed for about half a minute (the same mechanism can be used with the device turned off).

TWRP starts exclusively from fastboot mode: to access it, you can then use the adb reboot bootloader command seen previously from the Windows prompt or the key combination provided for your device (choose the Recovery option to load TWRP).
Using Settings, you can choose the Set language item to set the Italian language for the TWRP interface.
7) Get root permissions on the Android device. To root Android tablets and phones, at this point, it is necessary to have a specific code (for example, Magisk ), which can be loaded on the device using TWRP, which allows you to reach the prefixed goal.
It is not possible to generalize, and we suggest consulting the XDA Developers forum to find instructions for your specific device.
To automate Android’s root, among the best applications ever, there is Kingo Root, which allows you to try to unlock the device from a Windows PC with the Android device connected via USB cable.
Going to this address, you can find all the XDA Developers step-by-step guides for each Android device model.
In some cases, a modified boot image containing Magisk is distributed.

A tech-savvy writer with a knack for finding the latest technology in the market, this is what describes John Carter. With more than 8 years of experience as a journalist, John graduated as an engineer and ventured soon into the world of online journalism. His interest includes gadget reviews, decoding OS errors, hunting information on the latest technology, and so on.


