Do you have an old desk drawer lying around and you’re not sure what to do with it? Well, you should know that you can use it to make a beautiful keyboard tray that would serve you well.
Perhaps you have an entire (though old) solid wood desk. Rest assured that too can be turned into something spectacular.
It’s often our nature as human beings to look so far beyond, yet the solutions to our challenges lie so close to us or within us. The same can be said for a keyboard tray. A brand new one might cost you an arm and a leg. Perhaps the money is not a problem to you, and you would purchase a new one without feeling the pinch. But whether you have the means or not, the satisfaction that comes from saving some cash by utilizing the resources right before your eyes is usually like no other.
Furthermore, the process that we are about to teach you is extremely easy to execute. You don’t have to be a professional carpenter to go through with it.
An Open-Face Keyboard Tray
Step 1: The best drawer to convert into a keyboard tray is the middle top drawer. The references made in the rest of this article, therefore, will focus on this particular drawer. Carefully take measurements of this top drawer to ascertain it has sufficient room to house the keyboard. You don’t what to go through all the steps then realize your keyboard doesn’t fit.
Note that standard desk drawers are usually skinny and wide. Measure the width of the drawer and compare it against that of the keyboard to ensure they match well. Take note of other dimensions as well to determine whether there’s a good fit.
Step 2: If the drawer is currently fitted into a desk, take it out carefully. In case it’s designed with small wheels on both sides at the back, you may need to raise it up slightly for it to come off. If, however, the design doesn’t feature the two small wheels, just pull out the drawer. It should come off easily. If you had already removed the desk drawer, that’s even better.
Step 3: Place the desk drawer on your workbench or work surface to begin work on it. Drill a hole on the desk drawer’s back. The hole should be positioned nearest to the computer location. It should also be large enough, so you can fit the keyboard’s cable through it. You can skip this step if you’re planning to use a wireless keyboard.
To prevent the cable from being damaged as a result of rubbing against the wood, you’ll need to insert a plastic or rubber grommet into the hole you have just drilled. In addition to protecting your cable, the grommet also gives your keyboard tray a finished look.
Step 4: Remove the desk drawer face from the rest of the drawer. Use a reciprocating saw to cut it away. You’ll need to insert the reciprocating saw into the space where the drawer front meets the bottom and side pieces, then cut away the front.
Step 5: Use 80-grit sandpaper to sand the edges you’ve just cut, so as to eliminate chips and burrs of wood. You want to end up with a smooth finish.
Step 6: Apply wood paint or stain to the exposed raw edges of wood to protect and seal it. Note that exposed wood is vulnerable to all forms of attack. Because you want your keyboard tray to last you for a long time, you’ll need to be very serious when it comes to protecting it.
Step 7: Return the drawer to the slides, and place your keyboard into it. If you are using a wired keyboard, thread the cable the hole you had drilled earlier. Pass it through the back and connect it to your computer.
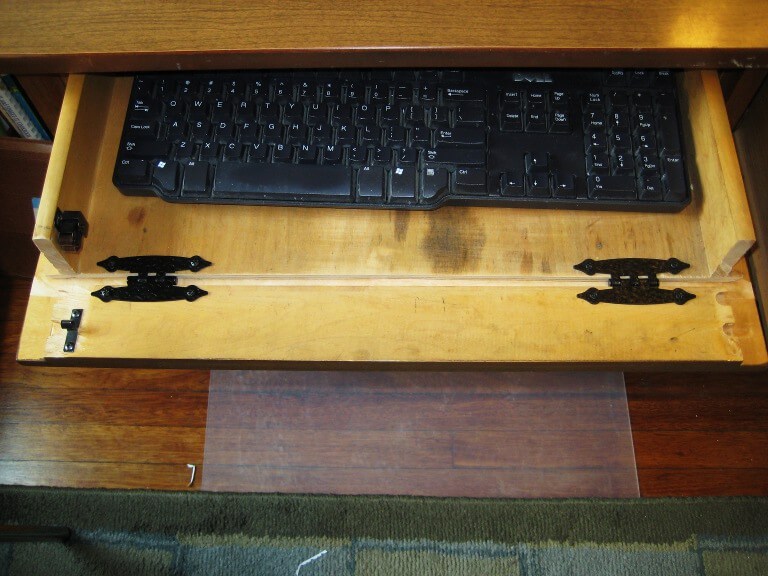
A Drop-Down Drawer Front
Step 1: Mark the positions for the screw holes on the desk drawer front. To do this, you’ll need to hold the hinges in position and insert the pencil through the holes. Add a piano hinge or two hinges to the face and bottom of the inside drawer. This process should follow the previous steps in the earlier section where you had separated the desk drawer front from its sides. Reinforce the hinges using wood screws. Make sure the screws are short enough, so they don’t penetrate the drawer front.
Step 2: Measure and mark the positions for inserting the female and male sections of the double roller catch. Be sure to do this on the inside drawer front and inside drawer sides. The male parts get attached to the drawer face, while the female units get attached to the interior of either sides of the desk drawer, specifically at the front edges. The roller catches need to lock the drawer front in place when you lift it up.
Step 3: Next attach the female and male parts of the double roller catches with the inside drawer fronts and sides using the wood screws situated at the marked locations. Be sure to shut the drawer front, so the roller catches work properly.
Conclusion
Don’t forget to take into account the ergonomics of the keyboard tray during the fabrication process. Too often, people tend to neglect ergonomics and end up suffering from fatigue and soreness. All this translates to poor health as well as reduced productivity at work.
Usually, the keyboard tray should be positioned such that, while typing on your keyboard, your arms stay parallel to the floor. Test this with your new keyboard tray to see whether that’s is the case. If not, then appropriate adjustments need to be made. It’s just a matter of adjusting the dimensions.
Also, you’ll want to make sure the keyboard tray is strong and sturdy enough to support the weight of the keyboard and other accessories. Moreover, it should not fall apart when you rest your hands on it as you type. Enjoy your keyboard tray and good luck with your work!

Stephen is a versatile and enthusiastic content writer with a passion for writing. He has over 8 years of experience in the field of writing. He strives to transform businesses and lives through his writing, and enjoys every minute of it.


