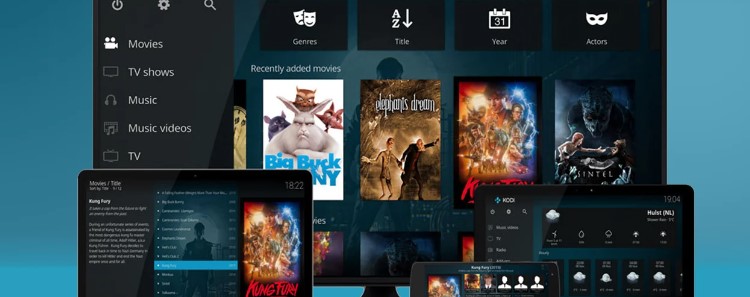
Kodi, formerly known as XBMC (Xbox Media Center), is an open-source media player software that has garnered a massive user base due to its versatility and support for various platforms.

Regular updates and upgrades are crucial to ensuring optimal performance, enjoying new features, and staying up-to-date with the latest developments. In this extensively detailed guide, we will provide step-by-step instructions on how to upgrade Kodi on different platforms, as well as additional tips and troubleshooting advice.
Why Upgrade Kodi?
Before delving into the upgrade process, let’s understand why upgrading Kodi is essential:
Bug Fixes and Security Patches
Upgrading Kodi ensures that any known issues or bugs are fixed, improving stability and security. Developers actively work to identify and patch vulnerabilities, safeguarding your system and data from potential threats.
Enhanced Features
With each new version, Kodi developers introduce exciting features and functionalities, making the media center more robust and user-friendly. These enhancements may include improved media playback, better user interface, and additional options for customization.
Improved Performance
Upgrades often come with optimizations and performance enhancements, making Kodi run smoother and faster. By utilizing system resources more efficiently, upgraded versions can provide a better media streaming and playback experience.
Compatibility
Staying up-to-date with upgrades ensures compatibility with newer hardware, add-ons, and streaming services. As technology advances, older Kodi versions may struggle to work seamlessly with modern devices and services, which could result in a degraded experience.
Checking Your Current Kodi Version
Before proceeding with the upgrade, determine the current version of Kodi installed on your device. The steps to check the version may differ slightly depending on the platform:
On Windows
- Launch Kodi.
- Click on “Settings” (gear icon) at the top left corner of the home screen.
- Navigate to “System” > “System information.”
- The version number will be displayed on the right side of the screen.
On macOS
- Open Kodi.
- Click on “Kodi” in the top menu bar.
- Select “About Kodi.”
- The version number will be listed in the popup window.
On Android
- Open Kodi.
- Tap on the three horizontal lines in the top-left corner to access the side menu.
- Scroll down and select “System.”
- Click on “System info.”
- The version number will be displayed under the “Kodi version” section.
On iOS
- Launch Kodi.
- Tap on the gear icon in the top-left corner to access the settings.
- Navigate to “System Information.”
- The version number will be listed under the “Kodi version” section.
On Linux
- Open a terminal window.
- Type the command: `kodi –version`
- Press Enter to see the installed Kodi version.

Backing Up Your Kodi Configuration and Data
Before upgrading Kodi, it’s essential to create a comprehensive backup of your settings, add-ons, and media library to avoid losing any valuable data. Different platforms may have varied methods for backing up Kodi:
On Windows
- Navigate to the following folder: “C:\Users\<YourUsername>\AppData\Roaming\Kodi”
- Copy the entire “userdata” folder to a safe location.
On macOS
- Go to “~/Library/Application Support/Kodi/”
- Copy the “userdata” folder to a secure location.
On Android:
- Use a file manager app to locate the “Android/data/org.xbmc.kodi/files/.kodi/” directory.
- Copy the “userdata” folder to an external storage device.
On iOS
- Use a file manager app on your iOS device to access the Kodi data folder.
- Copy the “userdata” folder to a cloud storage service or your computer.
On Linux
- The “userdata” folder is usually located at “~/.kodi/”
- Copy this folder to a safe location.
Besides the “userdata” folder, consider creating backups of the following elements:
Add-ons and Repositories
Navigate to the “addons” folder within the Kodi directory and copy it to the backup location. This backup ensures that you can easily restore your installed add-ons after the upgrade.
Media Library
If you have an extensive media library managed by Kodi, consider creating a backup of your media files on an external drive or a cloud storage service. This ensures that you can re-import your media library easily after the upgrade.
Preparing for the Upgrade
Before starting the upgrade process, ensure that your device meets the system requirements for the latest Kodi version. Visit the official Kodi website or the platform’s respective app store to find the recommended system specifications.
It’s crucial to remove any incompatible or outdated add-ons before upgrading Kodi. Some add-ons may not be compatible with the latest version, leading to issues and potential crashes. To remove add-ons:
- Open Kodi and navigate to “Add-ons” from the home screen.
- Select “My add-ons” or “Add-on browser” depending on your version of Kodi.
- Go through your installed add-ons and repositories, and uninstall any that are no longer maintained or causing problems.
Upgrading Kodi on Different Platforms
Now that you’ve backed up your data and prepared for the upgrade, let’s proceed with the Kodi upgrade process for various platforms:
Upgrading Kodi on Windows
- Visit the official Kodi website: https://kodi.tv/download
- Click on the “Windows” icon.
- Download the latest stable version of Kodi for Windows.
- Run the installer and follow the on-screen instructions to upgrade Kodi.
- After the installation is complete, replace the “userdata” folder in the new installation with the backed-up version to restore your settings and data.
- Launch Kodi, and it should now be upgraded to the latest version.
Upgrading Kodi on macOS
- Visit the Kodi website and select the “macOS” icon.
- Download the latest stable version for macOS.
- Open the downloaded disk image (DMG) file.
- Drag and drop the Kodi app into the Applications folder to upgrade.
- Replace the new “userdata” folder with your previously backed-up version.
- Launch Kodi, and it should now be upgraded to the latest version.
Upgrading Kodi on Android
- Go to the Google Play Store and search for “Kodi.”
- If an update is available, click “Update” to upgrade Kodi.
- Alternatively, you can visit the Kodi website for the latest APK and sideload it onto your Android device.
- Replace the “userdata” folder after the upgrade.
- Launch Kodi, and it should now be upgraded to the latest version.
Upgrading Kodi on iOS
- For non-jailbroken devices, go to the App Store and check for Kodi updates.
- If jailbroken, you can update Kodi through the package manager or by installing the latest DEB file from the Kodi website.
- Replace the “userdata” folder as mentioned earlier.
- Launch Kodi, and it should now be upgraded to the latest version.
Upgrading Kodi on Linux
- The method may vary depending on the Linux distribution you are using.
- You can check for updates through your package manager or use the Kodi website to find the appropriate package for your distribution.
- Replace the “userdata” folder after the upgrade.
- Launch Kodi, and it should now be upgraded to the latest version.
Post-Upgrade Steps and Troubleshooting
After upgrading Kodi, check the functionality of your add-ons, repositories, and media library. Sometimes, certain add-ons may require updates to work with the new Kodi version. Visit the official Kodi forums or the add-on developer’s website for the latest versions.
If you encounter any issues after the upgrade, consider the following troubleshooting steps:
Clear Kodi Cache
Kodi may accumulate cache data over time, leading to performance issues. To clear the cache, navigate to “Settings” > “File manager” > “Profile Directory” > “Database,” and delete the “Textures13.db” file.
Factory Reset Kodi
As a last resort, if you encounter persistent issues, consider performing a factory reset of Kodi. This will erase all settings, add-ons, and data, so make sure to back up your data before attempting this step.
Seek Community Support
If troubleshooting on your own proves challenging, visit the official Kodi community forums or other Kodi-related websites. Many experienced users and developers frequent these platforms and can offer valuable assistance.
Keeping Kodi Up-to-Date

Upgrading Kodi is not a one-time task; it’s essential to keep Kodi up-to-date to continue benefiting from the latest improvements and features. To ensure you are always using the most recent version:
Enable Automatic Updates (where available)
Many platforms, such as Android, iOS, and Windows, allow you to enable automatic updates for installed apps, including Kodi. This way, you don’t have to worry about manually updating Kodi whenever a new version is released.
Check for Updates Regularly
Set a reminder to check for Kodi updates regularly, even if automatic updates are enabled. Sometimes, app store configurations or system settings may cause automatic updates to be delayed.
Stay Informed
Follow the official Kodi website, social media channels, and community forums to stay informed about the latest releases, announcements, and important updates.
Conclusion
Upgrading Kodi is a crucial step to ensure you have the latest features, performance improvements, bug fixes, and security patches. Always remember to create a comprehensive backup of your Kodi data before proceeding with the upgrade to avoid any data loss. By following the platform-specific steps mentioned in this guide, you can easily upgrade Kodi and continue enjoying the ultimate media center experience. Should any issues arise, the Kodi community is an excellent resource for assistance and troubleshooting. Happy streaming!

Stephen is a versatile and enthusiastic content writer with a passion for writing. He has over 8 years of experience in the field of writing. He strives to transform businesses and lives through his writing, and enjoys every minute of it.


