The use of tethering is one of the most felt needs when traveling. Tethering is a particular way of using the WiFi terminal equipped with a SIM card that allows you to use your Android smartphone as a modem and connect to the Internet, on the move, even from a notebook or convertible.
If you know how to activate tethering, you can share the Internet connection via WiFi (or Bluetooth) with other devices that otherwise could not connect.
A family member or colleague who has run out of ” giga ” provided for in the mobile operator’s data plane will be able to connect to the Internet using the connection of othersactivating tethering and WiFi hotspot. Or more simply, you can connect to the Internet from a notebook, a convertible, a tablet using the connection of the mobile operator used on the Android smartphone.
What is tethering, and how it works
The term tethering can be translated with the word ” chaining “: the smartphone capable of connecting to the Internet through a 3G or 4G / LTE data connection can be “coupled” to other devices which, otherwise, would not be able to connect.
The tethering WiFi allows you to turn on the mobile device with access to the Internet, a WiFi hotspot to which can be connected to other devices (ie laptops, convertibles, tablets, other smartphones, and so on).
By starting a scan of the wireless networks available nearby from these devices, you can connect to the mobile device and use it as a gateway to “surf” the Net.
By activating tethering, the smartphone effectively transforms itself into a WiFi router that can share the connection Internet provided by the mobile operator via 3G or 4G / LTE with multiple client devices simultaneously.
However, in some cases, tethering on Android does not work: starting from the now very old version 4.1.2 of Android, it may not be possible to connect to the Internet using the smartphone as a modem. Some mobile phone operators also explicitly block tethering.
Until recently, Vodafone applied a charge every time the user tried to activate tethering on his mobile device. Fortunately, this practice was removed in April 2018 following a decision by AGCO.
Activate WiFi tethering on Android and use your smartphone as a modem
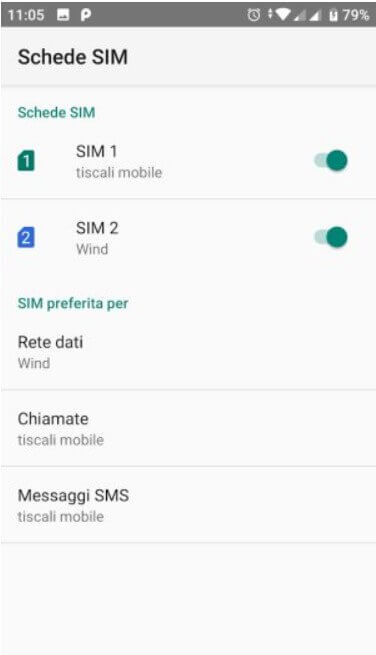
To use the Android smartphone as a modem, simply access the Android settings, touch Network, and Internet, then select SIM cards and make sure, in the case of a dual SIM smartphone with two cards inserted, on which SIM the Internet connection must be activated.
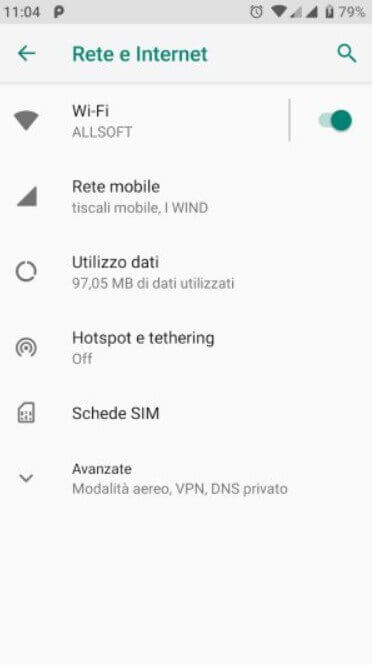
In the example, we have set Wind for connections to the Internet ( data network ) while Tiscali Mobile calls and SMS.
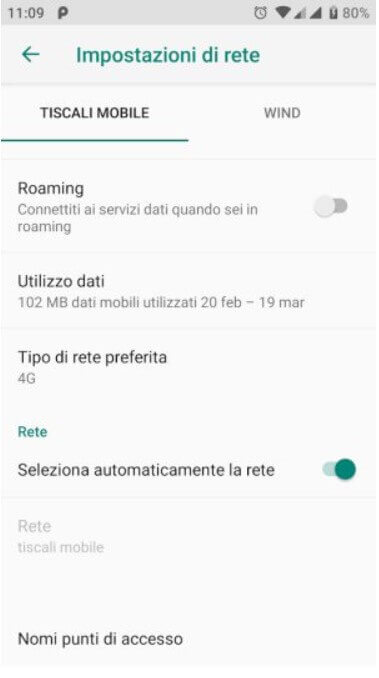
At this point, you will have to select a Mobile network, choose the operator whose data network you want to connect to, tap Advanced then Access point names at the bottom.
On the next screen, you will need to select or add a correct “access point” using the directions provided by each telecom operator.
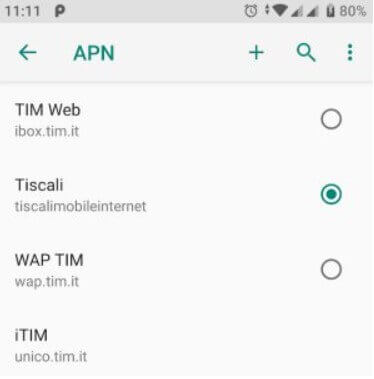
As reported in the article, default, supl, dun must be reported in correspondence with the APN type entry. If the dun entry is not present, you will have to add it manually, respecting the syntax indicated.
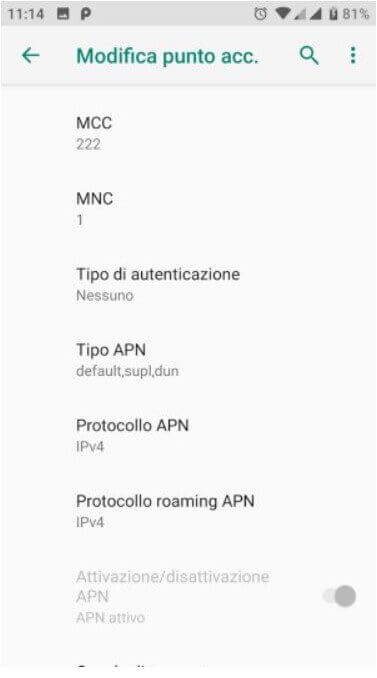
After applying the changes, you will have to touch the three dots in the column (top right) then choose the Save item. Remember to never ignore this crucial point.
The message “the operator does not allow to add APN of type dun”: how to solve
If adding dun and saving the configuration of the Android APN displays the message ” the operator does not allow you to add dun type APNs “, to activate the WiFi tethering you can solve it as follows :
1) Go to the Android settings, access the About phone section, and quickly tap the Build number at least seven times.
Some manufacturers rename this item by calling it, for example, Version followed by the Android customization installed on the smartphone in use.
The Developer Options menu will then be added to the Android settings.
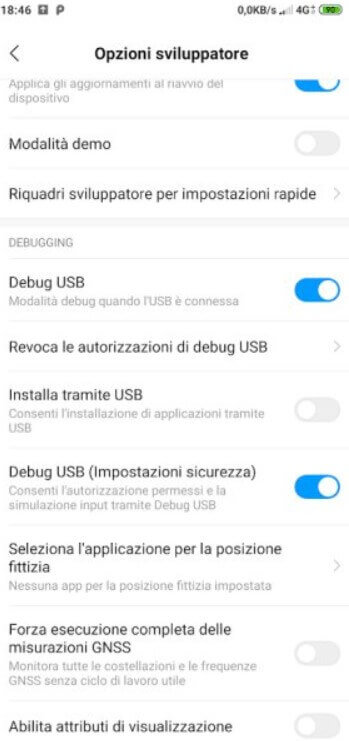
2) Go to the newly added Developer Options menu, then activate the USB Debugging option.
3) Install the following two software in Windows:
– ADB driver
– Minimal ADB and Fastboot
4) Restart Windows and connect the Android device via USB.
5) Open the Minimal ADB and Fastboot folder from File Explorer (usually C: \ Program files (x86) \ Minimal ADB and Fastboot or C: \ Program files \ Minimal ADB and Fastboot ).
6) Hold down the SHIFT key and click with the right mouse button in a free area of the Minimal ADB and Fastboot folder and select Open command window here or Open PowerShell window here.
In case you chose the Open PowerShell window here, type cmd and press Enter.
7) Type adb devices: the serial number of the device will be shown. Access to the Android device must be authorized (go to the latter’s screen and approve the connection).
In case the device has not been authorized, grant approval from Android, then repeat the adb devices command.
8) Type adb shell settings, get global tether_dun_required, and press Enter.
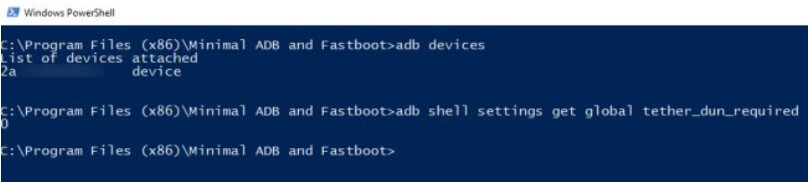
If you get null or 1 as a response, you will have to issue the following command:
adb shell settings put global tether_dun_required 0 (the last character is a zero)
This will not notify the telecom provider that you are using the tethering functionality, and Internet connection sharing will work without problems.
9) If the error message Security exception is returned: Permission denial: writing to settings requires: android.permission.WRITE_SECURE_SETTINGS , it means that you do not have the rights to make the requested change.
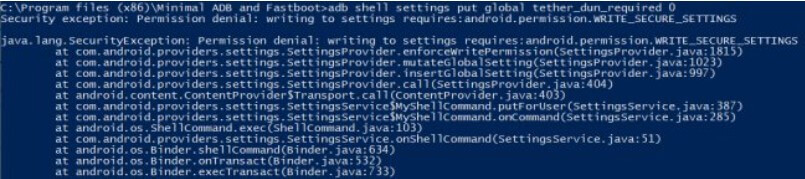
In this case, it is necessary to go to the Developer Options from the Android settings, activate the USB Debugging option (Security settings), or similarly placed a little lower than the USB Debugging item.
At this point, you can repeat the adb shell settings put global tether_dun_required 0 commands, which this time will be successful.
10) As the last step, just type adb kill–server, then exit to close the Windows command prompt window.
In this way, it should be possible to use the Android smartphone as a modem by connecting to the WiFi hotspot created there (even without adding the dun setting in the APN configuration).
The change is usually retained even after restarting the Android smartphone, even on non- rooted devices.
Android tethering not working: how to fix.
When Android tethering doesn’t work, we suggest you follow some steps. Often, when it comes to activating tethering and using the phone as a modem, you get lost in the most trivial steps.
Below we also present the situations that could become insurmountable obstacles if it was not clear where and how to act.
How to activate tethering even in case of problems
1) Check APN and APN type
APNs ( Access Point Names ) are the access points used by mobile phone operators to allow data to be sent and received.
After verifying, in the Android settings, the correctness of the configured APN, you need to touch the name of the APN to access its configuration and check what was explained above.
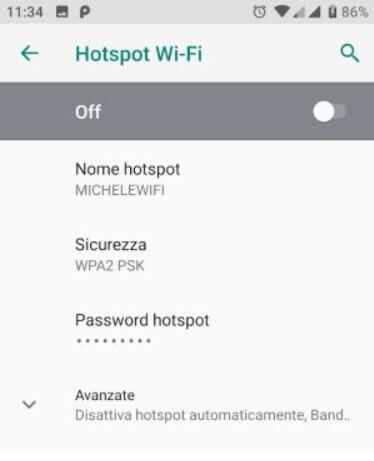
2) Correctly configure the WiFi hotspot on the Android device
After setting the APN correctly, you can activate the data connection from the Network and Internet, Hotspot and tethering section of Android, and select the WiFi hotspot.
Referring to the screen that will appear, you can now set the SSID that identifies the wireless hotspot to which the devices that will have to use the telephone operator’s data connection will connect. A sufficiently long and complex password must be set by choosing WPA2 PSK as the security algorithm to protect the wireless hotspot.
By activating the Off option and turning it to On, the WiFi hotspot will be immediately activated, and you can connect to your smartphone, using it as a modem, from any other device (for example, a normal notebook).
On the notebook, convertible, or client device, you will need to search for the WiFi networks available nearby, click on the name of the WiFi hotspot just set up on Android and enter the corresponding password, chosen just now.
After waiting a few moments, we recommend accessing the command prompt on the laptop and typing, for example, ping www.google.it .
If so, tethering is working smoothly, and you are using your Android smartphone as a modem.
If you get four overdue requests, it means that tethering is not working properly. To solve the problem, it is good to start with what is suggested in the following point.
3) Check the IP address associated with the client system
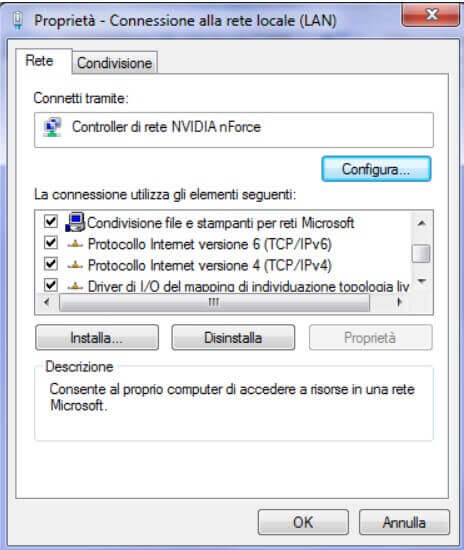
Suppose you want to access the Internet from your notebook, tablet, convertible, or other Windows client devices using tethering. In that case, we suggest you press the Windows + R key combination, type ncpa.cpl , press Enter, then right click the mouse over the WiFi interface and select Properties.
Next window, click on Internet Protocol version 4 (TCP / Ipv4) and then on the Properties button.
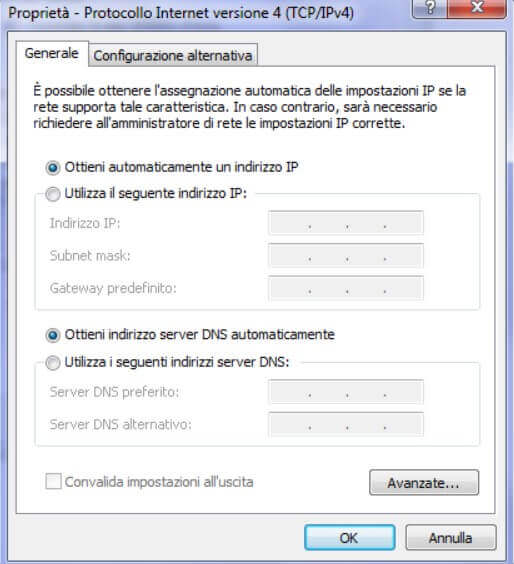
In the following screen, you will need to select Obtain an IP address automatically :
Confirming your choice by pressing the OK button, once you have returned to the Network Connections window, you can again right-click on the WiFi interface and choose Disable.
After a few seconds, you can double-click on the same wireless interface to re-enable the connection.
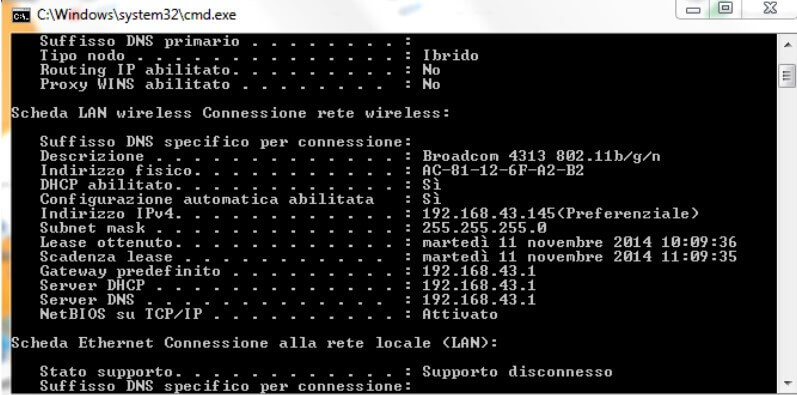
Trying to connect to the WiFi hotspot created with Android, you will have to open the command prompt and type the following: ipconfig / all.
Suppose in correspondence with the WiFi interface, you should read something similar to what is shown in the figure. In that case, it means that the system is correctly connected to the smartphone (in this case, the Android DHCP server has assigned it to the local IP 192.168.1.145).
Also, from the command prompt you can then type, again, ping www.google.it .
If it still doesn’t work (request timed out), it is highly likely that tethering is blocked (go back to the previous steps and check the APN setting and Android global setting tether_dun_required ).
4) Use the PING, and TRACERT commands at the prompt to check that everything works correctly
At the previous point, we saw how to use the ipconfig / all command at the prompt.
We recommend that you note what is indicated next to the Default gateway after activating tethering.
The IP address that you read atDefault gateway is the smartphone’s private address, which – like a router – manages connection requests and “runs” them on the 3G / 4G interface.
Using the command ping -t IP_GATEWAY_PREDEFINITO (indicating the IP read in correspondence with the Default Gateway ), the Android smartphone with active tethering functionality must not respond in more than 10-20 ms.
If you read longer times or even expired requests, you will have to physically get closer to the smartphone.
The millisecond latency that you read will be added to the time it takes to reach any target server.
We also recommend using the TRACERT command www.google.it , for example, to understand which steps are followed to get to your destination.
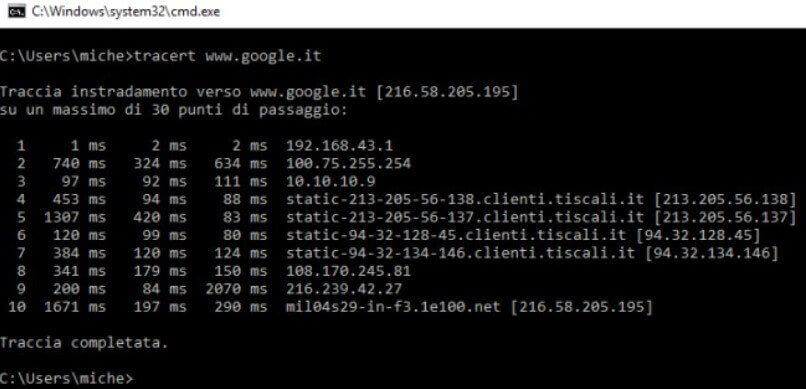
In the example, the path followed to reach Google’s servers from a data connection shared via tethering by activating the WiFi hotspot on the smartphone.
In this case, the operator’s 3G connection is not stable at all (basically weak signal) and there are also congestion problems due to the presence of multiple devices connected nearby. However, despite the high latency times, the connection remains usable for “basic” operations (sending and receiving emails, consulting websites, instant messaging, …).
It could be useful to keep a command prompt window open on ping -t IP_GATEWAY_DEFINITE and ping –t followed by the IP of one of the first hops of the mobile operator.
It can be used to immediately realize when a problem occurs ( Request expired ) due to too much distance from the WiFi hotspot (Android smartphone with active tethering) or due to the passage of the data signal on EDGE (icon “E”; web browsing impossible ; only possible to send and receive short messages with the various apps).
5) Make sure the client device is allowed to use the WiFi hotspot
Some Android versions allow you to specify the devices authorized to use the WiFi hotspot and, therefore, the tethering feature.
It is good to check carefully that the device from which you are trying to connect is not blocked.
6) Unblock tethering on Android 4.1.2 and later
If, again, you are unable to get tethering to work, you will need to root the Android device : only in this way will you acquire the rights to modify the operation of the operating system in depth Android and you can force the activation of tethering.
The rooting procedure differs from one smartphone to another: it is therefore good to read up carefully before carrying out it.
After purchasing the root rights on the Android smartphone, the fastest way to unlock tethering is to install and run the free ISWAT Tether Unlocker app .
Made by an Italian developer, it requires root rights (which must be granted through Superuser or SuperSU) and allows you to unblock tethering for all mobile operators, including foreign ones.
To use ISWAT Tether Unlocker, simply launch the app then tap the Unlock Tethering button .
The free version of ISWAT Tether Unlocker displays advertisements and must be manually performed before activating the tethering and, therefore, the WiFi hotspot from the Android system settings.
Alternatively, for those who do not want to use ISWAT Tether Unlocker , it is possible to manually intervene on the Android configuration, provided – even in this case – that you have root rights. Here are the steps to follow:
1) Verify that you have root rights.
2) Download and install a terminal window emulator from Google Play ( example ).
3) Open the terminal window.
4) Type the netcfg command
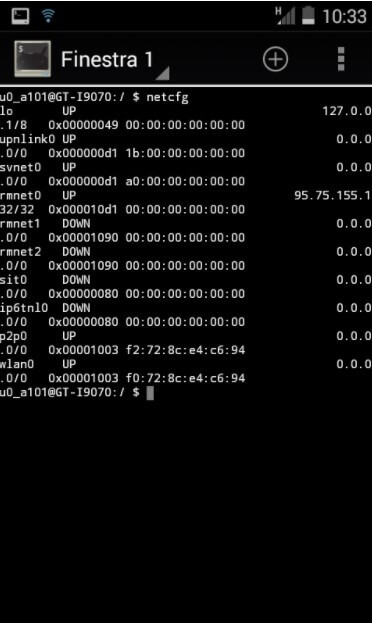
At the network interface that handles the 3G / LTE data connection is a descriptive name (usually rmnet0 and the public IP address currently acquired. Write down the name of the interface.
5) Type the command su -c “iptables -tnat -A natctrl_nat_POSTROUTING -s 192.168.0.0/16 -o rmnet0 -j MASQUERADE”
At this point, tethering – once the WiFi hotspot and data connection are reactivated – should finally work.
To have tethering unlocked every time the Android device starts , the suggestion is to create a text file on the SD card and save the command on -c “iptables -tnat -A natctrl_nat_POSTROUTING -s 192.168.0.0/16 -o rmnet0 -j MASQUERADE “
The Script Manager – Smanager app will then help configure the execution of the command at each Android startup: just hold down the text file created previously and then choose Open as, Script / executable .
By activating the Up and Boot options(touch the corresponding icons), the command will be executed each time the operating system is started.
7) Check the available bandwidth and deactivate programs that download or upload too much data
From any client device connected in tethering it is obviously possible, at any time, to check the available network band.
To proceed, we suggest using the fast.com service .
It should be borne in mind that speed tests like this tend to consume a fair amount of data traffic. If you are ” short of gigs ” on your mobile data plan, it may be preferable to avoid the test.
In EDGE the test will not even open while in 3G at least 120-200 Kbps will allow you to surf without problems.
On all client devices connected via WiFi via tethering, care must be taken to minimize the data traffic generated by temporarily disabling – for example – the download of Windows updates.
Using the suggestions illustrated in our article, we were able to activate tethering and use the smartphone as a modem even in particularly “rural” places, where the data connection of the various operators was rather unstable.
By identifying the right point, we were able to avoid the locking of the EDGE signal by remaining stable in 3G, albeit with a rather “dancer” signal.
In places further away from cities, we suggest choosing Prefer 3G networks in the Android advanced settings ( Mobile networks section ).
If this still does not solve, you can follow the instructions in the article Android hotspot does not work: the Internet connection is not shared .

A tech-savvy writer with a knack for finding the latest technology in the market, this is what describes John Carter. With more than 8 years of experience as a journalist, John graduated as an engineer and ventured soon into the world of online journalism. His interest includes gadget reviews, decoding OS errors, hunting information on the latest technology, and so on.
 Extender for Their Networks")


 Extender for Their Networks")


