How to install Windows 10 from USB: preparing bootable media and booting the system.
In general, it is much easier to make CD / DVD media bootable than a USB drive. If so, then how to install Windows 10 from USB in the simplest and fastest way possible?
Well, there are several tools to insert the Windows ISO file into a USB stick and install the operating system from that medium. Without wasting much time, let’s get started.
Install Windows 10 from USB with Media Creation Tool
To date, the simplest and most immediate solution to install Windows 10 from USB is to use the Media Creation Tool, a utility prepared and constantly updated by Microsoft.
To download the Media Creation Tool, simply refer to this page, and then click on Download Tool Now.
At this point, just connect a USB stick and double click on the executable Media Creation Tool that you have just downloaded.
After accepting the license agreement (click on Next), you will get the following bar.
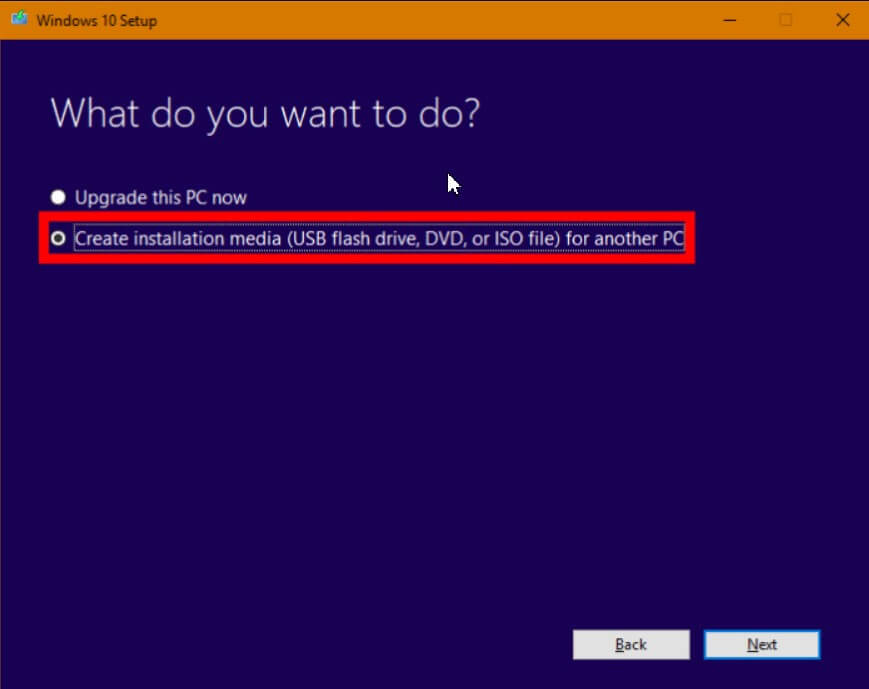
To prepare the bootable media and install Windows 10 from USB, select the option “Create installation media for another PC” and press the Next button.
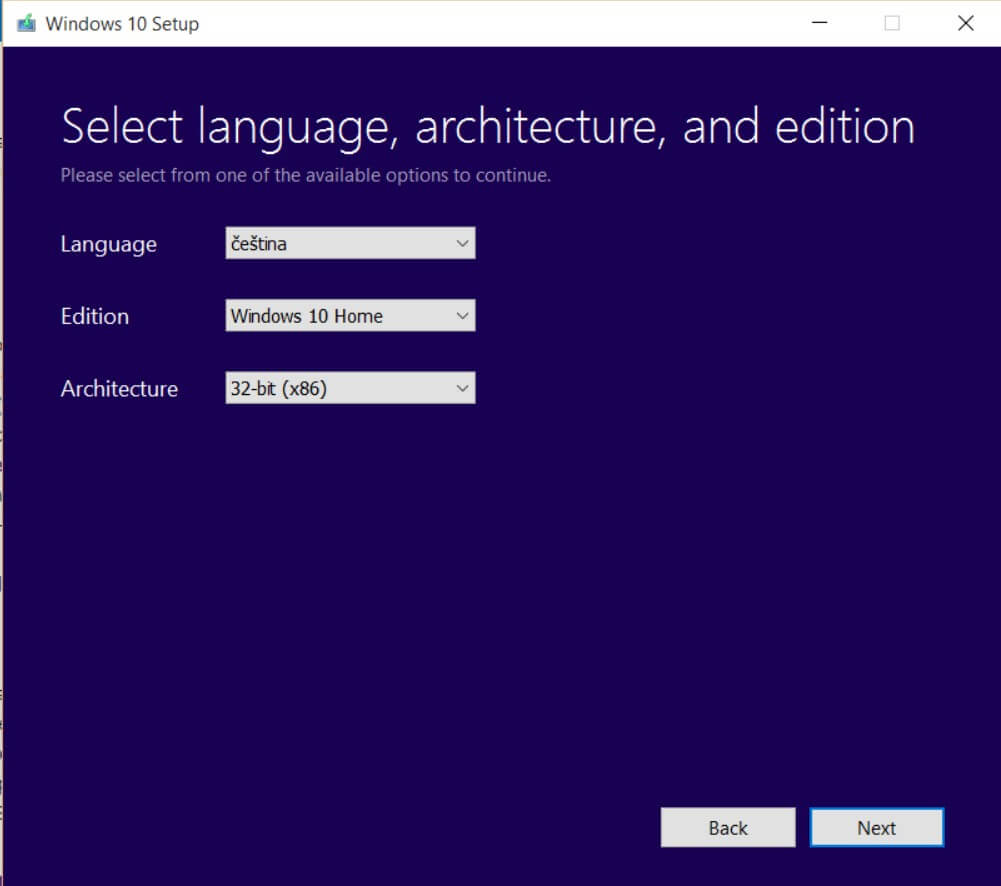
By removing the checkmark from the recommended options for this PC box and selecting both in the Architecture drop-down menu, you can set up a USB media that allows you to install both the 32-bit and 64-bit versions of Windows 10. However, if you plan to install Windows 10 only on 64-bit (x64) systems, you can only choose the 64 bit (x64) entry. If you want to know the difference between 32-bit and 64-bit architectures, check out this article (32-bit vs. 64-bit: the differences between the two architectures).
Obviously, it is good to keep in mind that by choosing both (therefore deciding to save both the 64-bit and 32-bit versions of Windows 10 on the USB drive), the space occupied will be almost double (make sure to use at least an 8-bit USB stick GB).
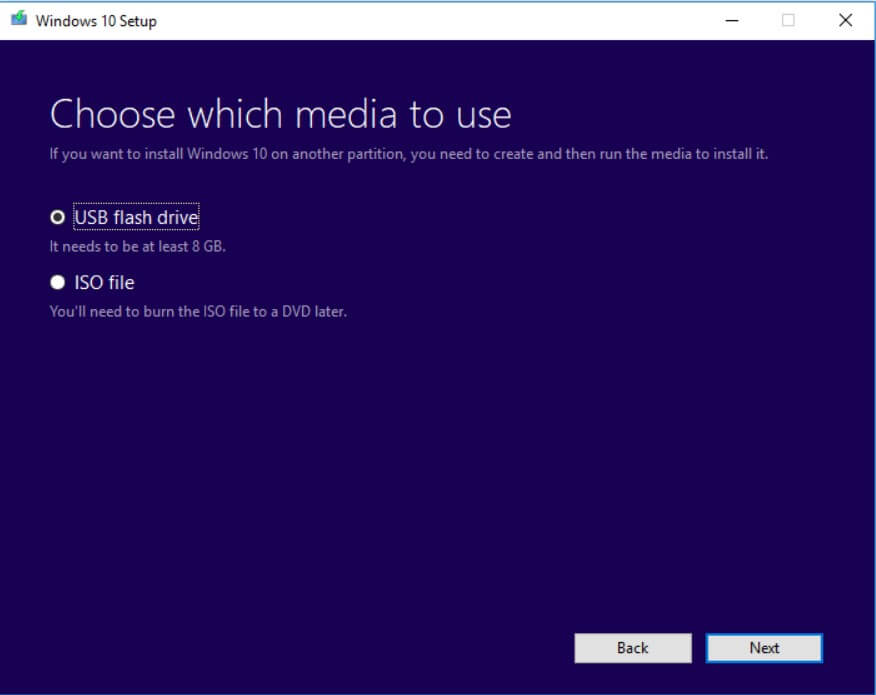
In the next screen, choose USB flash drive and the drive identification letter corresponding to the external media you are going to use.
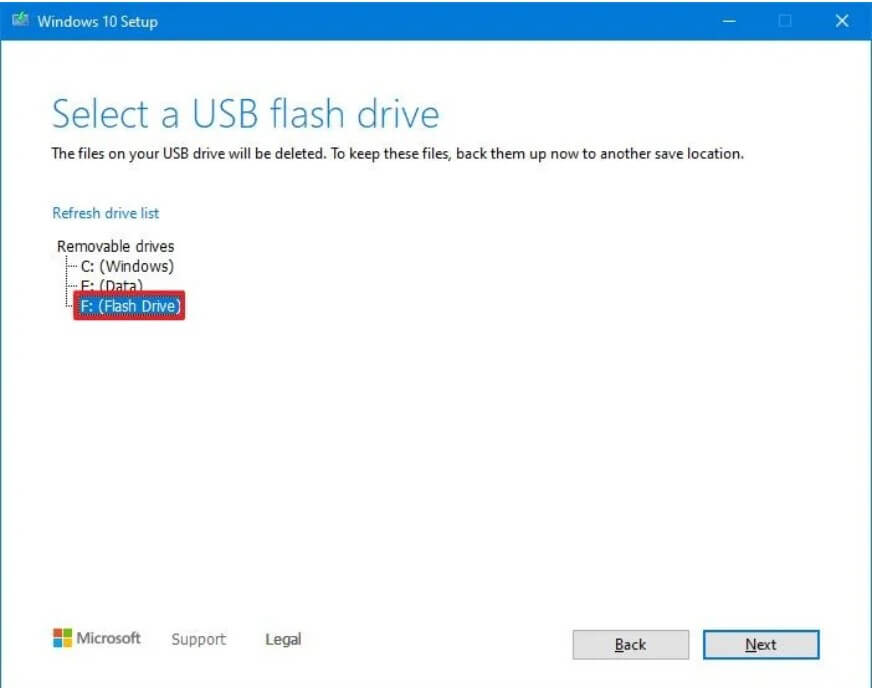
Any files present in the USB support will be automatically deleted: before continuing, it is advisable to make sure that the essential content is easily “expendable”.
Once the media is generated, you can install Windows 10 from USB just by restarting the system and checking that the correct boot sequence is set in the BIOS / UEFI (external USB drives first, and then hard disk / USB).
After rebooting the machine, you will have to repeatedly press the DEL key, F12, F2, or F11 to enter the BIOS or UEFI, depending on the PC or motherboard manufacturer.
However, the bootable media generated by Media Creation Tool is fully compatible with UEFI BIOS as it contains the Microsoft digital signature that authorizes boot from the external drive.
The only “contraindication” deriving from using the Media Creation Tool is that the Windows 10 ISO is downloaded from Microsoft servers every time (it is impossible to use an image previously stored on the system).
Also, it is not possible to generate installation media containing the LTSB edition of Windows 10: Windows 10 without Edge and Cortana: LTSB.
Media from any ISO file
Media Creation Tool allows you to generate USB bootable media for installing Windows 10 by downloading the necessary files from Microsoft servers.
To install Windows 10 from USB, starting from an ISO file, you will have to turn to other utilities.
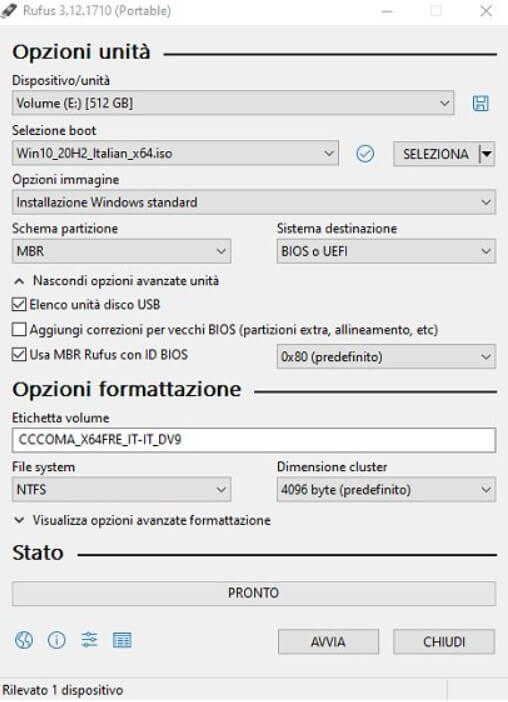
The best way to proceed is to use Rufus, an application that makes any USB drive bootable and allows you to insert a Windows ISO image already stored on the system.
The procedure to follow is illustrated in the article Bootable USB key, how to prepare it in the paragraph Bootable USB key also with UEFI: Rufus.
The reason behind the usage of Rufus as compared to other similar tools is that the configured drive, containing the Windows 10 installation files, will be compatible with the UEFI BIOS and can also be used on the most modern PCs.
To create useful support for installing Windows 10 from USB both on systems with legacy BIOS and on new ones (UEFI BIOS), we summarize all the steps:
1) Download the portable version of Rufus.
2) Start the program and select the USB storage device from Drive on which you want to store the Windows 10 installation files.
If the drive does not appear, check the USB disk drive list box (by default, Rufus does not show USB hard drives and SSDs).
3) Download the updated ISO of Windows 10 following the instructions in the article Download Windows 10 ISO: here’s how to proceed.
4) Click Select to choose the Windows 10 ISO file downloaded in the previous point.
5) In Image Options, leave Standard Windows Installation selected.
6) From the menuPartition scheme, select MBR .
7) Press the ALT + E key combination and choose BIOS or UEFI from Target System.
8) Enter a label in Volume Label.
9) Choose as FAT or NTFS file system: the latter will be the only option on drives with a greater than 4 GB capacity.
10) You can choose default as the cluster size.
Create bootable media to install Windows 10 from USB compatible with legacy BIOS and UEFI
Anyone wishing to proceed manually and use the command prompt to prepare a USB drive to install a new copy of Windows can apply the following procedure:
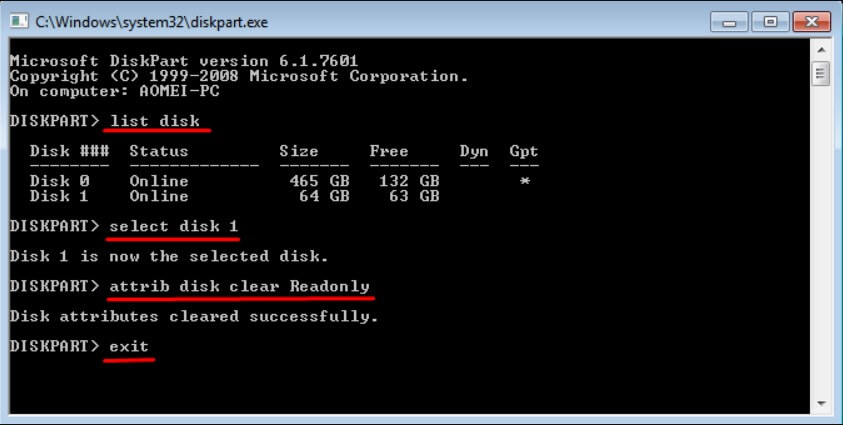
1) Type diskpart in the Windows 10 search box and answer Yes to the prompt “Do you want to allow this app to make changes to the device?”
2) Write list disk and locate the disk number ( Disk No. ) corresponding to the USB drive to use.
3) Use the select disk command followed by the disk number found in the previous step.
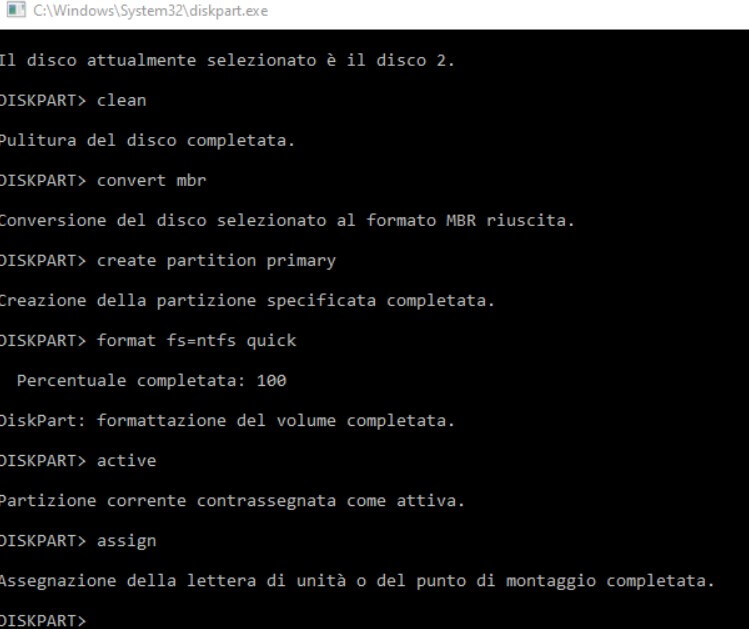
4) Write clean to delete all contents convert MBR to request the use of the MBR partition scheme.
5) Then, use the create primary partition command to create a single primary partition on the USB drive.
6) On drives larger than 4GB, use the format fs = ntfs quick command. Alternatively, use format fs = fat32 quick. However, you should always prefer removable USB media with at least 8 GB of capacity.
7) The final two commands (active and assign) when formatting is completed will allow you to make the partition active and assign it a drive letter.
8) Close the Diskpart black background window.
9) Download the updated ISO of Windows 10 following the instructions in the article Download Windows 10 ISO: here’s how to proceed.
10) Double click on the Windows 10 ISO file, downloaded in the previous step, to mount it in File Explorer.
11) Select all the files in the ISO file by pressing CTRL + A in File Explorer, then right-click on it and choose to Send to. From the menu that will be proposed, click on the drive letter corresponding to the USB support.
12) At the end of the copy operation, you can unmount the ISO file in Windows 10 (right-click, Eject ). The configured drive is ready to be used to install Windows 10 from USB.
Windows 10 and Product Key
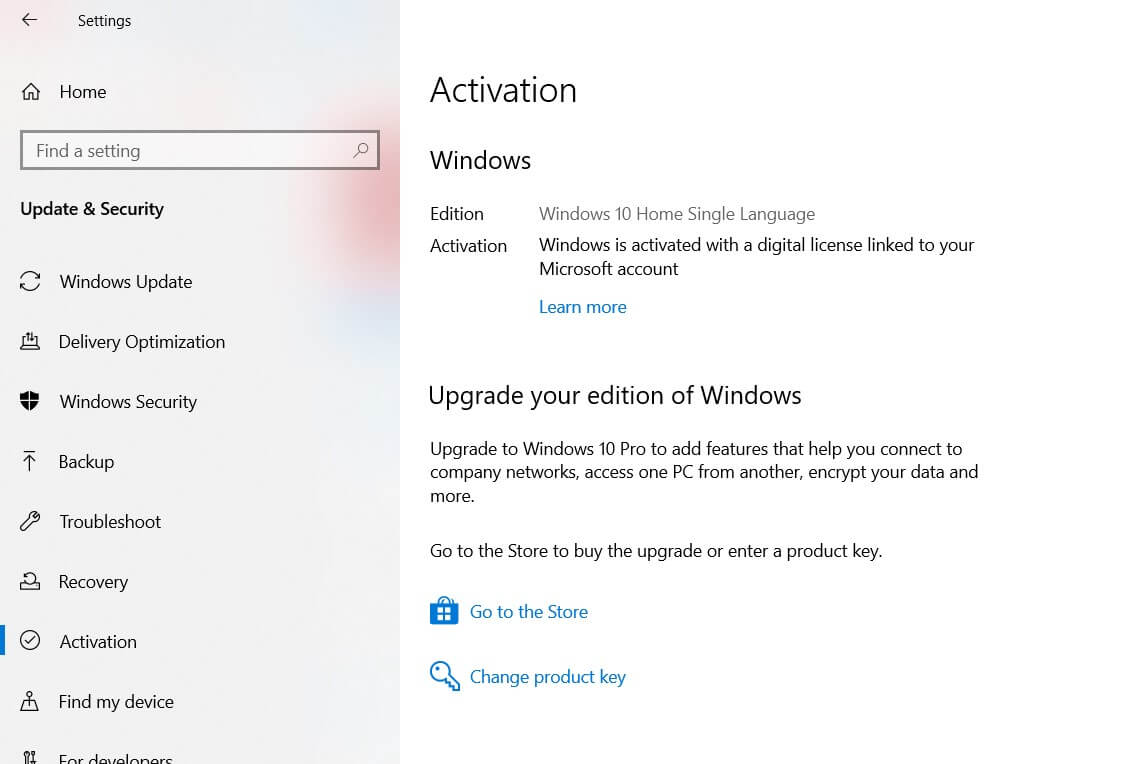
By reinstalling Windows 10 from USB media and overwriting what is contained in the SSD or hard drive, you will not need to enter any Product Key during installation, especially when the operating system is already present on the same machine and activated with a digital license (presence of the indication Windows 10 is activated with a digital license linked to your Microsoft account on the Activation screen, which can be called up from the Windows 10 search box).
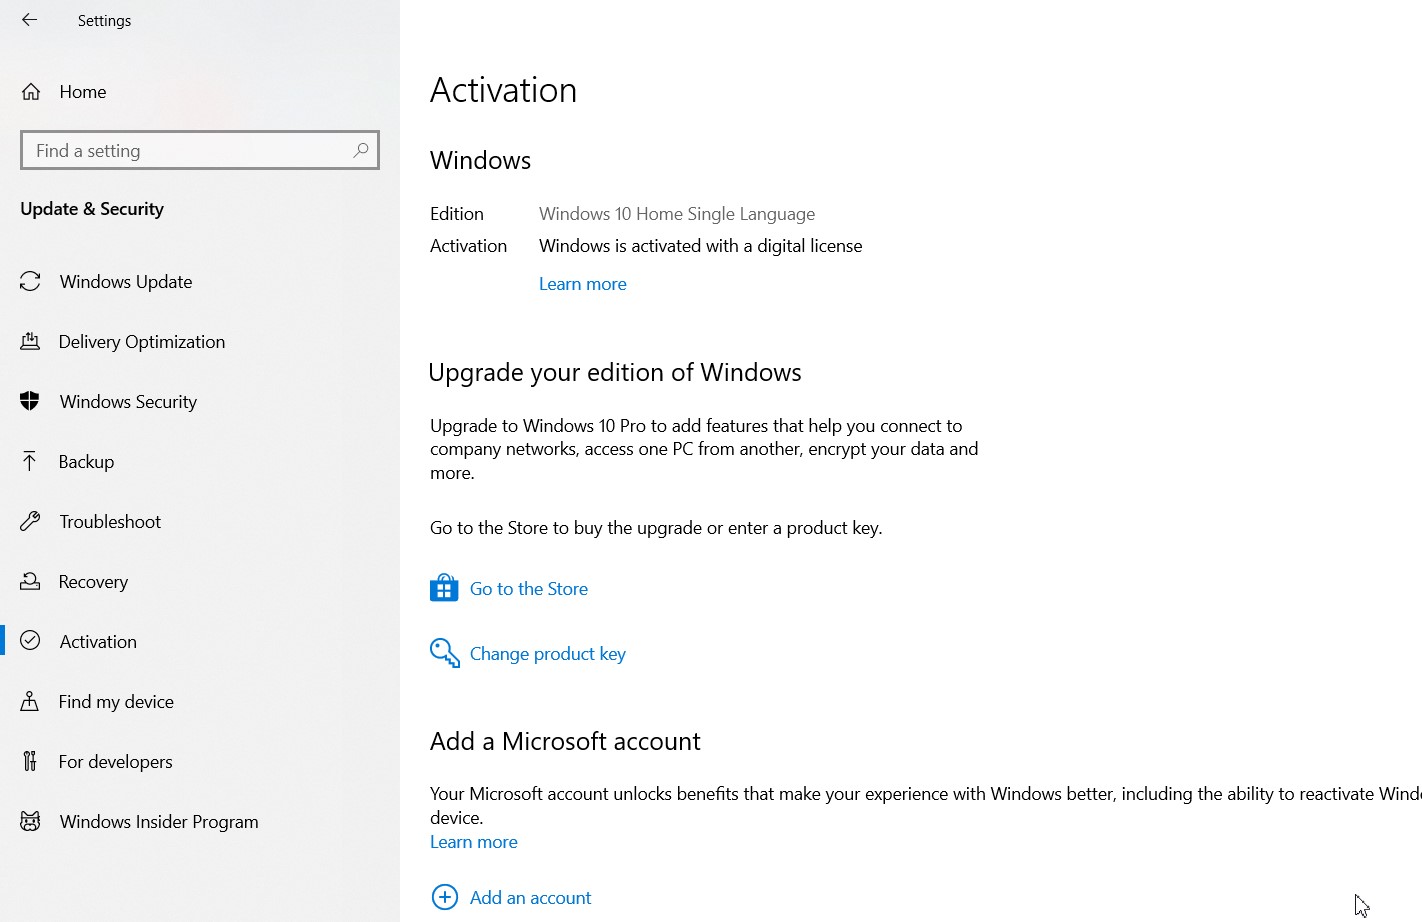
However, to retrieve the Product Key of the current Windows 10 installation, you can follow the article Recover Product Key suggestions from any computer, even when it does not start.

A tech-savvy writer with a knack for finding the latest technology in the market, this is what describes John Carter. With more than 8 years of experience as a journalist, John graduated as an engineer and ventured soon into the world of online journalism. His interest includes gadget reviews, decoding OS errors, hunting information on the latest technology, and so on.


