In the past, we have presented various products and some appliances, especially useful at the company level, which allow you to filter data traffic to and from the local network and block unwanted or potentially dangerous sites.
This time, we want to focus on the methodologies to control the local network sites (including WiFi) without the need to install anything inside the LAN.
To check the sites visited by the various clients connected to the local network, one of the first checks to be made is to make sure if the router installed in the office or at home allows the activation of the connection logs.
Most of the routers on the market, in fact, within the “Content filtering” section, provide the Logs function, which verifies which connection requests have been initiated by the various systems connected to the local network.
Usually, this section contains a register in a textual format indicating the local IP address of the machine (or mobile device) from which the request originated, and the addresses of the websites visited. To find out the name of the system connected to the local network, it is usually sufficient to refer to the router’s Attached devices section, which contains the information sought.
For example, suppose you found something like this in the log file:
[ALLOW: www.ilsoftware.it] Source: 192.168.1.33 Monday, 23 Jun 2014 08:30:30
It means that the system connected to the LAN with IP 192.168.1.33 visited the website www. software. It at 8, 30 of 23 June.
To understand who is using the IP 192.168.1.33, it is possible to refer to the Attached devices tab where you will find, for example, the association 192.168.1.33 PC-OFFICE-3.
To be sure that the various websites indicated are visited by the machines listed in the log, we suggest assigning fixed local IP addresses (static IPs) to the LAN systems to be monitored later.
Check the websites visited with OpenDNS
The OpenDNS DNS servers can be used without making any registration, replacing them with Windows, Linux, Mac OS X, Android, iOS.
By activating a free account on OpenDNS, however, you can block unwanted or inappropriate websites and check the list of sites visited from your local network.
The automatic blocking of unwanted websites works on any machine connected to the local network as well as on any mobile device that shares the same WiFi network as long as each client uses the two OpenDNS DNS servers:
208.67.222.222
208.67.220.220
The two DNS servers can be configured at the router level to automatically pass via DHCP to all client systems that request an IP. Alternatively, you will have to replace the DNS configured locally on the client machines and devices with the OpenDNS DNS.
Once the use of OpenDNS DNS servers has been configured, all domain name resolution requests will pass through these systems. By informing OpenDNS of the IP assigned by the provider to your router (static or dynamic IP), the service will allow you to block certain types of websites and obtain the list of sites visited by the local network.
1) The first step is to register an account on OpenDNS.
2) By filling in the appropriate boxes, you must indicate the provider’s IP address to the router at the time of connection. You will also need to specify an identification label for the network (for example, “OFFICE” or “HOME”).
Image
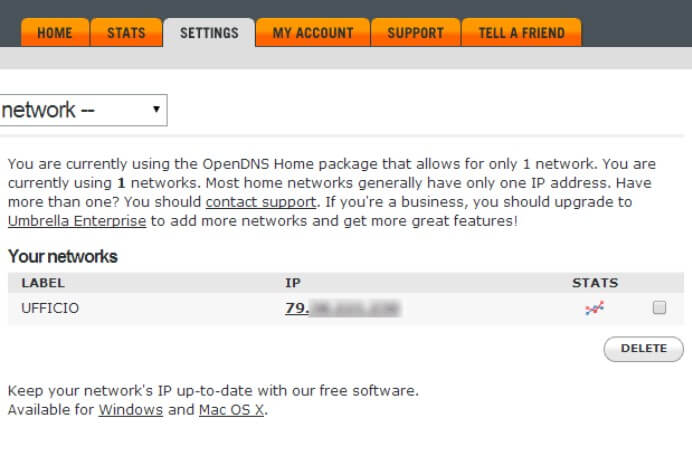
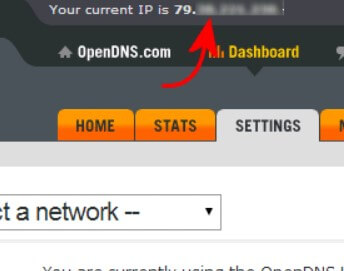
At the top of the page, OpenDNS displays the IP you are currently using.
3) By clicking on the Settings tab and then on the Web content filtering item, you can decide whether to activate a block on some types of websites.
By choosing Low, you will be prevented from visiting pornographic sites and services that allow you to make browsing anonymous. The Moderate and High entries allow you to block visits to a wider range of sites. The complete list can be checked by clicking on the View link :
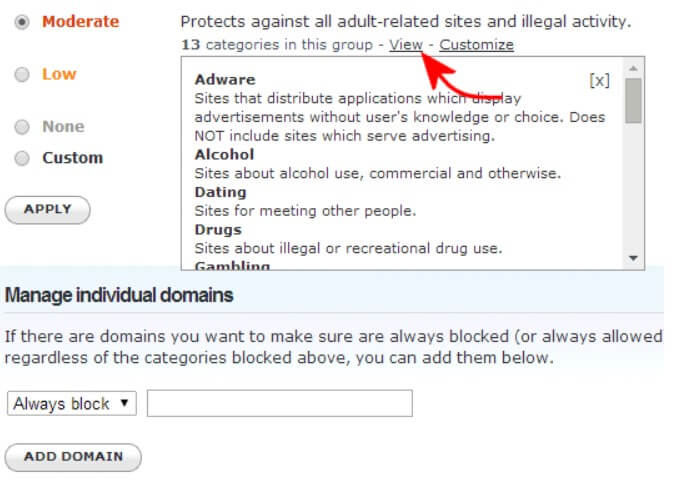
The None option avoids using any filter, while Custom allows you to “customize” the list of websites not allowed.
The Manage individual domains section allows you to block or unblock specific websites.
4) By clicking on Customization, you can customize the message displayed to the user who visits one of the websites belonging to the excluded categories:
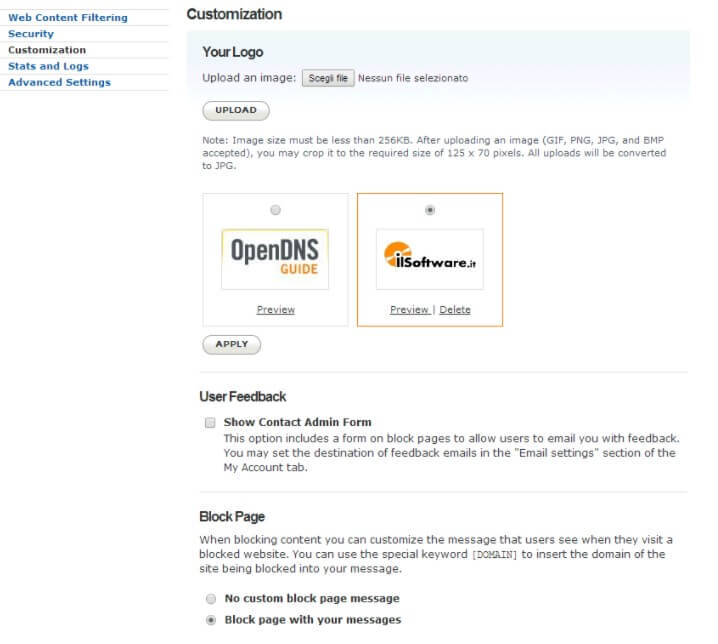
In this section, it is possible to replace the OpenDNS logo with one of your choices, hide the message that allows the user to send an e-mail to the administrator ( Show contact admin form ), modify the texts displayed web should be blocked.
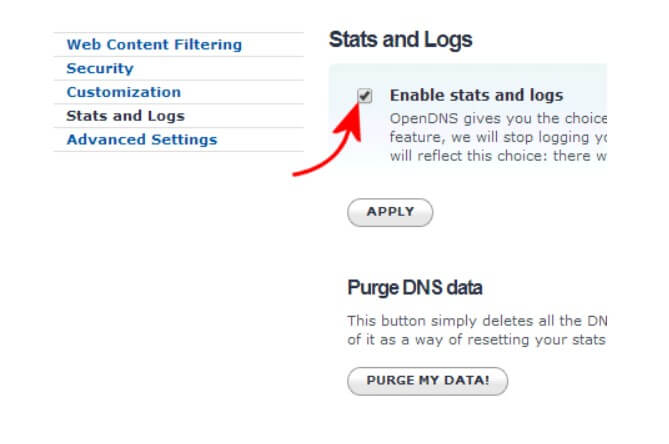
5) To check which websites are visited by systems connected to the local network, it is essential to access the Stats and logs section and activate the Enable stats and logs box.
6) If a static IP address is not used (Telecom Italia, for example, provides a static IP only for business connections [1] ), it is necessary to access the Advanced settings section and check that the Enable dynamic IP update box is checked.
Furthermore, it will be necessary to make sure that the router or a system connected to the local network automatically informs OpenDNS on the IP assigned from time to time by the Internet provider (dynamic IP.
7) Some routers allow you to activate the DDNS service about OpenDNS, No-IP, and DynDNS (see also Creating a static IP with DynDNS: you can, and it’s free ). By accessing the router’s administration panel then using the section Dynamic DNS and Dynamic DNS, you should test if one of the services supported will also OpenDNS.
If so, simply enter the OpenDNS username and password so that the router communicates the IP used each time at each connection.
Alternatively, you can use a free program such as DNS-O-Maticwhich, once installed on a system connected to the local network, is responsible for informing OpenDNS (and other services, if necessary) about the IP dynamically assigned by the provider.
Again, as a third alternative, it is possible to use a simple script that – without installing anything on the system in use – provides (from the command line) to inform OpenDNS about the IP used at every single connection.
The mechanism, compatible with all Windows systems, can be downloaded for free by clicking here.
After extracting the archive contents to a folder of your choice, you will need to open the opendns.bat file with a normal text editor (such as Notepad ).
In correspondence with the following line, it is necessary to enter the personal email and password for access to OpenDNS as well as the identification label of the network, as configured on OpenDNS:
wget –user EMAIL –password SOSTITUIRE_PASSWORD https://updates.opendns.com/nic/update?hostname= OFFICE –no-check-certificate -O opendnslog.txt
Double-clicking on the batch file to OpenDNS will be notified immediately of the IP address in use.
The advice is obviously to automate the batch file’s execution by inserting a link to this file in the Windows Startup folder or by scheduling it to start with the Scheduler tool.
Configure clients to use OpenDNS
As the last step, you will need to access the administration panel of the router and change the default DNS servers replacing them with those of OpenDNS:
208.67.222.222
208.67.220.220
In this way, whenever a client system connected to the LAN will request the assignment of an IP address local, the router will indicate the use of OpenDNS DNS servers.
However, it is advisable to check the DNS servers’ configuration on the individual machines connected to the LAN to verify that the use of alternative DNS servers is not set. In this case, you will have to request the assignment by the router or replace them manually with those of OpenDNS.
The same is true in Android devices and any other mobile device.
Check the list of sites visited by the local network (also by WiFi)
After making the appropriate substitutions of the DNS servers, on the router and/or on specific client machines, it will be necessary to wait from 2 to 12 hours for users to begin to appear in the administration panel of the OpenDNS account.
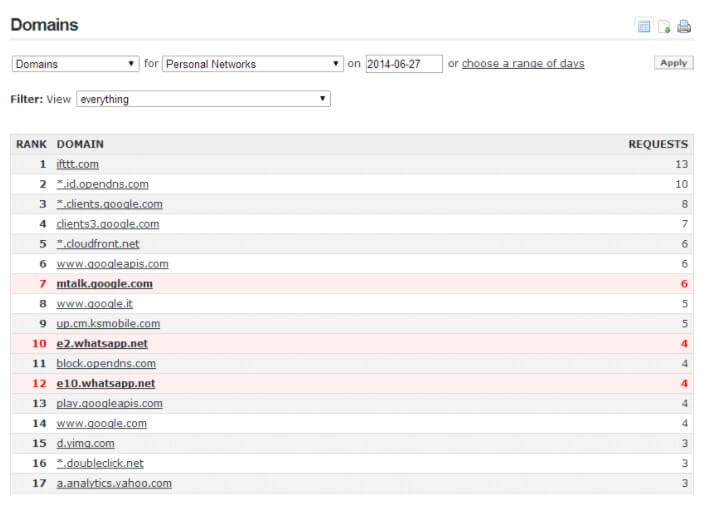
By clicking on the OpenDNS Stats tab and then on Domains, you will get the list of sites visited by the local network or the systems configured to use OpenDNS DNS servers.
By accessing the Blocked domains section, you can get the list of domains blocked by the OpenDNS servers.
For more information, we suggest you refer to this FAQ.
——————-
[1] Important note: those who use a Telecom Italia business connection may not be aware that it is possible to exploit the static IP made available by the provider on a contractual basis also with routers other than the “standard” ones, generally offered for hire or on loan for use by the company. Just follow the instructions that appeared in this old “post”.
Incidentally, it is no longer necessary to specify the first 13 characters (MAC address followed by the – character) of the username reported in the post.
Alternatively, you can use [email protected] as the username and, again, [email protected] as the password.

A tech-savvy writer with a knack for finding the latest technology in the market, this is what describes John Carter. With more than 8 years of experience as a journalist, John graduated as an engineer and ventured soon into the world of online journalism. His interest includes gadget reviews, decoding OS errors, hunting information on the latest technology, and so on.
 Extender for Their Networks")


 Extender for Their Networks")


