Is it showing PS4 Internet Connection Failed? Then, you will face frequent disconnection and lags while playing games. You may think that it is happening due to disruption in internet connection. However, the matter can be more than that. For this you can check if your other activities on the internet are working fine, then you need to take some steps. Therefore, these are some important solutions that can help about how to change NAT Type PS4. Please below to read thoroughly and apply them.
What is the Meaning of NAT Type?
First of all, NAT is the abbreviation of Network Address Translation. It is basically a method in which the network device helps set the IP address for every device present in the same network. Also, the NAT type helps in lessening the IP addresses into a single private network.
Therefore, NAT Type also has its advantage. One of the crucial advantages of NAT is that it helps in hiding the IP addresses in the private network. In this way, it keeps the network protected from any data breach.
Hence, the NAT Type is an efficient solution for internal connections. These include checking inbox, internet surfing, game joining, etc. Also, the data flow will be consistent as the connection starts from the internal network.
Moreover, it is not simple when there is an external connection. It mainly happens that the Router cannot identify the IP address from the internal connection. Some of the external connections are multiplayer activities, multiplayer games, and many others.
Steps for Checking the NAT Type on Your PS4
Hence, you can easily check the NAT type on your PS4 within simple steps. For that, follow the below steps.
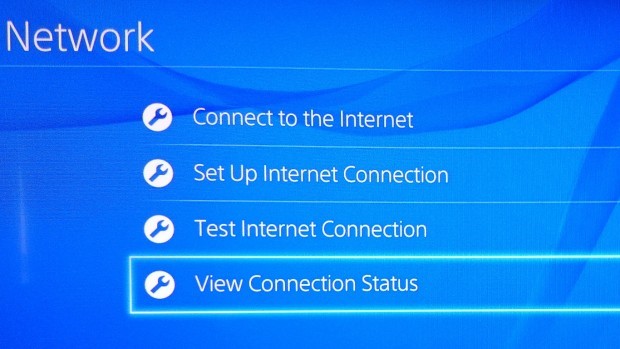
- Open the Settings on your PS4.
- Then, you have to open the Network and then go to the option to view the connection status.
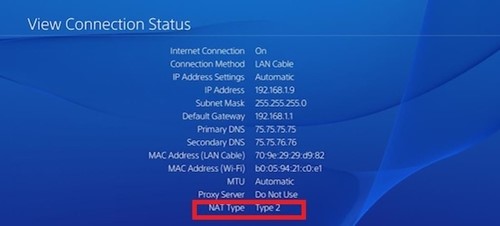
- After it completes, you will see the NAT Type below.
Hence, once you know to locate it, you can easily change and understand how to change NAT Type PS4.
What are the Different Types of NAT?
Several NAT types can help you set in your network. Have a look at them below.
Type 3 Strict
The NAT Type is set on 3 if you are facing a problem while playing an online game on PS4. It can mean that the gaming console is past the firewall and Router. Also, no one is able to connect with you if you can connect with them. Hence, in this setting, you cannot host any online game.
Type 2 Moderate
Secondly, the Type 2 settings of NAT provide the right balance of connectivity and security in PS4. In this setting, the device is kept behind the route. In this way, it receives external connections. You can download any kind of file through internet and play online games easily. Hence, you don’t have to worry much about the security.
Type 1 Open
The Open system of Nat Type provides the best experience for gaming. However, it will open the connection completely. Hence, it defeats the main reason to have NAT, i.e., providing security. Therefore, if you don’t want your connection to be vulnerable to online gaming, then you must avoid this.
Steps to Check the NAT Type PS4
Before applying the solutions, you have to check if the NAT Type is working or not. For that, you can follow these steps.

- Firstly, you have to turn on the PS4 and then go to the option of “Settings.”
- Secondly, you have to select the “Network.”
- Now, open the option for viewing the status of your connection
- The next step is to wait until it is complete. After that, you have to find the option of NAT type at the screen’s bottom.
Lastly, you have to write the Default Gateway and IP Address. This is required when you need to change the NAT Type.
Easy Solutions on How To Change NAT Type PS4
You must know that you can’t modify NAT Type through a direct process. Hence, for that, you need to change your Router’s options. Also, the steps can vary depending on the type of Router you have. Therefore, you can easily find the router type by a quick search on the internet.
So, are you finding the “PS4 Internet Connection Failed” option? The below solutions can help you.
Forward the Ports
This is one of the safe methods that you can apply if you find PS4 Internet Connection Failed. Follow these easy steps to do it successfully.

- Go to the settings of your Router and search for “forwarding points.” Its name will depend on the type of your Router. Thus, it can be “Post Forwarding” or “Virtual Servers,” etc.
- Now, you have to enter the forwarding points.
- The types (UDP or TCP) and numbers that you have to add are 443 (TCP), 80 (TCP), 3480 (TCP), and 3479 (TCP). After that, you have to provide an IP address and name to every port.
- Lastly, click on the option to confirm.
Hence, check if this solution has fixed the problem of PS4 Internet Connection Failed.
Put the PS4 into DMZ
Secondly, the DMZ is the network that resides between the home network and the secure network. So, your device can easily receive connections from outside. However, it will be at the risk of data theft.
- These are simple steps to know how to change NAT Type PS4.
- Firstly, open the settings of your Router and open the DMZ settings.
- Secondly, enable the DMZ and then type the IP address of your PS4.
- Thirdly, remember to save the modifications.
After that, restart your PC and open the settings of the PS4 to check if the steps are successful.
Restart The Network Connection or PS4
If you are still facing the error of PS4 Internet Connection Failed, then restarting the PS4 network is best. This will help in removing anything that is keeping this error to appear. Along with that, you can also try to reset your modem as well as Router. Moreover, if it doesn’t work, you can proceed to another solution.
Set the Network Connection of Manually
Furthermore, you can set up the network connection manually to solve the error of PS4 Internet Connection Failed. These are the steps that can guide you.
- Firstly, you have to open the Settings of your PS4 and then select “Network.”
- Secondly, select on the option for viewing the status of your connection. Now, node the IP address on a paper.
- Thirdly, you have to press the Windows key on the keyboard along with R. After it opens, type “CMD.”
- Now, you have to type this- “ipconfig/all” in the menu. You will get various information, and you have to note the subnet mask, DNS server, default gateway, and IP address.
- After that, go to the PS4 and open the Settings option. Next, you have to find the option to set up the internet connection and Network.
- Select the internet connection type such as LAN or Wi-Fi.
- You have to select the option called “Custom” from the next menu. Hence, here you have to enter the information regarding your network which you wrote.
- Lastly, select the option of “Don’t Use” for Proxy Server. Now, wait for some time until it processes.
After that, check if you have successfully corrected the error of PS4 Internet Connection Failed.
Enable the UPnP for the Router
The full form of UPnP is “Universal Plug and Play on the Router. It is used for allotting the open ports to avoid the custom ports for forwarding on your network router. Understanding UPnP is simple. From here, your PS4 will request the port from the Router.
However, one significant drawback of this step is that it will not allow other networks to connect. So, follow the steps to start the UPnP feature.
- Open the web browser on your system.
- Now, type the address of Default Gateway in the search bar.
- Thirdly, you will have to log in for the router interface to open. For that, enter your Id and Password and then press Enter. Hence, this step will open the admin panel of your Router.
- Additionally, you have p navigate UPnP feature and then click on it to enable.
Hence, make sure to restart the game after every step. Then, start your game on your PS4 to check if you have solved the error of PS4 Internet Connection Failed. Now, you will also see no more lagging in your game. So, now you can fix this problem on your own without much hassle.

With 4+ years of experience working as a journalist, Ford Pascall has gathered ample knowledge and skills in the tech reporting domain. I’m someone who chases after everything new in the tech world and is a perfectionist when it comes to technical reviews.


