To extend the Windows screen it is possible to use the cable, connecting the VGA / HDMI outputs of the computer to another screen or TV.
Alternatively, you can use Miracast, a bit of the “wireless equivalent” of the HDMI cable.
However, using Miracast is impossible on all computers: it may depend on the WiFi card and/or the video card.
Once you have verified Miracast support, you will be able to use the Windows + K key combination to identify the device on which to share the screen.
Use Chromecast to extend the screen
In the article Connect PC to TV, how to do with Chromecast and Videostream, we have seen different possible uses of Google’s HDMI stick, Chromecast precisely.
Let’s add more meat to the fire by presenting a simple gimmick that will allow everyone to extend the Windows screen to a TV using the Chromecast stick.
Using Chromecast, you can extend the Windows screen without resorting to Miracast, therefore even on systems that do not support this technology.
Chromecast, as you know, allows you to stream your Windows desktop. This is an experimental function, but it performs very well.
By “cleverly” using this feature, you can extend or duplicate your screen.
The procedure we illustrate refers to Windows 10, but it can be applied without problems even with Windows 7 and Windows 8.1:
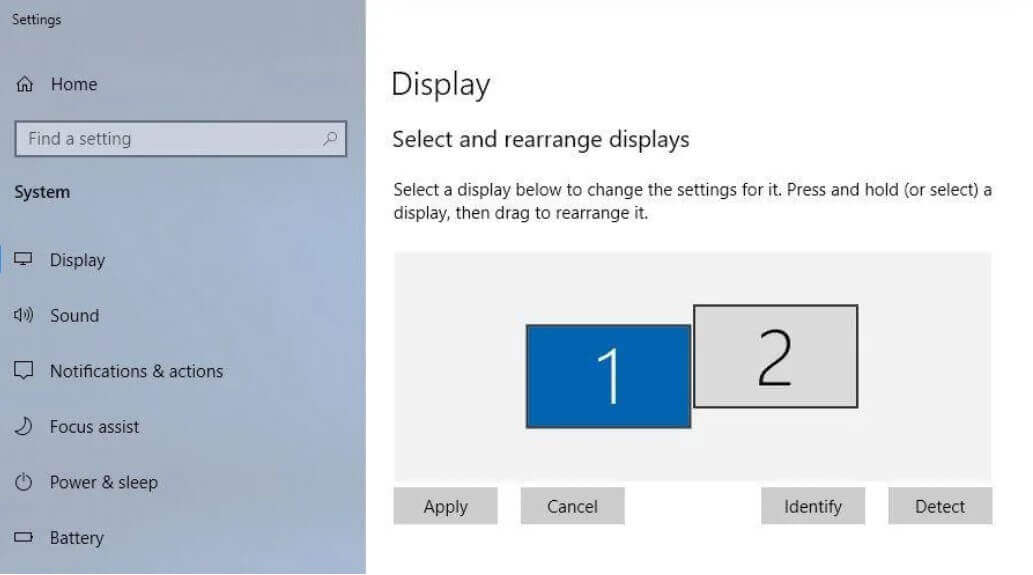
1) Right-click in a free area of the desktop and select Display settings
2) When the following screen appears (or similar), you will have to click on Detect
3) Windows will show a box with the indication Screen not detected
4) After clicking on Screen not detected , you will have to go to the drop-down menu More displays and choose Try to connect anyway on: VGA .
5) You will have to ignore the message. If you try to connect, the other changes made to the display will not be saved (or similar warning messages), and press the Apply button.
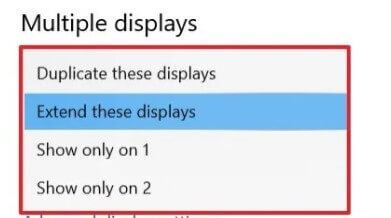
6) From the More screens menu, it is now necessary to choose the item Extend these screens and click Apply again.
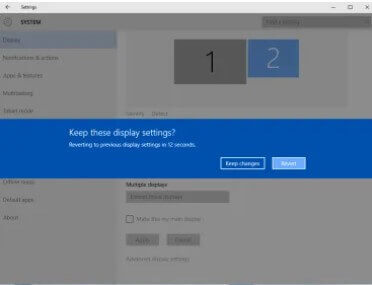
7) When the message shown in the figure appears, click on Keep changes.
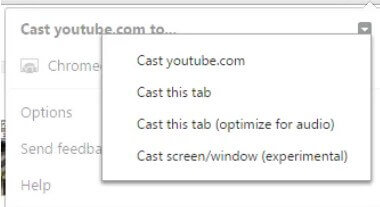
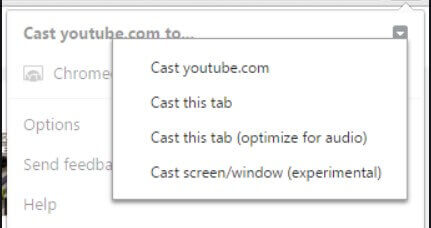
8) At this point, you can open Chrome, the Google browser, then click on the button displayed in the browser toolbar.
9) By clicking on the arrow highlighted in the figure, you will need to select Cast screen/window, then select the Chromecast key connected to the TV and, in WiFi mode, to the same router.
10) From the screen that will appear later, it will be necessary to select screen number 2 to activate the extension of the Windows system display on the TV to which the Chromecast key is connected.
11) After clicking on Share, you can try to drag any window from the Windows desktop to the right, beyond the “physical” screen of your computer: you will immediately see it appear on the TV screen.
By always acting on the Google Cast icon of Chrome, it is possible to interrupt the transmission and, therefore, the sharing of the computer screen.
Eliminate the additional screen
If at a later time, you want to delete the additional screen just added in Windows, you will have to follow some simple steps:
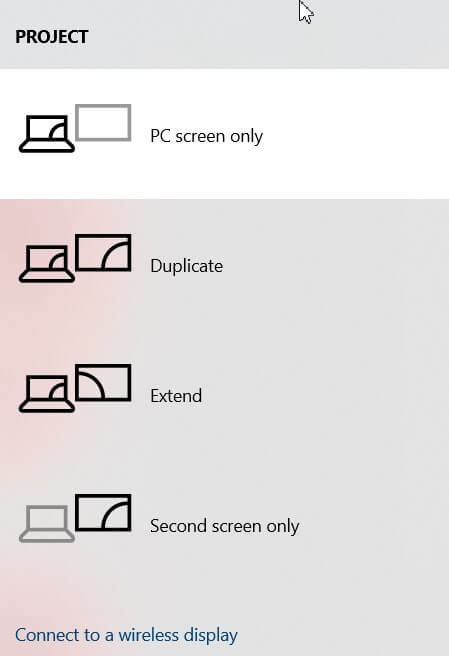
1) Press the key combination Windows + P
2) Choose PC screen only
3) Restart Windows
4) Go to Control Panel and click on Display
5) From the left column choose Change display settings
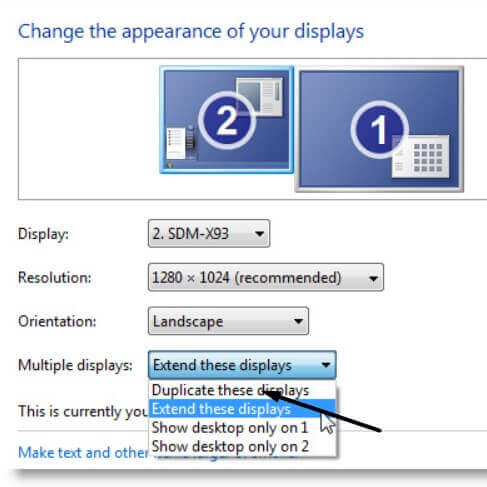
6) When the window shown in the figure appears, click on screen number 2 (the one added previously), then select Remove this screen from the Multiple screens drop-down menu.

A tech-savvy writer with a knack for finding the latest technology in the market, this is what describes John Carter. With more than 8 years of experience as a journalist, John graduated as an engineer and ventured soon into the world of online journalism. His interest includes gadget reviews, decoding OS errors, hunting information on the latest technology, and so on.


. What are the news of the new format for images")


. What are the news of the new format for images")

