After updating your iPhone, you will most likely find notifications frequently popping up requiring you to approve your device. You can approve your iPhone in many ways. This article will help you discover the easiest and most effective ways of approving the iPhone.
Solving the Keychain Problem to approve your iPhone
A keychain will usually require you to approve your iPhone while following these steps:
- Start by turning off iCloud Keychain both on your MacBook and iPhone
- From the iPhone, go to Keychain and click “Approve With Security Code.”
- You will be prompted to key in the 4-digit iCloud Security code. Click on “Forgot code.”
- Follow all prompts so as to reset the code.
- Then, your device ought to have an enabled and working iCloud Keychain.
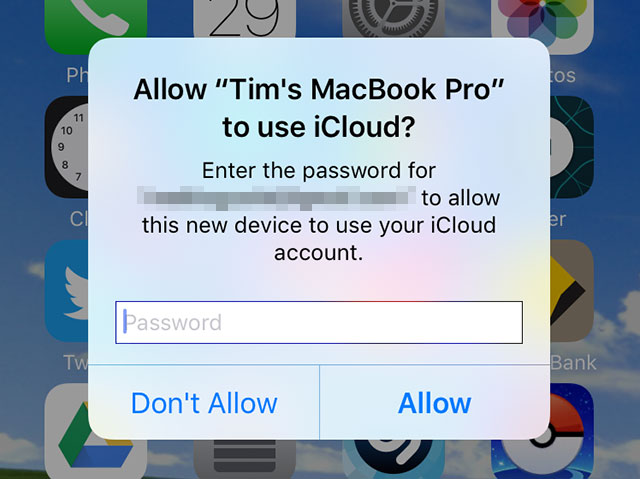
- Enable iCloud Keychain from your MacBook.
- You will get a notification on your phone about this on the prompt key in your iCloud Password.
Your Keychain will be enabled after this.
We hope that those steps will keep all device notifications away from you. Ensure that you have a passcode setup both on your iCloud setup and your MacBook. If you have not set one up, you could try approving the iPhone again, and this will most probably make your iPhone work. Below are other options of approving your iPhone device.
How can I Approve my iPhone I do not Have Other Devices?
It is possible to find a message requiring you to approve your iPhone after upgrading to the latest iOS, even if you do not have other devices. However, this is not an attempt of Apple forcing customers to own more than one device. You will also be likely to get messages like “Can’t Approve this iPhone”, and warnings that the only way you can proceed would be by resetting all your iCloud information. Well, we bet that is not something you are ready to do. However, there is a way to go about this.
Most probably, there are devices logged in to your apple account that you are unaware of, and this could be the reason why you are required to approve your phone. Use any device to log in to your Apple account, and on settings, check if there are any devices linked. Disconnect or remove those devices and your problem will be solved in a whim.
Approving IOS device From another IOS device on iCloud
Approving an iPhone on iCloud is quite similar with approving with a Mac.
- Hit the settings buttons of your iOS device and then choose “iCloud”. Key in your iCloud ID followed by your password.
- You will receive an Apple ID verification code from the other iPhone. Key in those 6 figures.
The main difference when it comes to approving a Mac on iCloud is that once you key in the verification code, you will be required to enter the iPhone passcode also, and once that is done, then you completely approve the iOS device on iCloud.
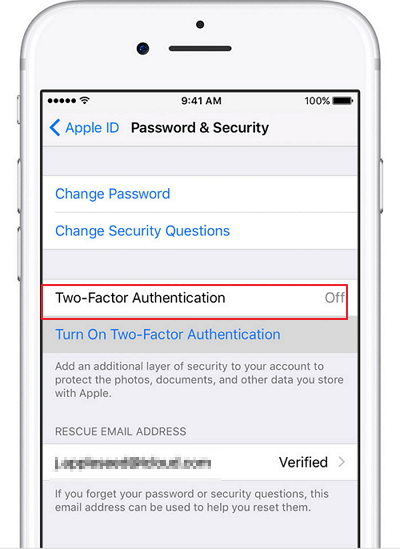
Approving an iPhone through the Two-Factor Authentication
The problem with your iPhone approval could be linked with Apple’s Two-Factor Authentication. And actually, many people have solved this by turning off the authentication.
But this might not always work for you since a lot of iPhone users cannot use the two-factor authentication across accounts created in 10.12.4 MacOS sierra, IOS 10.3, or later operating system versions. If you created your Apple ID in MacOS or an earlier version, it is easy to turn off your two-factor authentication.
To turn off the two-factor authentication:
- Hit the “cancel” button to see the screen that pops up requiring you to approve the phone.
- On the iPhone, go to settings, key in your Apple ID and passwords, and choose the Two-Factor Authentication.
- Click “Turn Off The Two-Factor Authentication”. In the process, you will have to reset all your Apple ID details including the iCloud and iTunes password. Fortunately, there will be no date deleted on this, and once you get the authentication email notice, you will see a link of disabling the authentication on email.
- After you have completely turned off the two-factor authentication, try approving your phone by going to settings. Your iPhone will be approved automatically and immediately without doing anything.
How to approve iPhone from a Windows Computer
From the tips above, it’s clear that you can approve your iPhone from any device so long as it accesses your iCloud, and this includes a Windows computer. Refer to our “how to approve an iPhone from other devices” above and follow the exact steps to approve it from windows. But how do you set up and easily use iCloud for Windows? Read on to discover.
With a Windows iCloud, you can automatically update documents, photos, and bookmarks of your computer on all your Apple devices.
What You Need
Before downloading iCloud for windows, it is imperative that you start by setting up an iCloud account on your Apple device(s). It is easy to sign in to iCloud using your Apple ID.
Setting up iCloud for Windows
- On your PC, download iCloud for Windows. In case it fails to install, open the setup on file downloads automatically.
- Restart your PC
- Ensure your windows is open and if it fails to open automatically, open the iCloud, go to Start, and then open Apps or programs
- Key in the Apple ID you have signed in to cloud with
- Select the features and content you intend to keep updated/synchronized on all your devices
- Hit the “Apply” button.
How to uninstall or Turn off iCloud for Windows
Once you turn off an iCloud service in windows, your information will no longer stay up to date automatically on iCloud, and you will also not view any updates that your other Apple devices have made.
To turn off an iCloud service on your PC, open your iCloud for windows, and then deselect the service you intend to turn off. Save those changes and press Apply.
You can turn off your iCloud for windows by signing out.
Before you uninstall the iCloud for a windows application, be sure to make a copy of all your data in iCloud and save it on the PC. Then, sign out on the Windows iCloud and uninstall the program. To uninstall:
- Choose “Control Panel” on the start screen of your PC,
- Go to programs and features,
- Choose iCloud
- Click “Uninstall” and confirm all the prompts until it is completely uninstalled.

Denis is an article/blog and content writer with over 7 years of experience in writing on content on different niches, including product reviews, buyer’s guide, health, travel, fitness, technology, tourism. I also have enough experience in SEO writing.


