Truths and myths regarding SSD optimization in Windows.
Replacing the old magnetomechanical hard disk with a brand new SSD is the best you can do to give life to a PC that is beginning to feel the years’ weight. Buying a new system today – both desktop and notebook – should always make sure it has a solid state drive as its primary storage medium.
The SSD will house the operating system, while the hard disk, configured as a secondary storage unit, will house the data.
In the article Hard disk or SSD,
– Move OS to SSD
– Move Windows 10 to SSD and clone hard drive with Todo Backup
– Replace hard drive with SSD, how to do it without reinstalling everything
– Install a second hard drive: why and how
Optimizing an SSD in Windows: Dos and Don’ts
On the web, hundreds of very similar guides explain how to optimize SSDs by lavishing advice that would increase the performance and life of solid-state drives with Windows systems.
Let’s say right away that many of those tips are, in our opinion, useless and sometimes even counterproductive .
Modern SSDs are far from fragile: as mentioned on other occasions, now the number of writes – Achilles heel of the first SSD models – is no longer a problem.
The enemies of SSDs, especially regarding the integrity of the data stored in them, are rather a the working time and temperature: Is the duration of SSDs a parameter to worry about?
Therefore, the number of writes is certainly not so much so that several parties carried out during the stress tests; it was possible to verify how the most recent SSDs begin to present problems only after having largely exceeded the TBW value ( Terabytes written) declared by individual producers.
Years ago, The Tech Report put several SSD models to the test with very encouraging results.
Since then, there has been talking of “petabyte club” to explain how all the SSDs examined allowed the writing of an enormous amount of data before starting to present malfunctions: up to a petabyte, equal to 1,000 terabytes.
A little recently, the Germans of c’t / Heise reached the same conclusions after a long and detailed test that tested 12 of the most popular SSDs available on the market.
Windows already knows how to optimize SSDs
One of the things Windows does best is recognizing and properly managing SSDs.
Apart from the problems that occurred at the time of the release of the Windows 10 April 2018 Update with some models of Intel and Toshiba SSDs, then fixed, the Windows OS already knows how to optimize SSDs.
If in Windows XP and Windows Vista, it was necessary to manually activate the TRIM command for SSD drives, starting with Windows 7, this is the default.
The support of the TRIM command by the operating system is fundamental because it allows you to indicate the memory blocks no longer in use in an SSD (think of the blocks freed after the deletion of one or more files).
TRIM allows you to pass the indications on the data blocks to be deleted to the SSD controller: it will then be the controller, based on the “recipe” contained in the firmware , that proceeds subsequently and with its times to their effective removal.
On Windows 7, Windows 8.1, and Windows 10 systems, by opening the command prompt and typing the commandfsutil behavior query DisableDeleteNotify you will get the value 0 confirming that the operating system correctly supports the TRIM command.
In the case of Windows 10, which also supports the new ReFS file system, you will get a double indication 0 (for the NTFS file system and ReFS).
There is no need to disable defragmentation for SSDs as many recommend: Windows perfectly recognizes solid-state drives, and the indication about the last run should not be understood as traditional defragmentation.
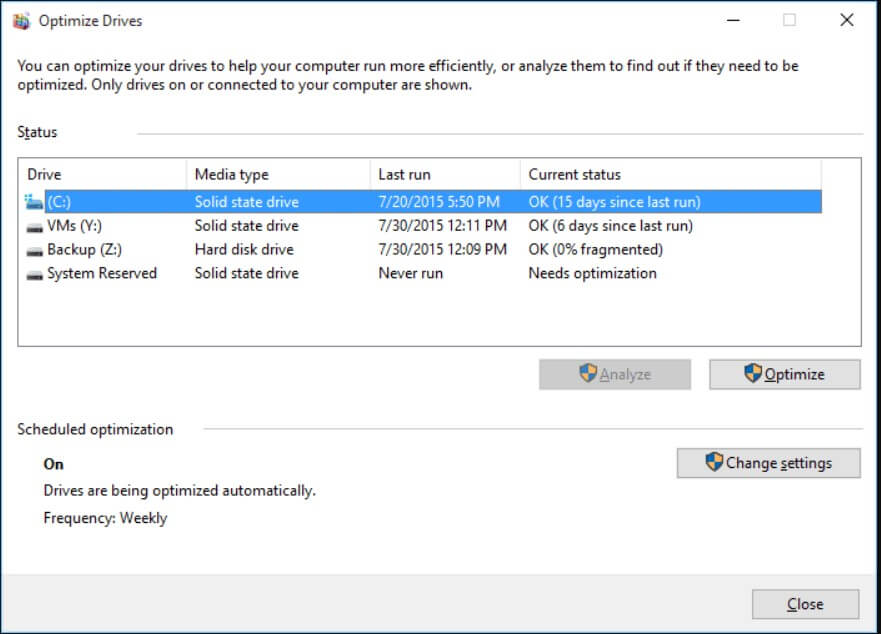
As Scott Hanselman (Microsoft) also explained, the optimization carried out by Windows in SSDs is not defragmentation in the strict sense that is usually carried out at most once a month. Most often, a retrimming is performed: SSD defragmentation: what happens in Windows.
Also, in Windows 8.1 and Windows 10, the operating system automatically deactivates the SuperFetch feature, leaving it active only for the slowest mechanical hard drives. The same operation is also performed in Windows 7, with the only difference that in the case of SSDs, deactivation occurs only for the fastest drives.
It is not recommended to disable the paging file – the number of writes, as mentioned, is no longer an issue – or, for the same reason, the System Restore feature: System Restore still exists: how it works.
Much less, the hibernation function should not be disabled at all, which – also thanks to the performance of modern SSDs – allows you to quickly restore the system configuration by returning it to the state it was in at the end of the previous work session.
Windows indexing must also be kept active ( Windows Search service ), which allows you to instantly locate the information contained within the files. It is also very useful in the case of SSDs and further improved in the Windows 10 Update of May 2019.
The advice to never “fill” the SSD drives, always leaving a few gigabytes of free space (typically 10-20% of the total capacity) is instead good even if it has little meaning (if not to allow the correct download and applying Windows updates; for paging file management and hibernation…) on SSDs that already use overprovisioning.
L ‘ over-provisioning , which consists of reserving a portion of available memory on the SSD for the operation of the controller (invisible then both users to the Operating System), is already provided for in the case of many models of unity in solid-state and prevents the ‘eventuality that the user can fill the SSD itself.
The difference between the SSD capacity declared by the manufacturer (also derived from the model name of the drive: press Windows + R then type devmgmt.msc and double-click on Disk drives ) and the one detectable in the Disk Management window ( Windows + R, diskmgmt.msc ) by examining what is reported in the first block on the left (under the name Disk 0 or Disk 1 ), it is precisely the amount of memory destined for overprovisioning .
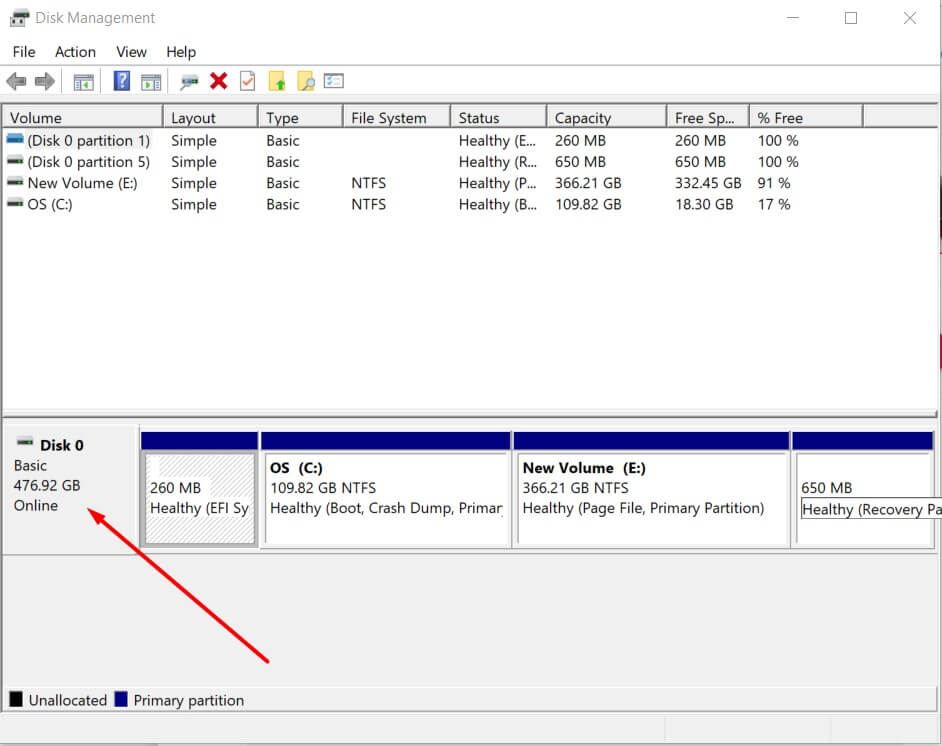
To verify that you have examined the correct SSD, just click on Disk 0 or Disk 1 and then choose the Properties item: you will be able to check the “identity” of each drive.
Check the alignment of the solid-state drives
On the other hand, a very useful operation to optimize SSDs by extending their life and improving their performance is instead to check the alignment of the first partition contained in the drive to ensure that a data sector begins exactly at the beginning of a “physical page. “.
If an SSD is not aligned, the sector can exceed the page’s limits and lead to having to perform an additional write for each write with the consequent reduction in performance.
The misalignment occurs mostly when moving the contents of an old hard drive to a new SSD.
In the SSD Alignment article, what it is and how to check it, we have explained how to check the alignment (a very simple operation since it is enough to use the msinfo32 system utility ) and solve it with partitioning software.
Utility to know the health status of SSDs
Interesting utilities that check the health conditions of SSDs and express themselves on the life expectancy of each drive are SSD Life and CrystalDiskInfo.
For the rest, there are the utilities developed and distributed by the various SSD manufacturers: Samsung Magician, Intel SSD Toolbox, SanDisk SSD Dashboard, Corsair SSD Toolbox, Kingston SSD Toolbox, OCZ SSD Utility, Crucial Storage Executive, and so on.
These programs allow you to update SSD firmware, launch diagnostic tools, request secure erasing of data (see also Secure Erase and SSD: what it is and how it works ).
When an SSD can be called slow
The traditional SATA interface in the most recent version, known by the name SATA 3, allows reaching a theoretical speed in the data transfer phase up to 6 Gbps.
The fastest SATA SSDs allow you to transfer up to 560 MB / s in the case of the most recent models, and 600 MB / s is considered the physical limit of the interface (at most, in optimal situations, today you can push up to 575MB / s).
Most modern PCIe 3.0 x4 SSDs can theoretically handle up to 4 GB / s, which is eight times more than a traditional SATA SSD.
Beware of available RAM on your system and high activity on the solid-state drive.
A system equipped with little RAM or in which the free memory is reduced to a minimum will highlight performances that can also be considerably lower than the optimal conditions.
We also suggest always check the system status by using the Windows Task Manager: despite the bandwidth of a SATA3 or PCIe 3.0 x4 SSD is considerably greater than that ensured by a traditional hard disk, intensive reading operations/writing can cause noticeable slowdowns.
In the article Windows 10 Task Manager: what it allows you to do we had published a guide to the Task manager while in the deepening Check which programs are writing to disk we had seen how to determine when there was a problem due to significant I / O operations on the SSD.
Performing a “clean boot” of the operating system can help avoid the loading of any program resident in memory to evaluate its impact.
Check the status of the file system
Significant performance drops can also be due to file system corruption: they can occur in various situations, for example, following the sudden shutdown of the machine in use.
Using the chkdsk utility, you can detect any problems at the file system level (use the chkdsk / f syntax to correct them).

A tech-savvy writer with a knack for finding the latest technology in the market, this is what describes John Carter. With more than 8 years of experience as a journalist, John graduated as an engineer and ventured soon into the world of online journalism. His interest includes gadget reviews, decoding OS errors, hunting information on the latest technology, and so on.


. What are the news of the new format for images")


. What are the news of the new format for images")

