Guide to Windows To Go, a little known and partially set aside feature by Microsoft that still allows you to install Windows on a USB drive or external media and run the operating system directly.
Windows To Go is a feature that Microsoft debuted in the Enterprise edition of Windows 8 that allows you to run the operating system from a certified USB stick or external storage media. With the launch of Windows 10, Windows To Go was also brought into the Pro edition of the operating system, albeit with some limitations.
Starting with Windows 10 May 2020 Update (version 2004 and later), Windows To Go has been removed from the operating system.
In a support document, Microsoft explains that “the feature does not support feature updates and therefore does not allow you to keep up to date. It also requires a specific type of USB interface, which many OEMs no longer support.
Windows 10 feature updates might also be overlooked because an operating system running from a USB stick or external drive will not be used for production purposes. But typically as an emergency boot support.
However, Microsoft must have deemed the requirements to install Windows 10 on USB and run the operating system directly from this support too stringent, preferring to withdraw the functionality rather than negatively affect the user experience of users.
What’s the use of having Windows on a USB stick or external SSD
The possibility of installing Windows on a sufficiently performing USB stick or an external SSD brings with it several advantages. You can always keep a complete and perfectly functional operating system in your pocket, which can be loaded at boot on desktop and notebook PCs, which can be used for backup purposes (however, remember that the internal drives of the PC will not be accessible) or to use your own devices quickly and without restrictions—data stored on the storage medium.
By developing Windows To Go, Microsoft has drawn inspiration from the philosophy of “live” Linux distributions, which – since the dawn of time – allow you to start any machine by “bypassing” the boot of the installed operating system.
How Windows To Go works
The official “recipe” that Microsoft proposed for the preparation of an external USB support based on Windows To Go consisted of using a certified USB key. Windows To Go certified USB sticks are few and very expensive; furthermore, they must appear as local “fixed” storage units and not external storage devices.
Try connecting a USB storage drive and running the following command at the prompt:
wmic logicaldisk get caption, drive type
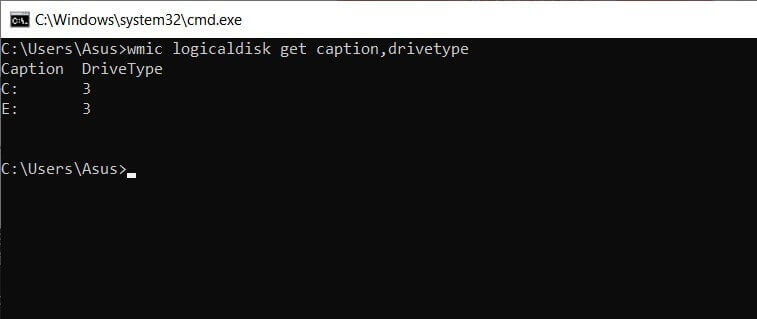
You will see numbers next to each drive identification letter. Here is the meaning:
0 Unknown
1 No root directory
2 Removable drive
3 Local drive
4 Network drive
5 Optical drive or image file mounted in Windows
6 RAM Disk
Some storage devices that cannot be used with Windows To Go are removable drives (2) and not as local drives (3).
It must be said that it is possible to use some simple tricks to overcome the limitation imposed by Microsoft and use USB sticks and other external drives that offer adequate guarantees in terms of performance even if they are not certified. A product that works very well is, for example, the Corsair Voyager GTX 3.1 USB 3.1 USB stick that allows you to transfer up to 440 MB / s in read / write.
By simply typing Windows To Go in the search box of Windows 10 Pro, Enterprise, or Education ( this can still be done today only in versions of Windows 10 up to and including 1909 ), you will access a guide procedure that will check the capacity and specifications of the support External USB connected to the system.
As previously mentioned, Windows To Go will not allow the use of drives of less than 32GB capacity and will not allow the use of non-certified products.
To install and run Windows To Go from a USB stick, you will need to download and keep the Windows 10 Enterprise ISO image available.
The Windows 10 Enterprise image can be downloaded from this page after filling out a form.
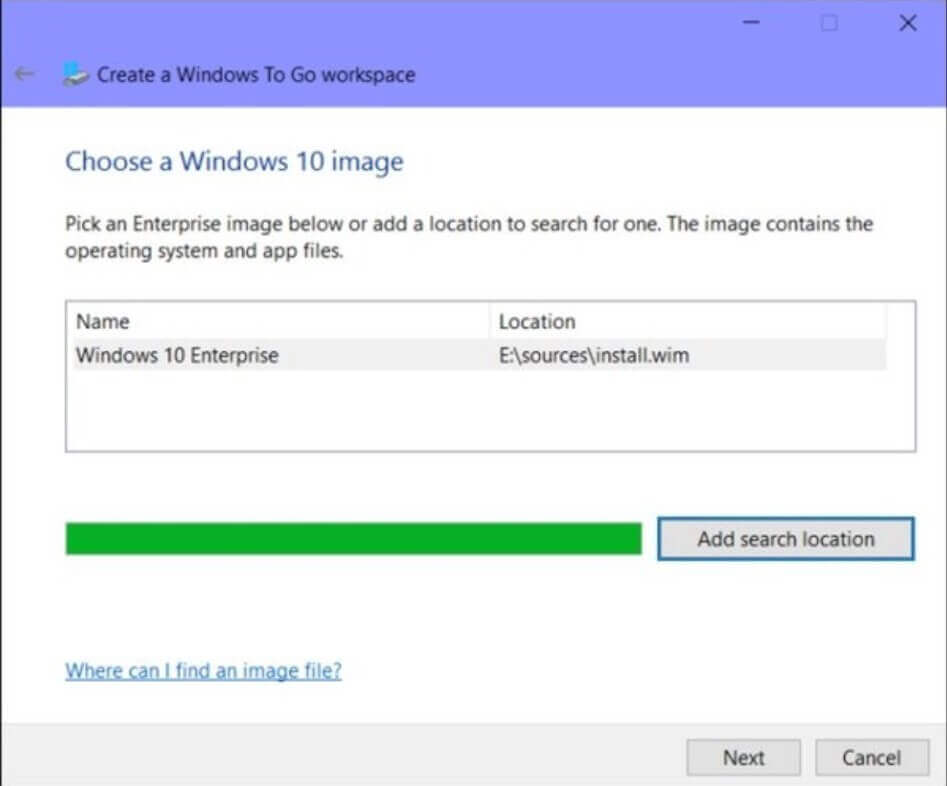
Once the download is complete, you will have to mount the ISO file in Windows 10: just double-click it to access its contents). Windows To Go only supports images.WIM format (not ISO files or other image types such as ESD, used in ISO images downloaded, for example, with the Media Creation Tool ).
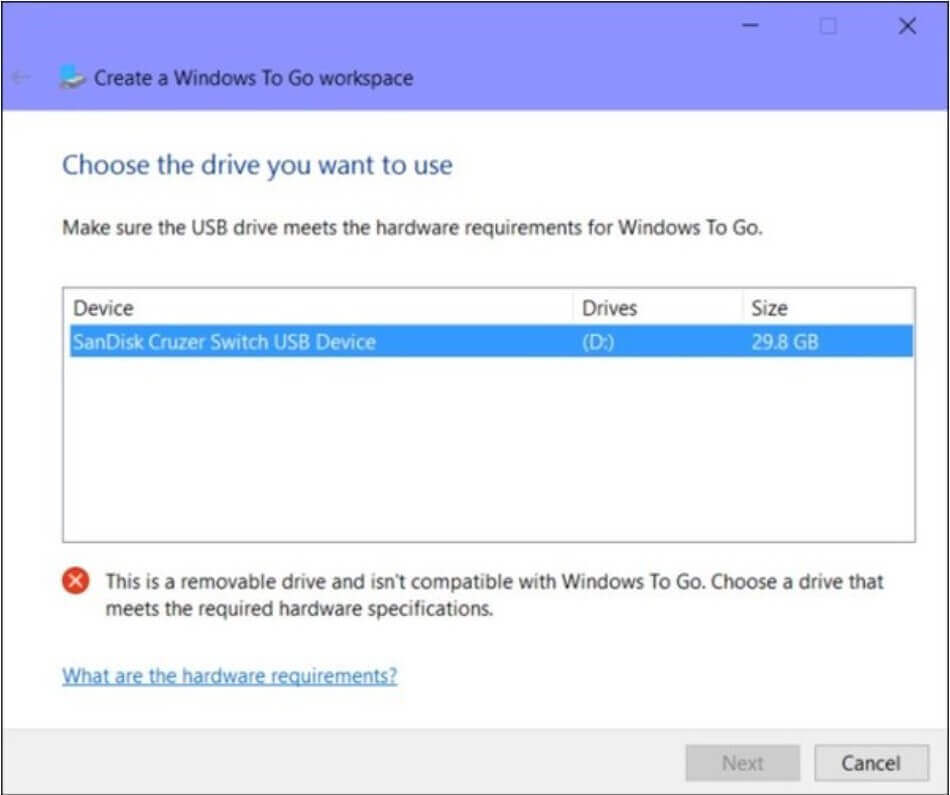
By clicking on Add search path, you will need to indicate the Sources folder contained in the Windows 10 Enterprise ISO file (hosts the install.wim file ).
In versions of Windows 10 after 1909 (press Windows + R then type winter to check which one you are using), the pwcreator.exe file is not present in the % systemroot% \ system32 folders, so it is no longer possible to access the Windows To Go routine.
You can download the Windows 10 version 1909 installation media image (see below).
At the end of the Windows To Go configuration, you can choose Yes and click Save and Reboot to boot from USB.
After rebooting the system, the Windows 10 configuration procedure should start automatically on the USB support to be performed one-off.
Windows To Go, as long as you use the “right” USB media and Windows 10 Pro up to and including version 1909, is probably the best way to enjoy a “portable” installation of the Microsoft operating system.
The importance of choosing the USB storage medium
When choosing a USB key or any other kind of external storage device, we suggest always orienting yourself at least one USB 3.1 products with reading performance not lower than 200 MB / s and writing, possibly, not lower than 50 MB / s ( this stick offers similar performance, i.e., 200 MB / s reading and 30 MB / s writing, for only 19 euros).
It is much better to orient yourself on similar products:
1) SanDisk Extreme Pro USB 3.1 USB stick, 128 GB up to 420 MB / s in reading and up to 380 MB / s in writing (about 50 euros)
2) Corsair Voyager GTX USB stick 3.1 USB 3.1, 128 GB, up to 440 MB / s read and write (approx. 70 euros)
4) Samsung T7 SSD USB 3.2 Gen 2 up to 10 Gbps, 500 GB, up to 1 GB / s in reading and writing (about 85 euros)
When choosing the fastest USB sticks, it is important to focus only on “Gen 1” (5 Gbps ), “Gen 2” (10 Gbps), “Gen 2×2” (20 Gbps), and “Gen 3×2” (40 Gbps): in this way it will be possible to understand the data transfer rates that can be reached as the maximum value. The PC and the port to which the USB device will be connected must also be compatible.
Once Windows 10 is installed on the USB stick or external SSD, Windows To Go automatically loads the best drivers for the machine you are using and deactivates the unnecessary ones.
However, we suggest using Windows To Go only to load Windows 10 from external drives: with some configurations starting Windows 7 and Windows 8.1 presented quite a few problems (including the appearance of blue screens or BSODs). Windows 10 instead offers maximum compatibility in terms of drivers and hardware support.
How to overcome the limitations of Windows To Go and install the operating system on any storage drive
To configure the USB key or external storage drive for installing and running Windows 10, you can use several tools that allow you to overcome the limitations of the Windows To Go wizard integrated into the operating system:
– Rufus. Downloadable from this page in a portable version, Rufus allows you to install Windows on any storage unit from 32 GB upwards.
To proceed, just start the program, select the ISO file of the Windows 10 edition to be made directly bootable from the external drive (the installation media images can be downloaded by following the instructions in the Download Windows 10 ISO article 🙂 then choose Windows To Go from the Image Options drop-down menu.
The important thing is NOT to use the ISO images generated with the Media Creation Tool. Otherwise, they cannot be used to create a bootable Windows To Go
media. Windows 10 ISO files can also be downloaded with the same Rufus by clicking on the arrow to the right of Select and finally on Download.
Then choose the USB disk drive list (otherwise, you will not be able to indicate the USB target drive), MBR as Partition scheme, and the BIOS or UEFI entry in the Target system drop-down menu to make the bootable key compatible with all systems.
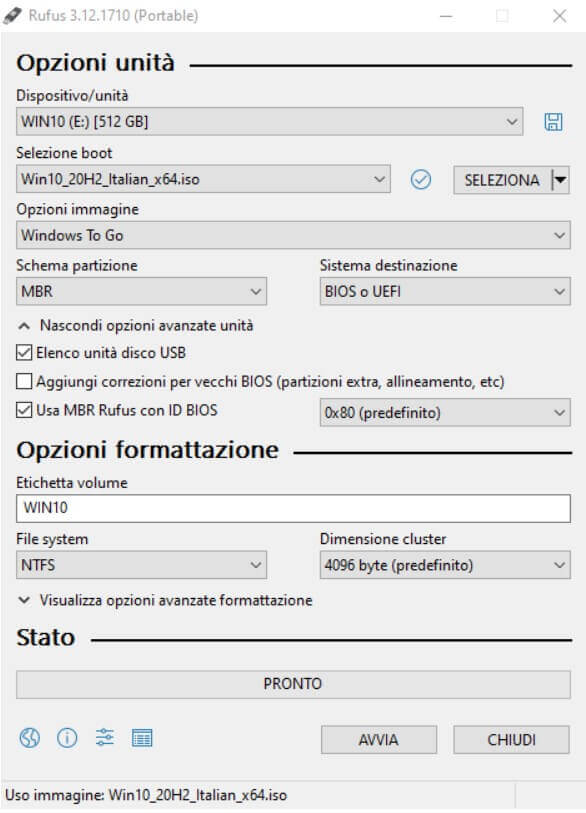
For example, WIN10 can be indicated as the volume label, while as regards the choice of the NTFS file system, it is a mandatory option due to the size of the unit.
Depending on the content of the image in WIM format, Rufus will ask which version of the operating system you want to install on the USB media with Windows To Go.
As soon as the bootable Windows To Go media has been generated, you can boot from its device, ensuring you have correctly set the boot sequence in the BIOS / UEFI. You will also need to temporarily disable Secure Boot, again from UEFI, otherwise booting will not be possible.
The author of Rufus explains the reason for this post on GitHub.
To learn more, we suggest reading the article Rufus, a guide to using the program to create bootable media.
– WinToUSB . Another software we have talked about in the past allows you not only to install the various editions of Windows on the USB stick or removable USB drive but also to clone the current installation of the operating system present on the machine and transform it into a fully functional version from the external unit. WinToUSB also allows you to convert a saved Windows installation to another hard drive (think of a hard drive or SSD disconnected from the source system and connected as external drives).
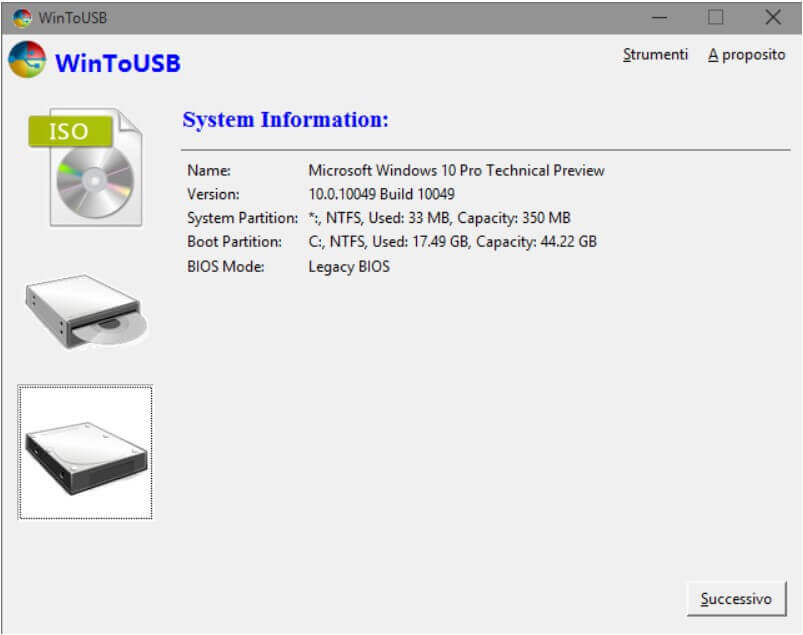
The free version of WinToUSB suffers from several limitations, including installing only the Home edition of the Microsoft operating system on the USB drive.
– AOMEI Partition Assistant. The well-known software for managing hard disk and SSD partitions, also useful for the latter’s alignment, integrates – in the left column – also the entry Windows To Go, Creator.
It will be possible to install and run the various Windows editions from the indicated external drive by clicking on it. For this purpose, it is possible to use image files in .ISO, WIM and.ESD format.
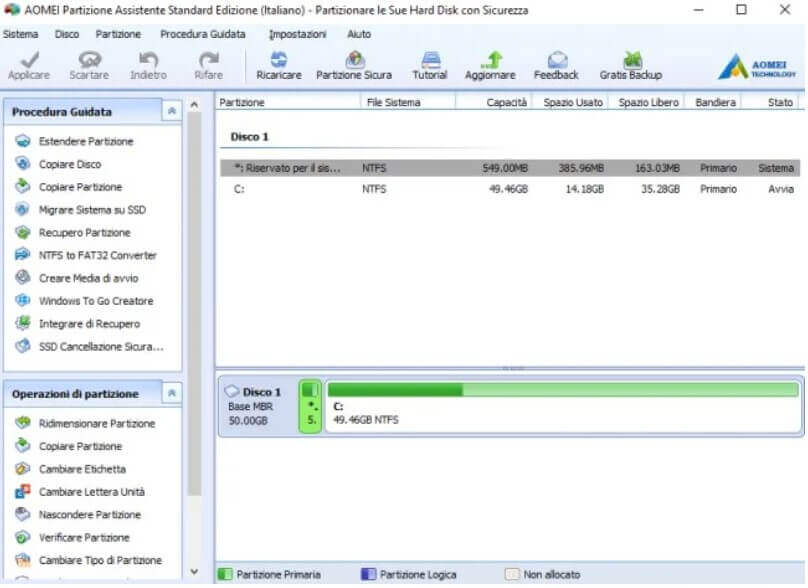
Finally, it is good to remember some limitations of the Windows system running from USB storage media with Windows To Go.
First of all, access to the internal drives of the machine in use will not be allowed; the hibernation functionality is disabled by default, the TPM chip cannot be used, so it is not possible to encrypt the data and the Windows configuration recovery mechanism will not it is usable.

A tech-savvy writer with a knack for finding the latest technology in the market, this is what describes John Carter. With more than 8 years of experience as a journalist, John graduated as an engineer and ventured soon into the world of online journalism. His interest includes gadget reviews, decoding OS errors, hunting information on the latest technology, and so on.


