Guide to Rufus’s lesser-known aspects, a very effective utility to create bootable USB drives at PC boot.Creating a bootabl
e CD or DVD is very simple: just download an ISO file containing the image of an operating system (Windows or Linux distribution) or an emergency tool, start your favorite burning software ( CD Burner XP or Burnaware Free ) then choose the Burn ISO image or similar function.
But why is making a bootable CD or DVD easy while getting a bootable USB stick is more complex?
Let’s say, first of all, that creating bootable USB media is not that complicated if you have the “right” software tools.
In the case of Microsoft operating systems, Media Creation Toolkit has now become a “must” to automatically configure a USB key containing the installation media image of the latest Windows version: Download Windows 10 ISO: here’s how to proceed.
However, there are many other alternative tools to create a bootable key not only for Windows but also for other operating systems:
– Bootable USB stick, how to prepare it
– Install Windows 10 from USB, all the ways to proceed
One of the most effective tools for achieving the goal and making a USB drive bootable is Rufus.
Rufus is great software because it allows you to run any ISO image when you turn on the system.
Guide to Rufus, application to make USB drives bootable
In many of our articles (see, for example, those mentioned above), we have often cited Rufus as a utility that facilitates the creation of bootable USB drives on PC boot.
When you start Rufus (which, by the way, is also available in a very convenient portable version; click here to download Rufus ), you have several options to configure the start of the USB drive selected from the Device/drive drop-down menu.
Rufus 3.0 offers a completely renewed user interface and much more practical to use compared to the past.
Furthermore, Rufus 3.0 no longer supports Windows Vista and Windows XP: those who still use these versions of the operating system (no longer updated even by Microsoft) can still download the program’s old version by clicking here.
Before using Rufus, it is good to make an important premise: the ISO format was never designed to allow booting from USB media.
An ISO file is a 1: 1 copy of an optical disc. Optical disks, in turn, are very different from a USB storage device, both in terms of the structure of the boot loader, both for the file systems used and for the impossibility of creating partitions.
The burning software does nothing but reading – byte by byte – the contents of the ISO file and store it on the optical media inserted by the user.
In the case of USB drives, it does not work like that, and it is not possible to do what is expected in the case of optical discs.
This does not mean that you cannot create a 1: 1 copy of a USB media: instead, we want to highlight that the mirror copy of a USB drive’s contents is profoundly different from that of an optical disc.
Unless you use ISOHybrid images created with the very intent of being usable on both USB and optical discs, 1: 1 copies referring to optical discs are not usable on USB drives and vice versa.
In Rufus software, the 1: 1 copy of a USB media is called a DD Image (more simply Disk Image in Rufus 3.0).
Some distributions, such as FreeBSD or Raspbian, also offer DD Images for direct use on USB media and ISO files for CD / DVD burning.
Rufus also supports DD images.VHD format (Microsoft version of DD images) and compressed formats .gz, .zip, .bz2, .xz, and so on.
Given that ISO images do not automatically adapt to USB media use, you need “something” to do the “magic” and make compatible with what is not compatible.
Why, then, do most developers and software houses distribute their product image files solely as ISOs?
Apart from historical reasons, one of the main problems related to the distribution of DD Images is purely technical.
Imagine creating a DD image that is a mirror copy of USB media. If the image thus created is smaller than the size of the media used by the person who will then use the DD image, the “apparent” capacity will be reduced.
Furthermore, suppose optical discs and – consequently – ISO files can use only two file systems (ISO9660 and UDF), both of which have been supported by various operating systems “since the dawn of time”. In that case, DD images can use any of the dozens and dozens of different file systems available today.
In some cases, therefore, after writing the contents of a DD image to USB media, Windows may not be able to read its contents due to the lack of support for the corresponding file system.
That is why all manufacturers prefer to publish images in ISO format almost exclusively.
How, then, to “adapt” the contents of an ISO file to a USB media and make it bootable?
The first step is to read the ISO image file system (ISO9660 or UDF), extract it, and copy it to a FAT32 or NTFS file system: Difference between NTFS, FAT32, and exFAT: here’s what changes.
The other important piece is called boot loader, an activated program during the PC boot phase allowing the user to choose which operating system to start.
The boot loaders used for hard drives and USB drives are very different from those used for ISO files. Furthermore, the BIOS / UEFI themselves treat USB media and optical discs differently during the boot phase.
Usually, therefore, it is not possible to use the boot loader contained in an ISO file (usually El Torito is used ), copy it to a USB media, and think of starting the unit when the device is turned on or restarted.
Rufus fills this gap and provides boot loaders that will allow any USB drive to be bootable.
By “feeding” Rufus an ISO file containing a Linux distribution, Rufus will use GRUB 2.0 or Syslinux will think the program to install, in the USB drive, a specific version of GRUB or Syslinux (not the one contained in the respective ISO files because it would be directly exploitable …).
Rufus automatically chooses the boot loader to use as soon as you choose an ISO file: the program is very skilled in recognizing what type of conversion must be carried out.
From the Create bootable disk with a menu of Rufus, both in the version of the portable program within the one with installation, it is possible to write both ISO images and DD images to USB support by acting on the Boot Selection drop-down menu.
In the case of the version with installation, however, other options are also available:
1) MS-DOS. Create a bootable drive with MS-DOS (Windows ME). By booting from the USB drive, you will find yourself at the MS-DOS prompt.
This possibility is offered on Windows 8.1 and earlier systems since, in Windows 10, Microsoft has removed the files for the MS-DOS installation. Under license conditions, only Microsoft can distribute these files, so Rufus cannot integrate them into its installation package.
2) FreeDOS. Create a bootable drive based on FreeDOS, free software proposed as an alternative to the old MS-DOS, and fully compatible with the latter.
Since anyone is entitled to redistribute FreeDOS, his files are included in the full Rufus package.
By clicking on the arrow to the right of Format options, even with the portable version of Rufus, it will be possible to create bootable USB drives set as follows:
3) Syslinux. Install the Syslinux boot loader, which will allow you to boot to the Syslinux prompt and nothing more.
4) GRUB / Grub4DOS. As in the previous case, you will access the GRUB prompt, but you will have to continue in total autonomy.
5) ReactOS. Experimental boot loader.
6) UEFI: NTFS. In this case, the boot is done in pure UEFI mode. The use of the NTFS file system is required.
In order for the boot to be successful, you need to copy the files /efi/boot/bootia32.efi or /efi/boot/bootx64.efi to the NTFS partition.
The latter mode is automatically used by Rufus to exceed the file size limit (4GB) affecting FAT32. For example, the program makes it possible to install Windows Server 2016 in UEFI mode without the need to split the file into two parts4.7GB install.wim .
How Rufus Works
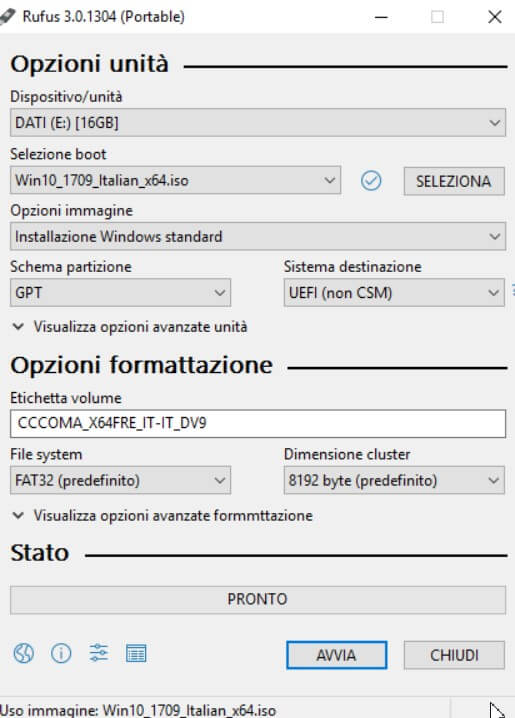
When you choose the ISO file to insert into the USB drive to make a bootable ( Select button to the right of the Boot Selection drop-down menu ), Rufus automatically sets the recommended file system ( File system menu ) based on the contents of the image.
The selection of partition scheme (MBR or GPT) is important because selecting GPT the bootable key will not be used on older devices with legacy BIOS (non UEFI): Differences between MBR and GPT. Here is how partitions are managed and the system started.
Rufus is, in fact, one of the few utilities out there that allows you to create bootable USB drives that are compatible with both older BIOSes and more modern systems using UEFI (see What UEFI is and what you need to know about the new BIOS ).
Selecting the GPT scheme in the Destination System drop-down menu is the only available item in UEFI; otherwise, opting for MBR will read BIOS or UEFI.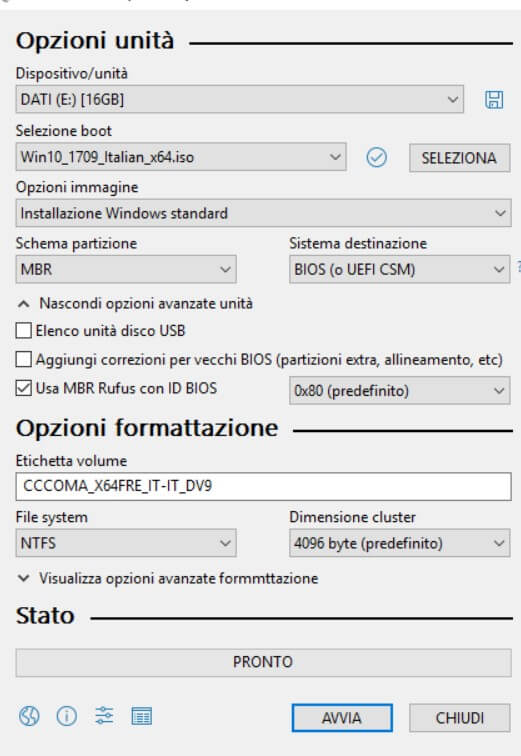
On older systems that use very outdated BIOS, if errors are displayed when the USB drive starts or the boot fails, you will need to click on View advanced drive options and check the Add correction box to old BIOS.
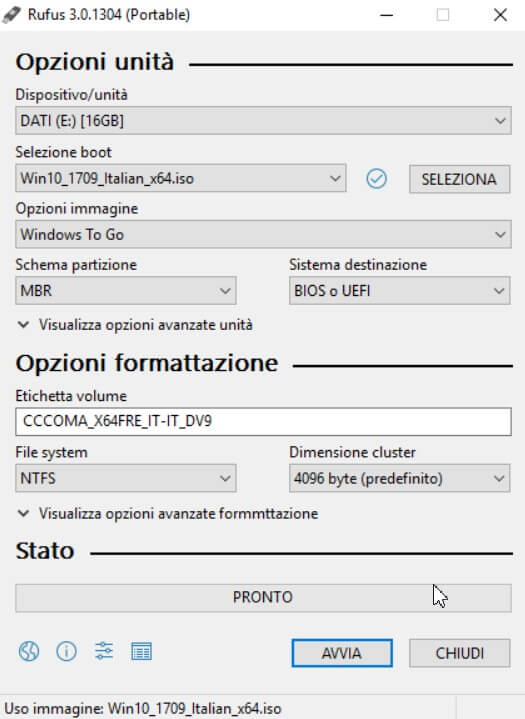
Prepare a bootable Windows installation with Rufus and Windows To Go.
We had already talked about the Windows To Go functionality in the past: it allows users to boot the operating system from mass storage devices (USB sticks, flash memories, external drives). Windows Setup will allow you to run the operating system and programs and load user settings and files.
Rufus directly supports Windows To Go: after selecting the ISO image of the Windows installation media (to download it, refer to the article Download Windows 7, Windows 8.1 and Windows 10 from Microsoft servers ), you will have to select the Windows To Go from the Image Options drop-down menu keeping in mind that the feature is only available for Windows 8.1 and Windows 10.
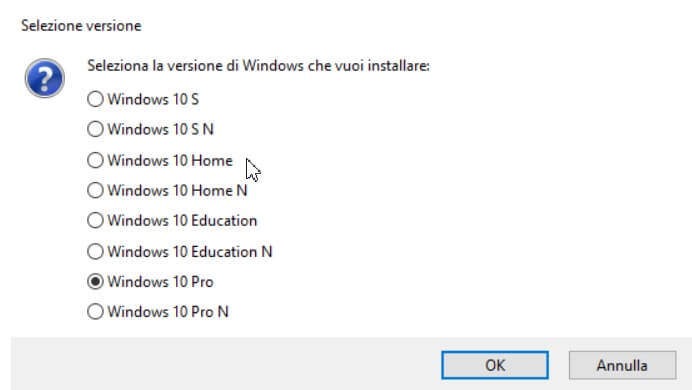
After confirming the Windows To Go drive’s creation, Rufus asks which edition of the operating system should be configured and made bootable from external memory.
Before booting the system from the bootable key created with Rufus, you must remember to access the BIOS / UEFI (by pressing the CANC, F10, F2, ESC keys – depending on the motherboard model and BIOS in use – when the first screen during boot; then define the correct boot sequence (USB drives must be configured to boot before hard drives / SSDs).

I’m Mr.Love . I’m admin of Techsmartest.com


. What are the news of the new format for images")


. What are the news of the new format for images")

