Hamachi is software that does not require specific skills and that allows you to make one or more computers (remote, for example) appear as “physically connected” to your local network. Just think of the convenience of using Windows file sharing securely, even from remote locations (the information is conveyed over an encrypted channel).
In essence, Hamachi allows you to create a VPN ( Virtual Private Network ) without any effort and at no cost. In the free version, the program allows the simultaneous connection of 16 hosts.
The program, developed according to the opensource philosophy, connects the various connected “nodes” (in computer networks, the “nodes” indicate network devices or real computers) through the UDP protocol and connecting two systems through the use of a third node called “mediation server”. The latter is used to locate the various peers and initiate communications between them.
Hamachi can make it possible to establish communications that could hardly easily materialize: think, for example, of systems behind firewalls or routers.
Hamachi’s architecture’s strength is the use of encryption and authentication algorithms already widely established and now standard worldwide. This guarantees that the data conveyed through the VPNs created with Hamachi cannot be intercepted and read by unauthorized persons.
Whenever the “mediation server authenticates a system (peer)” and a “tunnel” is established (the term “tunneling” refers to a set of techniques whereby a protocol is encapsulated in a protocol of the same level or upper: in the case of VPN networks a layer is inserted that introduces cryptographic functions), the respective keys are exchanged to secure the communication channel.
The authentication procedure makes it possible to identify anyone who is part of the network using RSA keys: to log in. Each client uses its private key together with the Hamachi IP. The server verifies the signature being transmitted and authenticates the user. More details on the mechanisms underlying Hamachi can be found by referring to this page.
Security concerns not only the architecture on which Hamachi rests but also the functionalities that the product makes available at the client level. When a user decides to create a VPN network, he must necessarily enter a password to protect it; he can prevent unauthorized users (even if they know the password) from becoming members of the VPN created. He can permanently expel users.
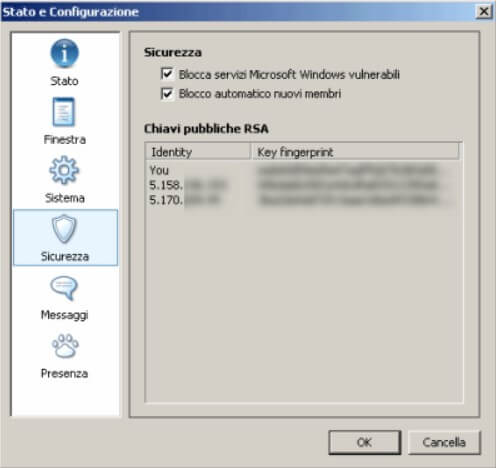
After starting the software installation, specifying the installation folder and whether Hamachi should run automatically when Windows starts (for the moment, we can disable this box), the setup asks if you want to use the file-sharing. If you plan to communicate with insecure hosts, to prevent your shared folders from being exposed, make sure you check the Disable Windows vulnerable services on the Hamachi box. It is possible to check the setting applied for this option even after installing the software by accessing the Preferences menu and then clicking on the Security icon :
At this point, the program asks which version you want to install: we opt for Hamachi Basic, completely free.
Once the program is started, Hamachi will connect to the Network and provide the host with a private IP address, indicated at the top of the window. At the bottom of the same, there are three buttons.
The first from the left allows you to activate Hamachi, the second to create a VPN network or join an existing one, the third to access the software configuration options.
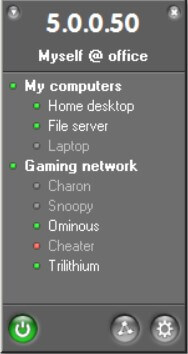
By clicking on the first button ( Switch on ), the program will ask you to specify a personal “nickname” used by other users to identify the host within the network.
Whenever Hamachi needs to communicate important messages to the user, the program icon – displayed in the tray bar area at the bottom right – will start blinking. The message that should appear after a few moments concerns the setting of the “master password”. We suggest not to skip this step by entering a sufficiently long and complex personal password. This password can be used in an emergency to gain control of your account.
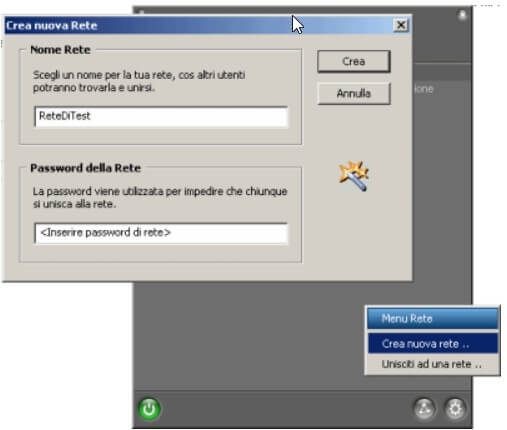
By clicking on the second button ( Network), you can now create your VPN network or access an existing one.
By default, once a user has joined the newly created network, a ping is launched by double-clicking on his nickname. To make a Windows window appear with the list of shared files and folders, simply access the Hamachi options, click on Window, then choose Search for shared Windows files in the Action drop-down menu double click.
A
ll those who access the same VPN network will become part of a virtual LAN. Windows and other applications will consider remote hosts as if they were machines connected to the local network. This means that to access remote resources, it is sufficient to use the functions integrated with the various software or in the Windows shell, which allow you to interact with a LAN.
Hamachi, therefore, opens up a truly vast panorama of possibilities. If things do not work as expected, we strongly suggest that you check the configuration of local networks set in the Network Connections window of the Windows Control Panel. In particular, if several connections are set up, it may happen that you cannot connect with remote hosts, which are part of the Hamachi VPN. The first aspect to check in these cases is that in the Advanced menu, Advanced settings of the Network Connections window, the first connection listed in the box relates to Hamachi ( Cards and bindings ).
It is also essential to check that it is possible to “ping” the various VPN network members without problems. The same members will have to verify that they can “ping” the other systems. If, otherwise, the message “Request expired” is displayed, it is advisable to check the settings of the personal firewall installed: it can generally be solved by inserting the IP address group 5.0.0.0 among the “trusted” local networks.
Hamachi was developed with an open architecture: every feature is documented in detail for the benefit of all concerned.

A tech-savvy writer with a knack for finding the latest technology in the market, this is what describes John Carter. With more than 8 years of experience as a journalist, John graduated as an engineer and ventured soon into the world of online journalism. His interest includes gadget reviews, decoding OS errors, hunting information on the latest technology, and so on.
 Extender for Their Networks")


 Extender for Their Networks")


 appear as "physically connected" to your local network.)