The Windows 10 Task Manager is undoubtedly one of the most useful software tools present by default in the Microsoft operating system’s various versions and editions.
It is almost useless to enumerate all the Windows 10 Task Manager; much better, however, to highlight which are the best features allow you to understand what is not working on the system in use and solve “blocking impediments”.
How to open the Windows 10 Task Manager
The easiest and fastest way to open the Windows 10 Task Manager is the same for all Windows versions – just use the key combination CTRL + SHIFT + ESC.
Alternatively, you can right-click on the Windows 10 taskbar and choose the Task Manager item.
Again, you can press Windows + R, and type taskmgr followed by pressing the Enter key or use the key combination CTRL + ALT + DEL and click on Task Manager (but, at this point, why not remember to use the simple key combination CTRL + SHIFT + ESC ?).
Windows Task Manager, a valuable resource for diagnosing and troubleshooting
As we highlighted in the articles Lighten Windows 10 by deactivating unnecessary functions, the Windows 10 Task Manager is the first tool you should use to determine which applications occupy the most resources.
At the first start, the Windows 10 Task Manager appears essential: only the running applications are indicated. Microsoft has chosen this setting in order not to “scare” less experienced users.

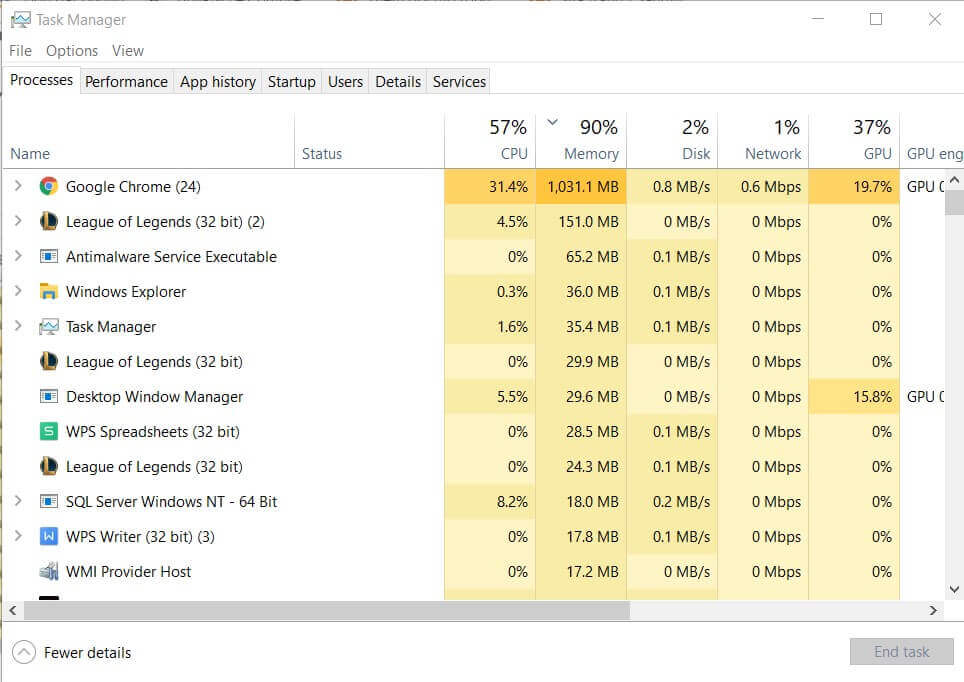
By clicking on More details, a truly complete and versatile Task Manager opens: there are seven tabs in which all information is collected: Processes, Performance, Application History, Startup, Users, Details, and Services.
Processes and Performance are the most interesting tabs of the Windows 10 Task Manager.
When the Task Manager is opened in the Windows traybar area, at the bottom right, an icon is shown that graphically expresses how busy the processor is: in multicore CPUs, the value expressed is an average of the workload detected on the various cores. Leaving the mouse pointer over this icon for a few moments, the occupation of other resources such as memory, disk, and the network is summarized.

Just a glance at the icon allows you to understand if the system is excessively busy or not.
To get an instant and timely analysis of what is happening, just refer to the Processes and Performance tabs.
The percentage values indicated in correspondence with the CPU, Memory, Disk, and Network columns, in the Processes tab allow you to determine how the individual resources are occupied.
If the CPU remained actively engaged for a long time without the system being used by the user, there is certainly a problem. The processor’s occupation, which never goes to sleep, is determined by some running process (one or more).
To find out, it is usually sufficient to click on the header of the CPU column so that the Windows 10 Task Manager lists the applications in descending order based on the processor’s occupation (the arrow in the header must look downwards).

With this simple check, it is possible to know the application’s name that is occupying the processor so aggressively.
To know the specific process responsible for the CPU’s excessive workload, just refer to the Details tab and then click on the CPU column, exactly as seen above.
Once the process causing problems has been selected, the End task button allows you to request Windows to force it to close. If clicking on the Processes tab, the End task button allows you to immediately close all processes belonging to the same application: a very useful feature that avoids using the taskkill / im / f command from a command prompt.
The processor that is actively engaged or reaches frequent peaks of 100% occupation is not always a sign of a problem. If you are using the system to perform heavy processing, it is completely normal that the CPU is permanently engaged even for periods not short.
The problem, if anything, could arise when the user does not use the system to carry out any demanding processing, and the CPU appears to be committed strangely. In these situations, the Windows 10 Task Manager is useful for investigating the causes.
Not uncommon is the system’s occupation by superfluous software components that sometimes act as spyware / adware and are often integrated into some rather popular applications. One of the best software to detect and remove such objects remains AdwCleaner, in the Malwarebytes portfolio.
If, on the other hand, the memory occupation always remains at high levels even when the system is “unloaded” ( in idle ), the RAM allocation of the machine is likely low for the system being run.
In this case, however, before drawing hasty conclusions, it is good to check which programs and, specifically, which processes are occupying more RAM.
To determine this, just click on the Memory column to obtain applications and processes that use more memory.
In this way, unnecessary programs can be recognized, loaded when Windows starts, which remain running in the background, and continue to consume resources.
By right-clicking on any item, a context menu opens that allows you to quickly go to the folder containing the file ( Open file path ) or search for information on the Internet on the program’s identity ( Search online ).
In the case of Windows 10, however, it is not recommended to install the operating system on a system with just 2 GB of RAM (see the requirements indicated by Microsoft on this page ).
When increasing the RAM, it is good to keep in mind that not all Windows editions support the same amount of Memory.
Windows 10 is the most “permissive” Microsoft operating system: the 64-bit editions allow – all – to reach up to 2 Terabytes of RAM; therefore, in fact, they do not impose limitations. Only Windows 10 Home 64 bit allows you to reach up to 128 GB of RAM, a value in itself already very high.
The most serious limitation remains only for 32-bit editions of Windows that do not support more than 4GB of RAM (see How to upgrade from 32-bit to 64-bit Windows ).
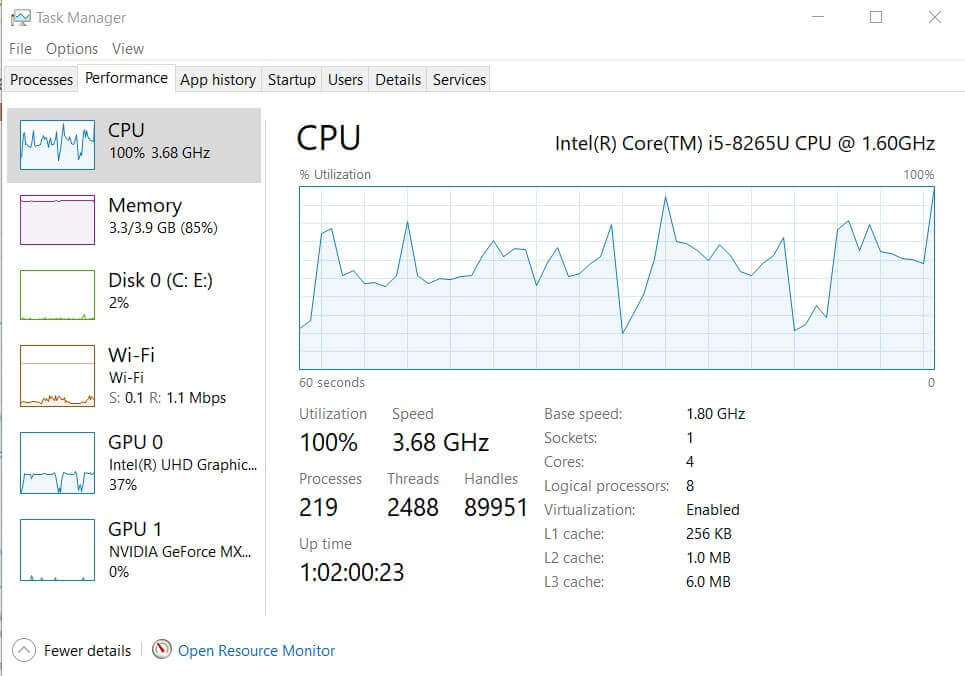
The Windows 10 Task Manager’s Performance tab allows you not only to know the occupation of resources over time but to access a report of the configuration of the machine.
By clicking on the CPU icon, you get the processor occupation graph and all the technical data (maximum clock speed, clock speed detected instantly, number of physical and logical cores, cache, …).
It is also possible to know if the extensions for virtualization are present and have been enabled by BIOS (useful in using Hyper-V, VMware, Virtualbox, …).
By right-clicking on the CPU occupation graph, choosing Change graph to, Logical processors, you can instantly check each logical core’s workload in use.
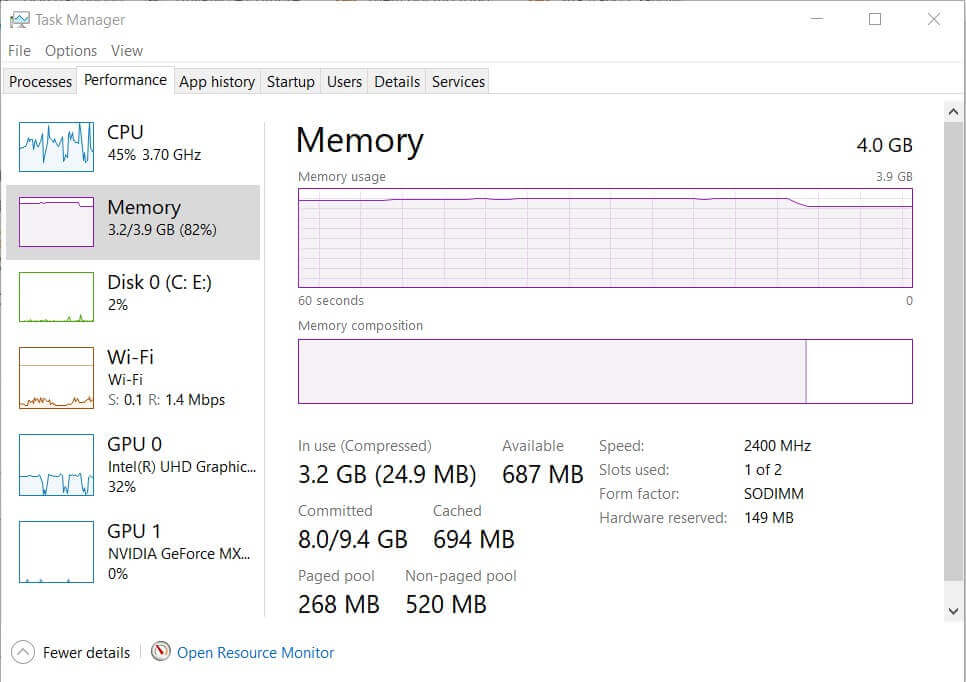
With a click on Memory, you can check the amount of Memory installed (sum of the values In use, compressed and available ) and how much RAM is usable by the operating system and applications. The Reserved for Hardware entry reports Memory that the software cannot use.
In this regard, we also suggest reading the article Installed memory and usable memory in Windows.
We who use to keep dozens of tabs open in Google Chrome sometimes use The Great Suspender extension to free up RAM in case of need, for example, while using virtual machines: Google Chrome tricks, how to best use the browser. The benefits of using The Great Suspender will be immediately verifiable in the Performance, Memory tab of the Task Manager.
The Disk column of the Processes tab allows you to understand which applications are performing read/write operations.
In case the memory is not enough, Windows will start to use the virtual memory heavily and lean on the hard disk to store information that should be accessible (quickly) in RAM.
This is, of course, the situation to avoid as the whole system would be negatively affected. However, if frequent accesses to the hard disk by installed applications are detected during normal use of the system, switching to an SSD drive will speed up the machine in a decisive way.
Regarding the transition from hard disk to SSD, we recommend the following readings:
– Install SSD to replace a traditional hard disk
– SSD alignment, what it is, and how to check it
– Hard disk or SSD, features and differences
By clicking on the link Open resource monitoring, it is possible to access a greater number of “raw” information on all the system elements in use: we talked about this link name and further investigate the checks.
Identify the most demanding programs in terms of performance and energy consumption. Using the graphics processor (GPU)
With the Windows 10 October 2018 Update (build 1809), the Task Manager saw the addition of Status, Power Consumption, and Power Consumption Trend columns. The presence of a green leaf in the Status column indicates UWP (Microsoft Store) applications that use techniques to reduce energy consumption; the other columns summarize the global impact and the trend recorded over time.
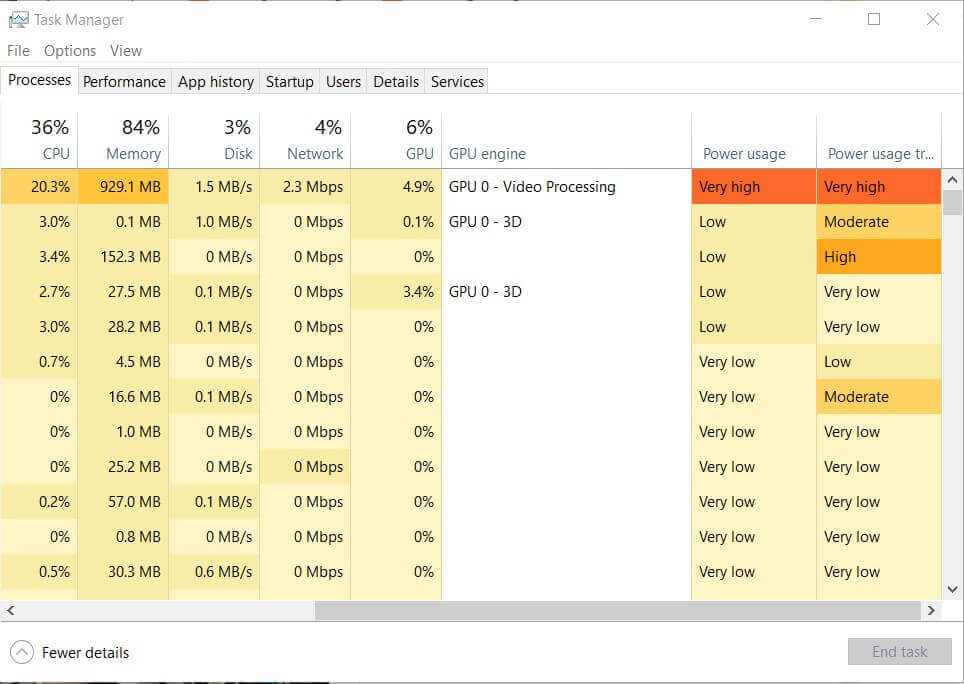
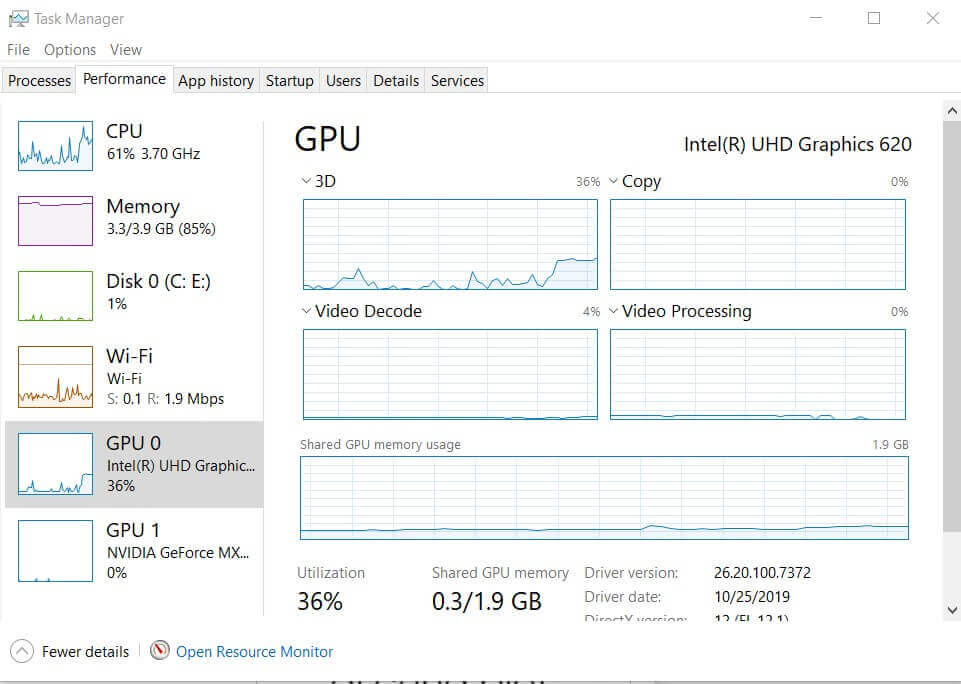
The GPU column indicates whether the selected application or process used the graphics processor more or less intensively.
By clicking on the Performance tab and then on the GPU pane, you can deepen and check how the workload is distributed on the video card. The Task Manager gives an overview of the various GPU “engines”.
The graphics processor can be thought of as an independent unit capable of programming the execution of tasks and carrying them out in parallel: the Copy engine, for example, can be used to transfer data while the 3D engine is used for three-dimensional rendering.
If your internet connection was slow and you were the only one using it
If sending and receiving data packets on the Internet were tiring, the Task Manager allows you to find out which application uses the available bandwidth upstream and/or downstream.
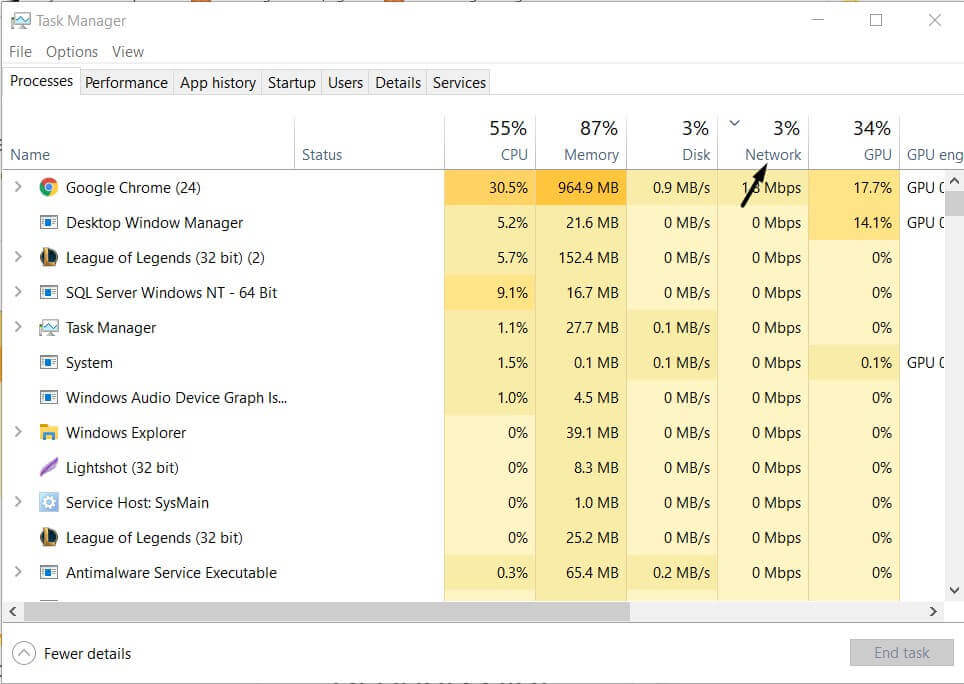
To establish it, just go to the Processes tab of the Task Manager and then click on the Network column, sorting the values, as always, in descending order.
By checking the value expressed in Mbps, it is possible to immediately trace the currently exchanging the most data.
Increase the speed of updating information within the Task Manager
When examining the Windows Task Manager’s contents, it may happen that the data updates too quickly or, vice versa, that you do not even have the material time to check what is happening.
To change the Windows Task Manager window’s content refresh rate, simply access the View menu, click Refresh Rate, and then select High, Normal, or Low. With Paused, you can temporarily suspend the window update to have time to analyze the information returned by Windows.
Check the applications loaded when Windows starts
The Windows 10 Task Manager, in the Startup tab, displays the list of applications loaded at each entry into the operating system.
As mentioned above, these applications can not only slow down the loading of Windows, but they can also remain running, occupying hardware resources unnecessarily.
Of course, not all applications on the Startup tab should be disabled or removed.
By right-clicking, however, you can disable an application’s loading once its identity has been ascertained.
Finally, the Windows 10 Task Manager’s Users tab simply gathers running applications broken down by the user. If there was only one active work session on the machine, Windows 10 would display only one username.
The Services tab then collects the list of services installed in Windows 10, both Microsoft and third-party ones. In this regard, the free Autoruns application that immediately highlights which services are not Microsoft is much more useful.

A tech-savvy writer with a knack for finding the latest technology in the market, this is what describes John Carter. With more than 8 years of experience as a journalist, John graduated as an engineer and ventured soon into the world of online journalism. His interest includes gadget reviews, decoding OS errors, hunting information on the latest technology, and so on.


. What are the news of the new format for images")


. What are the news of the new format for images")

