YouTube is an amazing platform where you can surf unlimited videos with a variety of content. In the past several years, YouTube has undergone several changes. But, YouTube videos stuttering is one of the major problems that still happens with all of us.
Video stuttering is the problem when you play videos, and it pauses for a few minutes. Hence, it interrupts the whole watching experience. However, there are various reasons for video stuttering. In this article, we will discuss different problems that cause YouTube videos stuttering. Along with that, we will also give tips so that you can solve videos stuttering windows 10.

Major Problems Causing YouTube Videos Stuttering
It might happen that you are not able to identify the problem. So, if you are unable to fix videos stuttering Windows 10, then you may look for the below problems.
Check Your Internet Connection– if you find YouTube Videos Stuttering, then you need to check your internet connection. So, before you move forward to the settings, ensure the speed of the internet connection is pretty good.
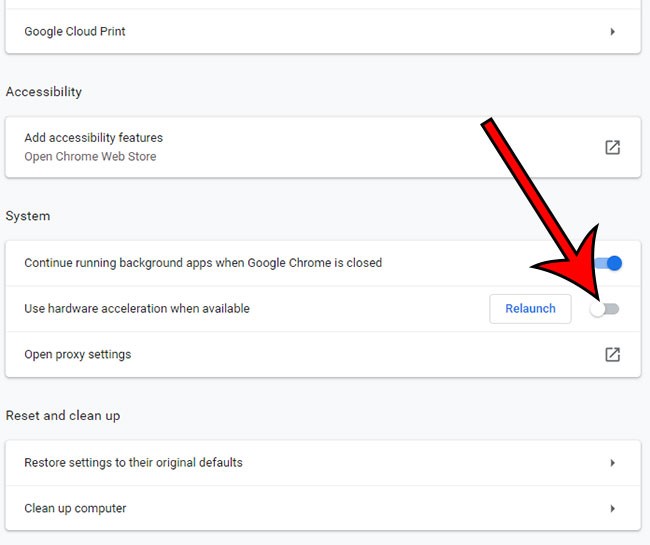
Computer Related problems– if you find that the problem is not the internet, then you must check your computer. You must enable or disable the hardware acceleration accordingly.
Issues Related to Video Player– another major problem for videos stuttering windows 10 is the video player. Check if the video player is working fine or not.
Tips To Fix YouTube Video Stuttering
Read below to know the important tips that can help you to solve videos stuttering windows 10.
Update The Video Driver In Your PC
One of the major causes of videos stuttering windows 10 is the video driver. It is because the video driver can become old or corrupted. It can also happen the video driver is missing from your PC. Hence, to solve this problem, you have to update the video driver of your PC.
Doing this can really help you to solve the YouTube videos stuttering without much problem. So, don’t forget to update the video driver regularly. You can choose to auto-update or manual update the driver.
Automatic Update For Video Driver
It is very easy to update the video driver automatically. If you don’t know how to choose the right graphics card for your windows, then this is the right option. Follow the below steps to update the video driver automatically.
- Install the video driver on your computer.
- Open the application
- Click on the “Scan Now” button.
- Then, click on” Update All.”
In this way, you can update the drivers automatically for your system.
Updating Video Driver Manually
Follow the below steps to update your video driver manually on your computer.
- Go to Start and right-click on it
- Then, scroll down and go to Device Manager
- A list of display adapters will appear. Expand it by clicking on it.
- Then select the software for updating the driver.
Hence, in this way, you can update the drivers manually in your system. You can recheck if the videos stuttering has stopped or not.
Clean Boot Your Computer System
Doing a clean boot in the system helps to solve the app-related problems easily. Follow the below steps to do a clean boot.
- Go to the search bar and type “MSConfig“
- Then, click on the System configuration.”
- Then you have to locate the services tab on the screen.
- After that, you have to hide the services box of Microsoft.
- Then click on the option of “Disable All.”
- Then, go to the start-up tab.
- Close the Task Manager and click on “OK.”
- Then, reboot the computer.
The above steps will help you to solve problems for videos stuttering windows 10.

Disable the Antivirus Program In Your PC Temporarily
This trick can be helpful to most of the users. For that, you just need to disable the security program in your PC. If you find this is helpful, then it means that the antivirus program is creating problems for video playing.
You can disable the program while watching YouTube videos. However, it will be better to choose another antivirus brand. Along with that, you can also change the format of the video for stopping its stuttering.
Update Google Chrome On Your PC
If you are facing problems with YouTube Video Stuttering, then updating Chrome can be helpful. You can follow the below steps to update Google Chrome on Your PC

- Open Google Chrome
- Go to the top right and click on the three dots.
- An option to update Google Chrome will appear. (If this option is not available, then Chrome is already updated.)
- After the update, click on “Relaunch.”
- Then again, go back to YouTube and resume watching your favourite videos.
Enable Or Disable Hardware Acceleration
Whether if you have a new or old computer, you can easily apply this tip. If you have an old computer, then turning off the hardware acceleration will help. It can slow down your old computer. But, if you have a new computer with fast performance, then you have to switch on the hardware acceleration. This will help you to solve the video stuttering windows 10.

- Follow the below steps to enable and disable the hardware acceleration on your computer.
- Go to the Search bar and then type “Control Panel.” Then click on Open.
- Then click on Display
- Go to the left-hand side and click on the option of “change display setting“.
- Then go to the” Advanced Display Settings.”
- Then troubleshoot the tabs that you need and change the settings.
- Go to the section of hardware acceleration. Switch the pointer up to low if you want to disable it. Whereas for enabling, switch the pointer up to full.
- Then click on OK and restart your computer.
How to Repair YouTube Videos Stuttering
If you download various videos from YouTube and it shows them as corrupted, then you need it to repair. You can download any repair software for videos and solve this issue. Apart from that, there is various software available online. So now you can easily repair the corrupt videos.
Clear Your Browsing Data and Cache
When you do internet surfing, the browser saves the caches to improve your experience. However, these caches also contain several temporary data that can affect YouTube to run smoothly. Thus, to solve this problem, you need to clear those caches regularly.
You can follow the below steps to clear the caches on Google Chrome.
- Open Chrome on your Computer.
- Then, click on the icon of “Customise and Control Google Chrome.”
- After that, click on More Tools.
- Next, you have to click on the option of “clear browsing data.“
- Then you have to select the browsing history that you want to delete.
- Finally, click on “Clear Data.”
Now, you don’t need to worry if YouTube Videos Stuttering happens again. The above useful tips will help you to solve this problem on your system without much hassle. Hence, now you can watch YouTube videos smoothly and without any interruption.

With 4+ years of experience working as a journalist, Ford Pascall has gathered ample knowledge and skills in the tech reporting domain. I’m someone who chases after everything new in the tech world and is a perfectionist when it comes to technical reviews.


