
Excel is a powerful tool widely used for various purposes such as data analysis, calculation, visualization, and storage of numerical information. It provides a grid-like interface where users can organize data in rows and columns, creating a worksheet or spreadsheet.
However, the unforeseen can happen, and you may find yourself facing the dreaded scenario where you mistakenly deleted an important Excel file or forget to save your work before a system crashed.
The fear of losing valuable Excel data can be overwhelming, but fret not – we will provide you with step-by-step guidance on how to recover deleted or unsaved Excel files on Windows. Prepare to unlock the secrets of data resurrection and reclaim control over your Excel files!
Part 1: The Step-by-Step Guide on Deleted Excel File Recovery on Windows (Three Methods Included)
Accidentally deleting an Excel file doesn’t mean it’s lost forever. It is often possible to recover deleted Excel files in some ways.
Method 1 Recover Deleted Excel Files from Recycle Bin on Windows
The Recycle Bin is a designated folder within the Windows operating system that serves as a temporary storage space for deleted files and folders on your computer. When you delete a file or folder, it is not immediately removed from your system but instead gets moved to the Recycle Bin folder first. This provides a safety net before permanent deletion in case you accidentally delete something and need to restore it.
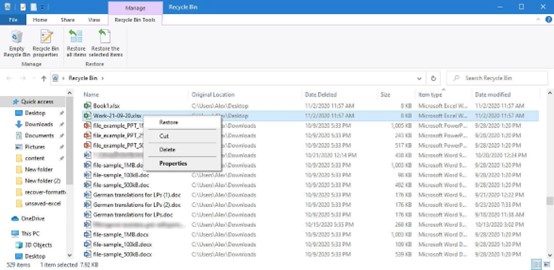
Step 1: Open the Recycle Bin folder by double-clicking on its icon on your Windows desktop.
Step 2: Look for the deleted Excel file within the Recycle Bin folder.
Step 3: Right-click on the file and select “Restore” to recover it to its original location.
Method 2 Recover Deleted Excel Files on Windows Using File History
File History is a built-in backup feature in Windows that allows you to automatically back up and restore your files. It provides an easy and convenient way to protect your important documents, pictures, music, videos, and other personal files from accidental deletion, system failures, or other data loss scenarios by creating regular backups. If you have created backups of your important Excel files with File History, then you can easily get your deleted files back.
Step 1: Navigate to the Control Panel on your Windows computer and select “System and Security” to locate and access the “File History” option.
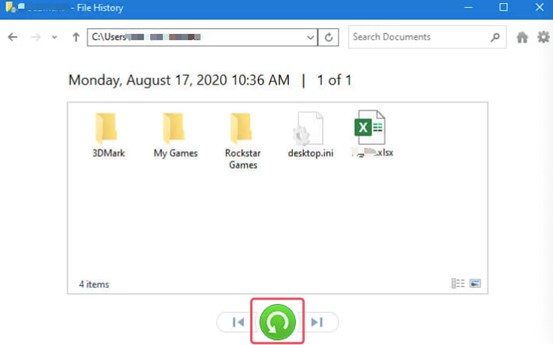
Step 2: Click on the “Restore personal files” option on the left side of the File History window. This will open a File Explorer window displaying your backed-up files and folders.

Step 3: Locate and select the deleted Excel file you want to restore.
Step 4: Click the Restore icon located at the bottom to restore your file to its original location.
Method 3 Recover Deleted Excel Files on Windows Using iBoysoft Data Recovery for Windows
If the Recycle Bin has been emptied, which permanently deletes the contents of the bin, or you neither enable the File History feature nor back up your file to other storage devices, you will have difficulty in retrieving your deleted Excel file through the aforementioned ways. In this instance, you should try iBoysoft Data Recovery for Windows.
iBoysoft Data Recovery for Windows is a reliable data recovery tool developed to recover deleted or lost Office documents (such as Excel, Word, PowerPoint, PDF, etc. ), videos, audio files, photos, emails, and more types of files from storage devices like a computer’s internal hard drives, external hard drives, SSDs, digital camera, SD cards, and so on.
Equipped with advanced algorithms, this utility can deal with various data loss scenarios, including mistaken deletion of a file, accidental formatting of a storage device, file system corruption, and malware attacks, to name a few. To implement Excel file recovery, you should take the following procedure.
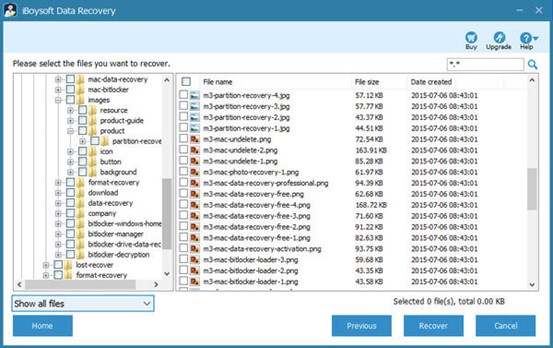
Step 1: Download, install, and launch iBoysoft Data Recovery for Windows on a PC that runs Windows 11/10/8/7/XP.
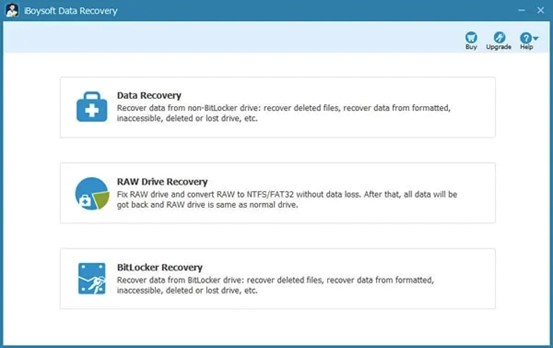
Step 2: Select the “Data Recovery” module from the software interface.
Step 3: Find and select the target drive storing your deleted Excel file from the available drive list and click on the “Next” button to initiate the scanning process.
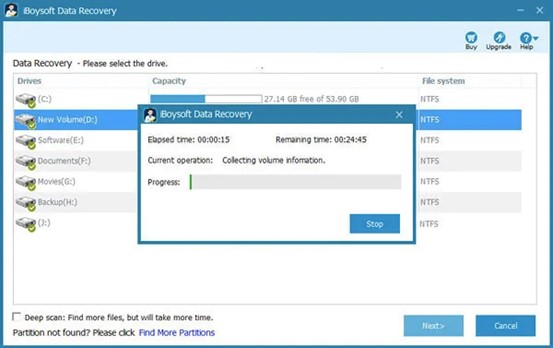
Step 4: Preview the scanning results to locate the desired Excel file, tick the checkbox next to it, and click the “Recover” button.
Part 2: The Step-by-Step Guide on Unsaved Excel File Recovery on Windows
In cases where your Excel files were unsaved due to unexpected computer shutdowns, application crashes, or human error (mistakenly clicking the “Don’t save” option), all your work will be in vain. Don’t panic just yet! Fortunately, Microsoft included an autosave feature called AutoRecover in the application that enables you to retrieve unsaved Excel files.
AutoRecover is a feature in Microsoft Excel that automatically saves temporary backup copies of your Excel workbooks at regular intervals. It acts as a safeguard against data loss in case of unexpected events, such as a power outage, system crash, or application error. AutoRecover helps to recover unsaved Excel files, allowing you to restore your work and minimize the potential loss of valuable data.
Step 1: Open Excel, then select the File tab located in the top left corner of the Excel window.

Step 2: In the menu that appears, click on “Info” from the left-hand side.
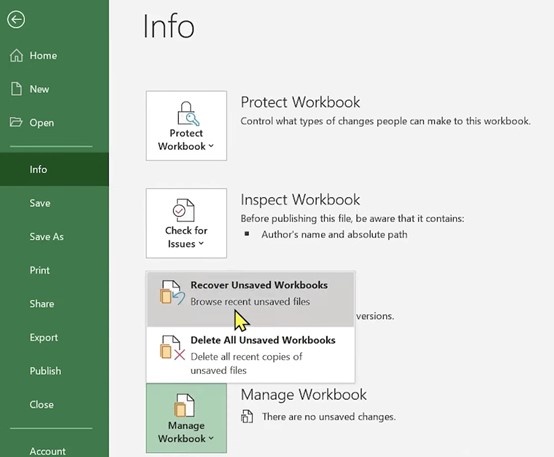
Step 3: Look for the “Manage Workbook” option in the middle pane and click on it.
Step 4: Click the “Recover Unsaved Workbooks” option from the available selections. A pop-up window will appear, displaying a list of unsaved Excel files.
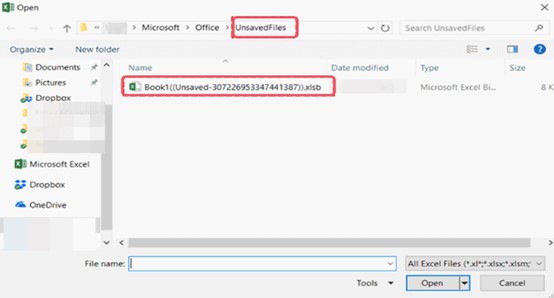
Step 5: Browse through the list and select the unsaved file you want to restore and click the “Open” button. The selected unsaved file will open in Excel, allowing you to review and work on it.
Step 6: To avoid losing any changes in the future, it is crucial to save the recovered file carefully. Click on the “File” tab, then select “Save As” to specify the desired location, filename, and file format for your files.
You must enable and customize the AutoRecover feature in Excel before you can utilize it. Use the instructions below to set up AutoRecover in Excel.
Step 1: Open Excel and navigate to the “File” tab to select “Options” from the menu.

Step 2: In the Excel Options window, choose “Save” from the left-hand side.
Step 3: Tick the checkboxes before the “Save AutoRecover information every X minutes” and “Keep the last autosaved version if I close without saving” options. Specify the desired time interval for AutoRecover saves (e.g., every 5 minutes).
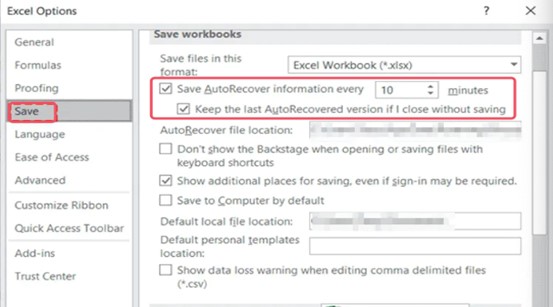
Step 4: Optionally, you can modify the file location for AutoRecover files by clicking on the browse button and selecting a different folder.
Step 5: Click “OK” to save the changes and activate AutoRecover.
Final Thoughts
Losing vital Excel files can be a nerve-wracking experience, but with the methods mentioned above, you can recover deleted or unsaved Excel files on Windows. To safeguard your valuable Excel files and minimize the risk of data loss, remember to take some preventive measures such as enabling the AutoRecover or AutoSave feature, backing up your Excel files regularly, and being cautious while deleting files.

Taylor is a freelance SEO copywriter and blogger. His areas of expertise include technology, pop culture, and marketing.


