How can you create a bootable USB stick that is bootable even on the latest UEFI– based systems?
Tools like YUMI, which allow you to easily prepare a bootable USB stick, are not UEFI compatible. This means that on newer systems, the ISO files contained on the stick will not be able to be loaded.
Even using official Microsoft tools like Windows 7 USB / DVD Download Tool, things don’t change. For example, if you try to prepare a bootable USB stick from a non-UEFI system, that media will not boot on UEFI systems.
To learn more about the topic, we suggest reading the following articles:
–What is UEFI, and what you need to know about the new BIOS
– Secure Boot and Windows: what it is for and how to disable it
Bootable USB stick also with UEFI: Rufus
One of the best tools ever to prepare a bootable USB stick also from UEFI is Rufus.
To use Rufus and create a bootable USB stick, simply follow these steps:
1) Download the ISO file of the Windows installation or Linux distribution you want to boot (including diagnostic and troubleshooting tools).
2) Download Rufus.
3) Connect the USB key to your system (make sure it can be formatted and the content completely removed).
4) Start Rufus.
5) Select the correct USB key in the Device / Drive menu.
6) Choose MBR partition scheme for computers with BIOS or UEFI from Partition scheme and target system type.
7) Set NTFS as a file system in case files of 4 GB are stored on the USB key.
8) For the rest, Rufus can be set as shown in the figure:
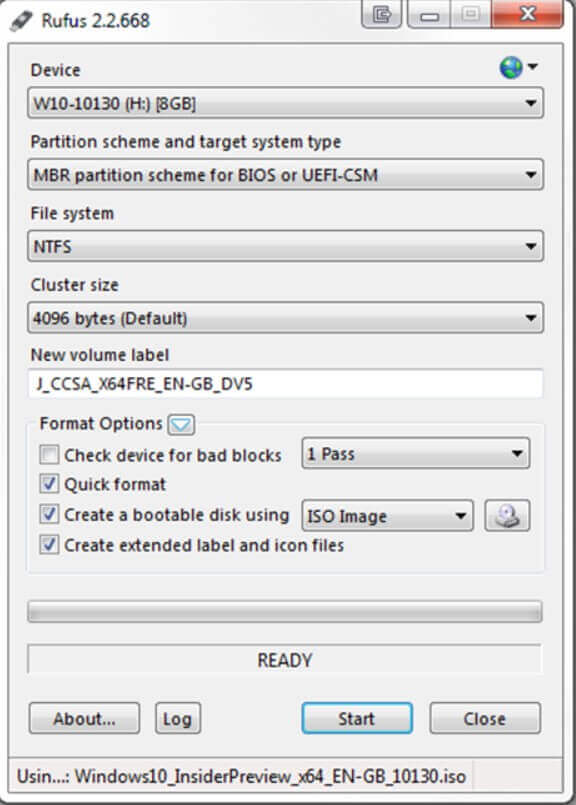
9) By clicking on the button next to the ISO image, you will have to indicate the ISO file to start, leaving the USB key connected to the system when the computer is turned on.
10) To proceed, just click on the Start button. The bootable USB stick will then be automatically prepared.
Run Windows 7, Windows 8.1, or Windows 10 from USB stick: WinToUSB
As long as you have a USB key or a sufficiently large external hard drive available, you can use the free WinToUSB utility.
WinToUSB allows you to install the latest versions of Windows on a bootable USB stick from an ISO file or a Windows installation media. After starting the utility, just click on the ISO buttons on USB or CD-ROM for USB in the first two cases.
However, the application offers one more interesting opportunity: transferring a Windows installation to a USB drive. The installation of Windows in use with all the case’s limitations mainly due to the USB connection’s performance can be started from an external media when the machine is booted.
However, for this type of activity, it would be good to have a Windows To Go compatible external storage medium or a SanDisk Cruzer Extreme USB 3.0 key.
Here are some examples:
– Ironkey Workspace
– Kingston DataTraveler Workspace
– Super Talent RC4
– Western Digital MyPassport Enterprise
Create a multiboot USB stick with multiple ISO files and UEFI compliant: Easy2Boot
Easy2Boot is a free application that allows you to configure multiboot USB drives that allow you to start multiple programs when you turn on or restart the system: from the Windows installation to the Linux “Live CD” distribution up to all the various utilities (backup, partitioning, diagnostics, …).
With Easy2Boot, it is possible to ensure that a USB key or an external USB hard disk can contain a copy of the installation media of the various versions and editions of Windows and all the tools to intervene directly on the system configuration in case of need.
Easy2Boot is not an easy to use software such as, for example, YUMI or SARDU (see install the operating system from USB or start it from the key ), but it has the advantage of allowing the boot of programs inserted in the USB drive even on UEFI systems.
Although Easy2Boot is not “new” software, little is said about it on the web because it is considered a tool for “professionals”.
Since we believe Easy2Boot to be one of the best solutions in circulation to create a bootable USB stick, below, we wanted to summarize the procedure that allows you to obtain multiboot support, also compatible with UEFI systems.
1) Download the latest version of Easy2Boot (use the first E2B + DPMS link published on this page ).
Some antivirus may indicate the Easy2Boot archive as potentially harmful. This is a “false positive,” ie an error in the recognition phase because Easy2Boot makes extensive use of scripting languages and tools for automating operations. If the antivirus reports Easy2Boot, it will be sufficient to temporarily disable the real-time scanning system ( here is the list of antivirus that is a little too zealous in analyzing Easy2Boot).
However, we recommend that you disable the real-time protection of the antivirus because, in preparation of the bootable USB stick, Easy2Boot may fail to copy or generate some files (this is the case of the autorun.inf file in the root directory of the USB stick).
2) Install the 7-Zip software if it is not present on your system.
3) Open the archive file containing Easy2Boot with 7-Zip.
4) Create the C: \ E2B folder.
5) Extract the contents of the compressed 7-Zip archive to the C: \ E2B folder.
6) Connect a sufficiently large USB key to the system in use.
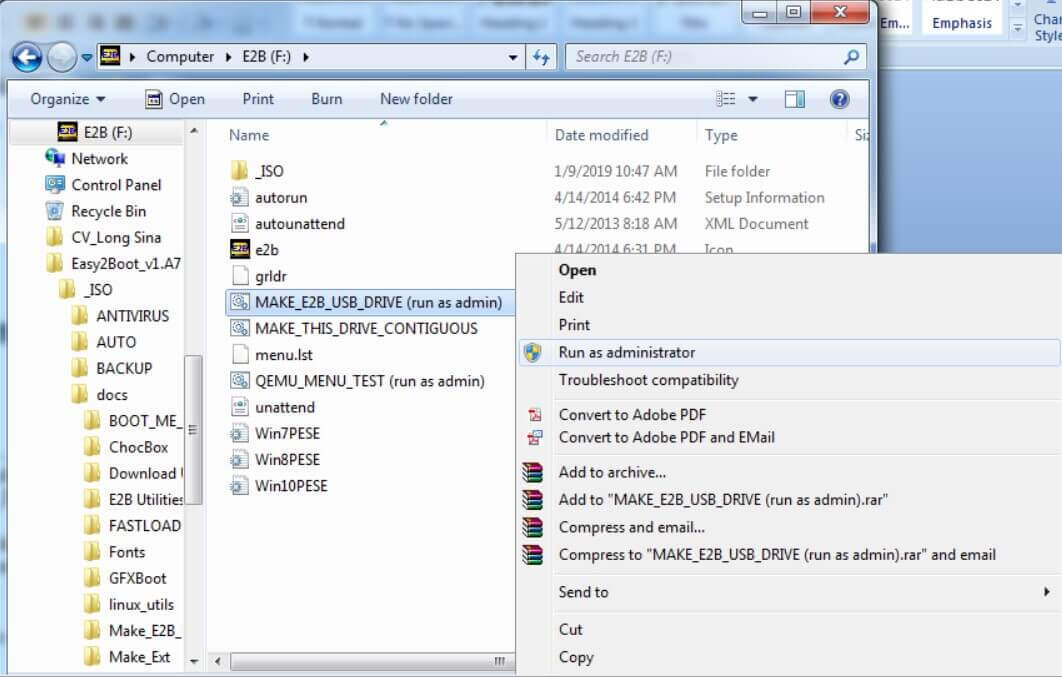
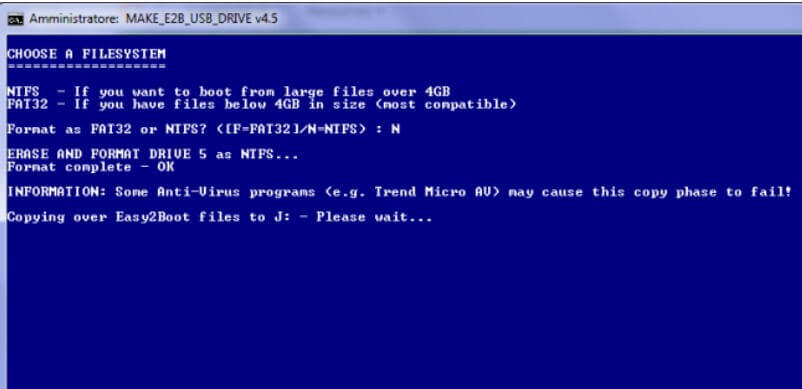
7) Access the C: \ E2B folder, right-click on the MAKE_E2B_USB_DRIVE (run as admin) .cmd file and choose the Run as administrator command.
8) When the following screen appears, indicate the number corresponding to the USB drive or in any case to the USB key to be made bootable .
In the example ( DRIVE 5 ), just type the number 5 and press Enter.
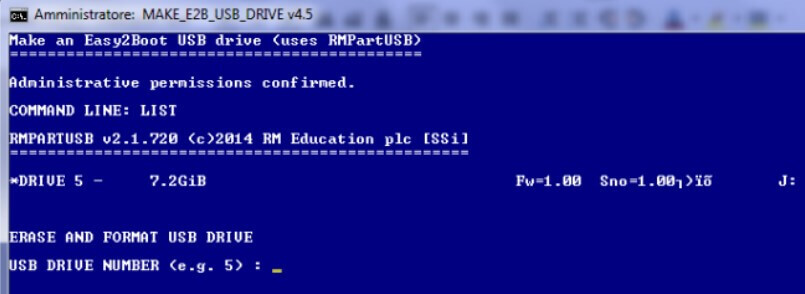
For further confirmation, Easy2Boot indicates the drive letter assigned by Windows to the USB drive on the right.
The procedure will format the indicated USB drive by permanently removing all its contents ( check that you have specified the correct drive and that its contents can be completely deleted ).
When the Are you sure it is OK to format DRIVEN message appears, you will need to type Y and press Enter.
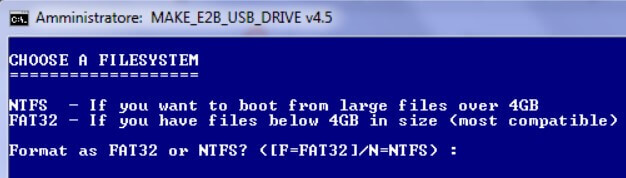
You may then be asked to format the USB drive with the FAT32 or NTFS file system. You will need to choose NTFS (and then press N followed by entering) if you intend to store, on the key, files larger than 4 GB (for example, the ISO files of Windows 7, Windows 8.1, or Windows 10 ).
9) The next step, once the files have been copied to the USB drive, is to choose the language and keyboard layout.
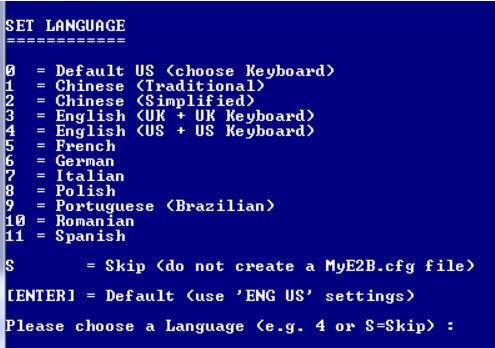
When the Show filename extensions in the menu message appear, simply press the Enter key.
As soon as Write \ _ISO \ MyE2B.cfg gile? It appears you will have to press the Enter key again.
The Easy2Boot window will turn green and, by pressing Enter again, you will exit the USB key configuration procedure.
10) At this point, the ISO files of Windows 7, Windows 8.1, or Windows 10 can be copied into the \ _ISO \ WINDOWS subfolders contained in the newly prepared USB key.
In the \ _ISO \ LINUX folder, you can insert Linux distributions (“Live CD”) or other utilities based on the Linux kernel.
We recommend that you always check this list to verify if the package you intend to start with the multiboot key is compatible and has already been tested for use with Easy2Boot.
The same page shows the instructions to follow to start, from the same USB stick, more or less known bootable software tools.
It must be said that most ISO files (except for the files that contain the Windows installation procedures ) can be started simply by copying them to the \ _ISO \ MAINMENU folder.
In some cases, it is necessary to change the file extension (but the author of Easy2Boot specifies this in the list mentioned above).
In case an ISO file does not boot at system boot, from the USB stick, with UEFI enabled, you will have to use the MPI Toolkit tool and convert it as an .imgPTN partition image.
11) Easy2Boot does not create problems with booting from UEFI systems (see What is UEFI and what you need to know about the new BIOS and Secure Boot and Windows: what it is for how to disable it ) because it does not negatively interfere with the Secure Boot functionality.
Boot via UEFI is possible via Easy2Boot by saving one or more .imgPTN images on the previously configured USB key.
As explained on this page, it is possible to generate an .imgPTN file, compatible with UEFI boot, from an ISO file, from a USB drive, or files contained in a folder.
After downloading the MPI Toolkit tool, you will have to extract its contents on the hard disk then:
– Access the ImDisk folder.
– Double click on the imdiskinst.exe file.
– Double-click the CreateDesktopShortcuts.cmd file to create the icons on the desktop.
– For example, drag an ISO file (or the icon of a USB drive or a folder) onto the MPI_FAT32 link on the desktop. This will generate an .imgPTN image file for UEFI boot.
– The .imgPTN file thus produced must then be copied to the \ _ISO \ MAINMENU folder of the Easy2Boot USB key.
In the following video, starting at approximately 9 minutes and 11 seconds, the procedure for generating a file for UEFI boot is summarized.
12) As the last step, you will have to start the MAKE_THIS_DRIVE_CONTIGUOUS.cmd file in the root directory of the USB key. The Microsoft WinContig utility will automatically run for fast defragmentation of the data contained in the key. If the files are not saved in contiguous areas, some ISOs may not start correctly.
As an alternative to the solutions mentioned, it is possible to purchase the Pro version of SARDU (from 9.99 euros), software developed by the Italian Davide Costa and repeatedly reviewed on IlSoftware.it.

A tech-savvy writer with a knack for finding the latest technology in the market, this is what describes John Carter. With more than 8 years of experience as a journalist, John graduated as an engineer and ventured soon into the world of online journalism. His interest includes gadget reviews, decoding OS errors, hunting information on the latest technology, and so on.


. What are the news of the new format for images")


. What are the news of the new format for images")

