Create Windows 10 Kernel-Based Emergency Boot Media: How Windows PE becomes a valuable tool for troubleshooting and performing maintenance on normal PCs, workstations, and servers!
Windows PE, which stands for Windows Preinstallation Environment, is a lightweight version of the Microsoft operating system that can be loaded at system startup and used to administer it in emergency conditions.
In the past, we have often talked to you about Windows PE, and we have said that some software allows you to create a startup disk without the need to resort to any add-on: AOMEI Backupper, to name it.
However, as we have seen, it is possible to create a Windows PE bootable media using a series of unofficial tools and even insert utilities and scripts to facilitate the management of Microsoft operating system installations and brilliantly solve any problems.
Today we want to tell you about a project that has matured a lot over the last few months: it’s called Win10XPE and allows you to automate bootable media creation based on Windows PE.
It is thus possible to create a tool based on the Windows kernel for starting any machine to be used as a real Swiss army knife. By creating a Win10XPE project, you can “package” a Windows PE media that works a bit like a Windows installation without changing the partitions’ configuration and content on the hard disk or SSD.
The “recipe” that has been developed allows you to create an ISO file to be inserted into a USB stick (for example, with Rufus: see Rufus, a guide to using the program to create bootable media) to boot the system from a Windows environment and run a variety of troubleshooting utilities.
How to create Windows PE bootable media with many ready-to-use utilities
The process of creating a Windows PE bootable media with many utilities to troubleshoot the installed operating system, recover data, and boot in emergency conditions is very simple with the Win10XPE “recipe” that we present to you. Here are the simple steps to get Windows PE-based bootable media:
1) Download the Win10XPE package by clicking here.
The archive contents can be indicated as potentially dangerous by many antivirus software simply because it contains several scripts, and the files of many “portable” tools are encoded within the scripts themselves. You can pick up and use the Win10XPE package without any fear.
The version of Win10XPE that we propose is updated to 20/11/2019. You can check the availability of more updated versions of the Win10XPE package at this address (click on the Win10XPE link ).
2) Download the Windows 10 64-bit evaluation version ( from here, you can download the 32-bit version for older systems).
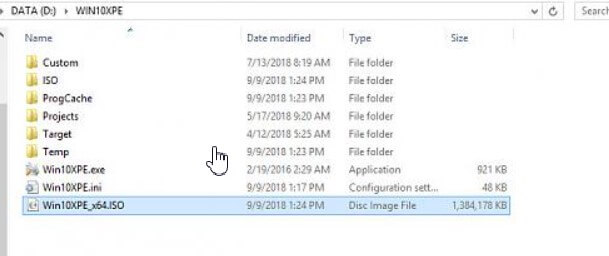
3) Extract the contents of the Win10XPE archive to c: \ Win10XPE.
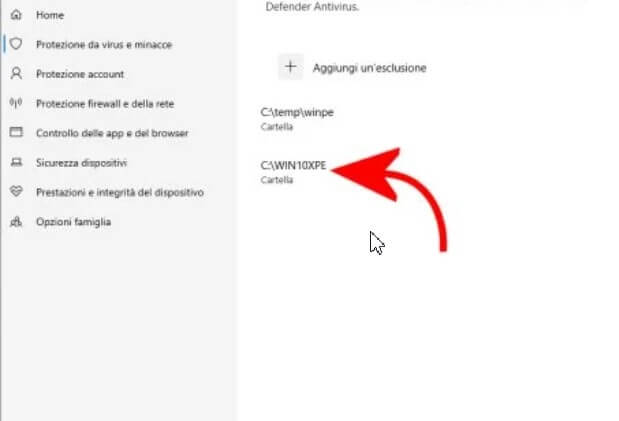
4) Temporarily disable the antivirus or add an exception so that the contents of the c: \ Win10XPE folders are always excluded from the real-time analysis.
In the case of Windows Defender, just type Virus and threat protection in the operating system search box, click on Manage settings under Virus and threat protection settings, add or remove exclusions and finally add the c: \ folder Win10XPE.
5) In Windows 10, double-click on the .ISO file downloaded in point 2) above, then clicking on the This PC icon; note the drive letter assigned to the image file content.
In Windows 7, you can mount the ISO file using “ad hoc” software like WinCDEmu or extract the ISO image contents with an application such as 7-Zip.
6) Go to the c: \ Win10XPE folders and double click on the Win10XPE.exe file.
7) Wait for Win10XPE to load, then click on Select the Windows 10 source folder and indicate the drive letter corresponding to the support of Windows 10 evaluation version “mounted” in the previous point 5).
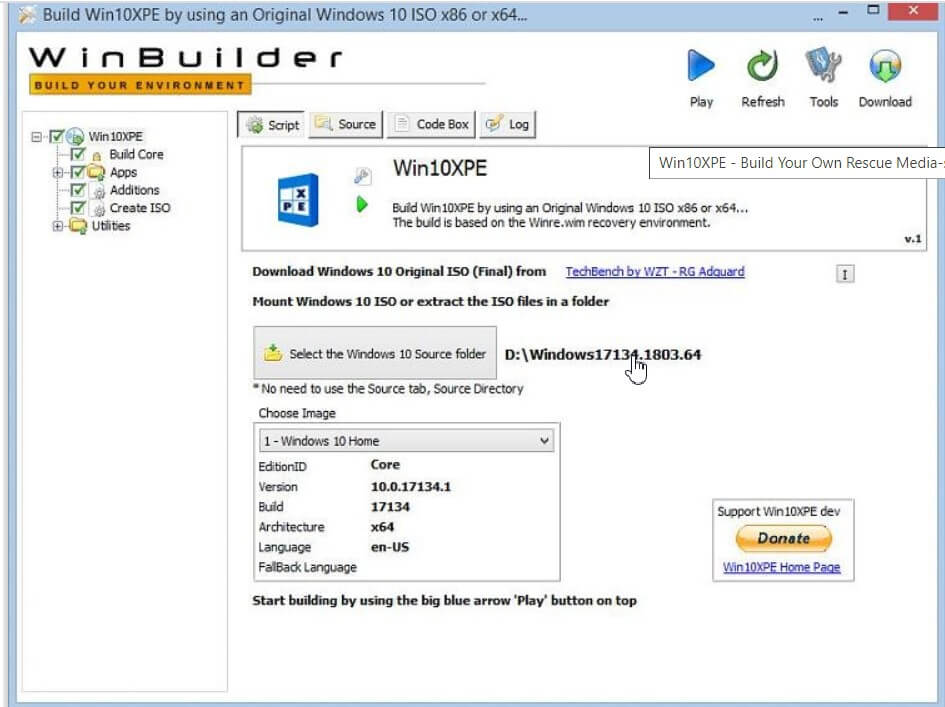
8) At this point, click on Play at the top to obtain a Windows PE ISO file based on the Windows 10 kernel with all the mentioned utilities. Performing the procedure on an SSD drive will not take more than 10 minutes (some files need to be downloaded from the Internet: answer affirmatively when any requests appear).
The Windows PE ISO file will be saved in the same folder c: \ Win10XPE.
9) Using Rufus, you can save the contents of the ISO file created with Win10XPE in a USB key and make it bootable at system boot.
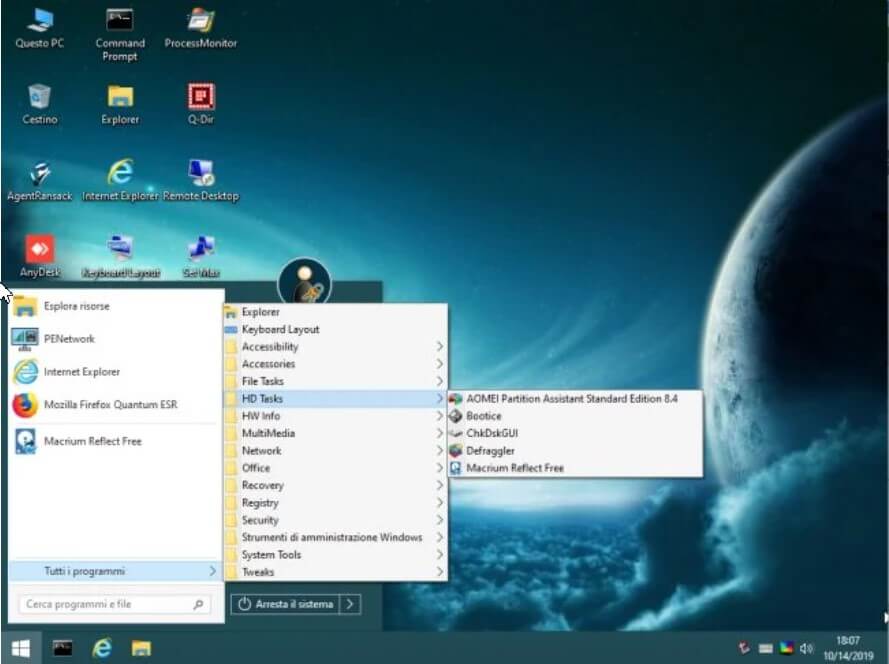
10) Starting the system from the support created with Win10XPE, a desktop screen similar to the one shown in the figure will be proposed.

11) By accessing the Start menu, you will find all the standard Windows utilities and the additional programs, divided into categories, essential to restore an installation that is not working correctly or to carry out maintenance operations.
By downloading this file and copying the compressed archive contents to the C: \ Win10XPE \ Projects \ MyPlugins \ utility folder, you can add other useful programs to the Windows PE bootable media.
We will soon be providing an add-on package to enrich Win10XPE with additional applications that are very useful during Windows system maintenance and troubleshooting.
To customize the desktop background and user icon, replace the images in C: \ WIN10XPE \ Custom \ Wallpaper and C: \ WIN10XPE \ Custom \ UserAccountPicture.
You can also manually add new portable applications: go to the paths C: \ WIN10XPE \ Custom \ Custom \ x64 \ AdditionalFiles \ Program Files and C: [WIN10XPE \ Custom \ Custom \ x86 \ AdditionalFiles \ Program Files and then add what you prefer. The files will become part of Windows PE media but will not be pinned to the Start menu. To create links, you can modify the pecmd.ini file and add LINK% Desktop% \ xxx% Programs% \ xxx by making the appropriate substitutions in place of ” xxx. “
If you are wondering what the DVB T2 is, make sure you take a peek at this guide!

A tech-savvy writer with a knack for finding the latest technology in the market, this is what describes John Carter. With more than 8 years of experience as a journalist, John graduated as an engineer and ventured soon into the world of online journalism. His interest includes gadget reviews, decoding OS errors, hunting information on the latest technology, and so on.


. What are the news of the new format for images")


. What are the news of the new format for images")


