Most notebooks on the market (and some desktop PC models) host the so-called recovery partition on the hard disk. The hard disk is divided into two portions: one partition is made available to the user in the form of free space, the other is the recovery partition which is inaccessible to the user and hidden in such a way as not to be listed in the window Computer resources.
In the recovery partition are stored all the data for carrying out a reinstallation of the operating system, its basic configuration (initially decided by the notebook manufacturer), the preloaded software.
Generally, after the purchase of the notebook, at the first start of the same, a procedure is automatically initialized, which, drawing on the recovery partition, takes care of installing the operating system and all the preset applications within the partition visible to the user and available for storing files and folders.
The recovery partition can occupy several GB of hard disk space (even more than 10 GB), a value that is felt especially on systems with not very large hard drives.
Some readers have asked us if it is possible to get rid of the recovery partition. The procedure is all quite simple: it is still good to make some important observations on the matter.
1. the deletion of the recovery partition should only be carried out by experienced users if necessary
2. you must be sure that you can restore the operating system and installed applications without the aid of the recovery partition (by performing a reinstall complete system or using the “Emergency CDs”)
3. if you really want to delete the recovery partition, make sure you have already created the “Emergency CDs / DVDs.” In fact, each notebook has a particular software that allows the user to burn the recovery contents partition onto CD or DVD media. In case of problems, if the recovery partition has been deleted, it will be possible to restore the system to its initial state using the “emergency CD / DVD.”
4. verify that deleting the partition does not automatically lead to changes in terms of the warranty.
5. make a complete backup of the contents of partition C:
To check the recovery partition size, access the Disk Management window by right-clicking the My Computer icon, then Management, then Disk Management. The recovery partition (it has no drive letter associated with it) is generally not deleted even using “Disk Management” (the Delete Volume command is not available).
You can also use the command-line-based DISKPART tool to do this without using third-party utilities.
Before proceeding, however, there is one fundamental aspect to bear in mind: whether the partition is recovery is placed BEFORE drive C: (you can check this by referring to the graphical representation of the partitions shown in the Shrink volume window are, in fact, peculiarities introduced only in the most recent Microsoft operating systems). To delete the recovery partition using only the DISKPART, go to the Command Prompt Disk Management ); it will not be possible to “expand” this last in the unallocated space left free by the recovery partition after deletion. On the other hand, if the recovery partition is located AFTER the C: drive, in case you are using Windows Vista, you can use the Extend Volume command to extend the volume size. IS’
Windows is making sure once again that you have already created the “Emergency CD / DVD” set and that you are always able to restore the system to the initial configuration.
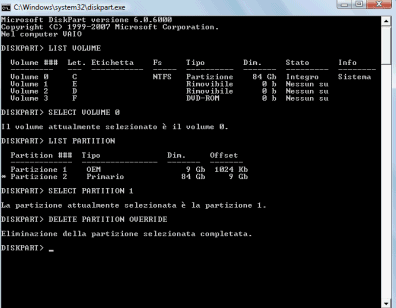
After having typed the DISKPART command, type LIST VOLUME: you will get the complete list of the hard disk drives. Then locate the main hard disk and note the identification number associated with it (for example: 0 or 1, …).
Then type the commandSELECT VOLUME n taking care to replace “n” with the identification number found previously.
By running the LIST PARTITION command, you should get two partitions: one is the main one, visible to the user, the other – smaller – is the recovery partition (the order of the two partitions can vary).
At this point, make sure several times to correctly identify the recovery partition and its identification number (first column), then type the command SELECT PARTITION n where “n” must be replaced with the numerical identification obtained.
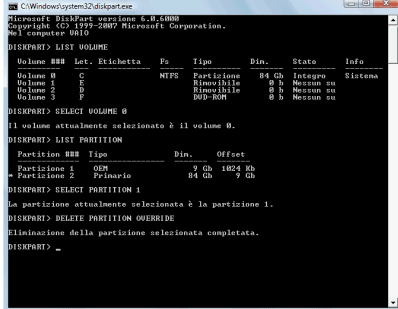
The DELETE PARTITION OVERRIDE command allows you to permanently delete the selected partition: make sure you have correctly selected the recovery partition.
To exit DISKPART, type EXIT.
Going back to the Windows “Disk Management” window, you will notice that – instead of the recovery partition – there is now unallocated space.
The free space can be used as the user sees fit. If possible, it can be merged with the primary partition (C 🙂 or formatted to create a new partition accessible from My Computer with a different identifying letter (e.g., E :). Within the new partition, for example, you can think of storing personal documents, backup files, data files, and so on.
NOTE: Interventions on the hard disk structure should always be carried out by advanced users. We recommend that you do not practice the suggestions illustrated in the article if you do not have the necessary technical knowledge.

A tech-savvy writer with a knack for finding the latest technology in the market, this is what describes John Carter. With more than 8 years of experience as a journalist, John graduated as an engineer and ventured soon into the world of online journalism. His interest includes gadget reviews, decoding OS errors, hunting information on the latest technology, and so on.


. What are the news of the new format for images")


. What are the news of the new format for images")


 host the so-called recovery partition on the hard disk.)