What’s the quickest and most painless procedure to format your PC and install Windows from scratch regardless of which version you are using?
Much attention can be used to avoid making the operating system so slow and unstable that it requires formatting and reinstalling Windows.
We have talked about it in many of our articles, and you will find several suggestions in this regard also at the bottom.
Formatting the PC and reinstalling Windows is, however, the only solution when the simple advice we refer to has not been followed (use of virtual machines, periodic backups, checking the programs loaded when Windows starts, removing unnecessary software, particular care in choice and installation of new applications to avoid the loading of superfluous or potentially harmful elements …).
Below we present some procedures that allow you to format your PC without problems and quickly, regardless of Windows’s version.
The following steps are valid for Windows 7, Windows 8.1, and Windows 10.
Before formatting the PC, in any case, we suggest that you preferably create an image of the storage unit content or, in any case, make a backup of your data and the most important configurations.
How to format your PC and reinstall Windows in 5 steps
1) Retrieve the Windows Product Key and make sure the system is not activated with a digital right
If you are using Windows 10 and intend to reinstall it on the same machine, we suggest you to check if the operating system is activated with a digital right (or ” digital license “; digital entitlement in English).
Now, in Windows 10, the digital right is a sort of “signature” that photographs the system’s hardware configuration in use. It is stored on Microsoft’s servers and allows you to automatically reactivate Windows indefinitely.
To use the digital right on the same machine, just reinstall Windows 10, and the system will be activated immediately without the need to enter any Product Key.
The digital right is valid only if you do not modify “key” components, such as the motherboard.
To check if Windows 10 is activated with a digital right, we suggest typing Activation in the search box and then press Enter.
Suppose under Activation; you read Windows 10 is activated with a digital license. In that case, you will not have to go looking for any Product Key, and the operating system can be immediately reinstalled.
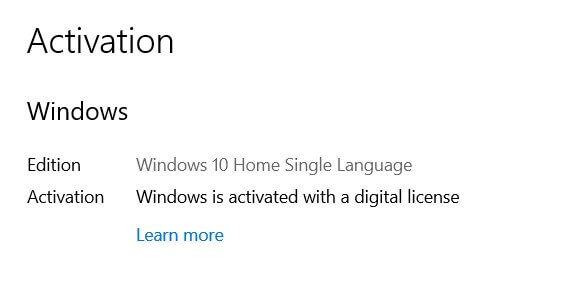
If the additional phrase ” linked to your Microsoft account ” is also shown, it means that the digital right has been successfully saved, server-side, and linked to the user’s Microsoft account. This gives more guarantees in case of a radical change in the Windows 10 PC (for example, the replacement of the motherboard).
If Windows 10 is activated with Product Key or in the case of Windows 8.1 and Windows 7, you could find the product key using the tools presented in the article Recover Product Key from any computer, even when it does not start.
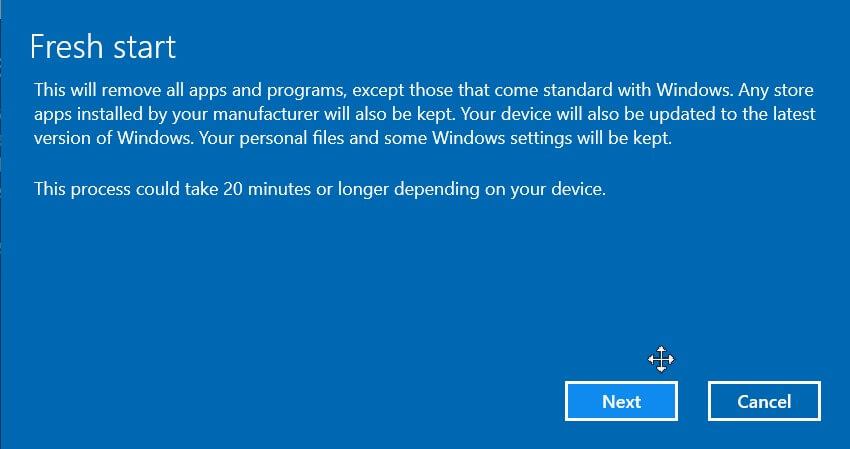
2) In Windows 10, use Fresh Start or Fresh Installation
All versions of Windows 10 currently supported by Microsoft support the Fresh Start or Installation from scratch functionality in the U.S. It is also very useful to permanently get rid of the so-called bloatware or those pre-installed when you buy a new PC.
In any case, it can be used to delete all Windows 10 programs by performing a full system restore equivalent to a fresh installation.
Compared to traditional formatting, however, you can keep your files stored with Fresh Start or Installation from scratch, avoiding their removal.
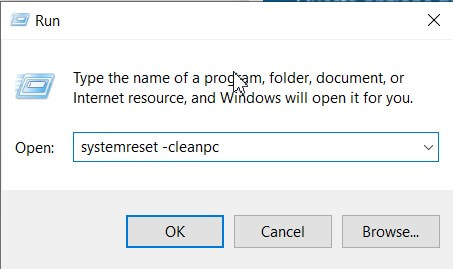
To start Fresh Start with any version and edition of Windows 10 currently supported by Microsoft, just press the Windows + R key combination, type systemreset -cleanup in the Open field, and press the CTRL + SHIFT + ENTER key combination to start the utility integrated into Windows with administrator rights.
For more information, we suggest referring to the articles Windows 10, the difference between Installing from scratch or Fresh Start and Reset your PC, and How to reinstall Windows 10 by removing unnecessary components.
If you decide to reset the system with Fresh Start, there is no need to continue with the next steps. And in case you are wondering how to format Windows 10, here is a quick guide to help you with the same!
3) Download and generate the Windows installation media
Regardless of whether you want to format your PC and reinstall Windows 7, Windows 8.1, or Windows 10, we suggest you download the most recent installation media available today.
The best practice that allows you to format your PC faster – is to have a USB stick with at least 8 GB of capacity and the one whose content can be safely removed.
In the article Download Windows 7, Windows 8.1, and Windows 10 from Microsoft servers, we explained how to get the latest version of the various versions of the operating system’s installation media.
From the same Windows 8.1 or Windows 10 system (or from another working machine equipped with the same operating system), you can, for example, use the Media Creation Tool software to configure the bootable USB key.
Alternatively, you can download the installation media ISO image and insert it into a bootable USB media, for example, using the free utility Rufus: Bootable USB stick, how to prepare it.
More information also in the article Rufus, a guide to using the program to create bootable media.
4) Download the drivers for the configuration of the hardware devices
Before starting the system’s reinstallation, we suggest downloading and saving separately (for example, in another USB key or other removable media) all the necessary drivers for the hardware devices that make up your PC.
You will need to make sure that you download the drivers for the Windows version you are reinstalling and for the correct architecture (32 or 64-bit version of Windows).
Often it is not even necessary to equip yourself with the various drivers (possibly always refer to the manufacturer’s website to download the latest versions) because Windows 7 and later are usually able to recognize the various hardware components and proceed with the installation of the necessary drivers.
In any case, we suggest that you at least download and save the network card drivers so that you can reinstall everything you need after the successful reinstallation of the operating system.
To check the network card in use, we suggest you press the Windows + R key combination, type devmgmt.msc, double-click on Network cards, and then on the Ethernet and WiFi network controllers (where present).
Searching Google for the name of the network controller and then going to the corresponding manufacturer’s download area, you can download the updated driver.
If in doubt, you can select the Details tab and choose Hardware ID from the drop-down menu. By right-clicking on the first item and choosing Copy, the identification data will be copied to the memory.
Just paste them ( CTRL + V ) into the Google search box to find the network card.
5) Format the PC and proceed with the installation of Windows
At this point, it is possible to restart the PC leaving the Windows installation media inserted (the bootable USB key previously prepared).
The Windows installation entirely handles the PC formatting procedure: therefore, no additional steps are necessary.
To boot the USB key system, you will need to make sure you have configured the correct boot sequence at the BIOS / UEFI level. Then, when turning on the machine, press the key to boot from the removable media.
After setting your preferred language and keyboard layout, just click the Install button and then click I don’t have a product key if Windows 10 was previously activated with a digital right.
In other cases (including other versions of Windows), you will have to enter your Product Key as soon as requested (make sure, during installation, to choose the correct edition of Windows: for example, Home, Pro, Enterprise, and so on ).
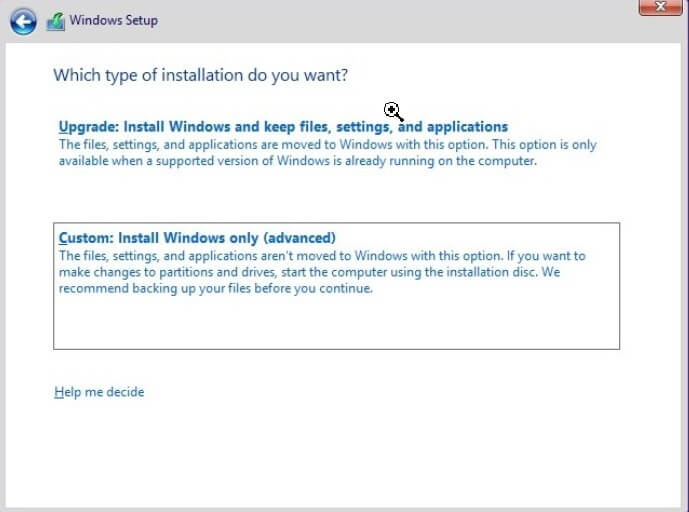
Once you have accepted the license terms, you can choose the Custom installation option: install Windows only (advanced option).
At this point, always as long as you are sure of what you are doing, you can select each partition present and then click Delete to remove them (if you want to do a complete cleaning of the contents of the disk or SSD and reinstall Windows from scratch).
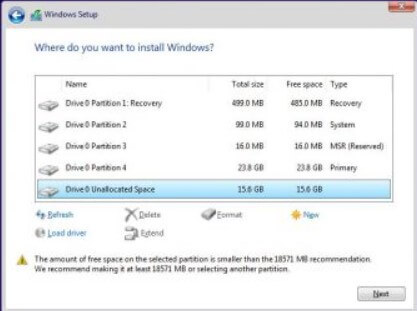
You will get an indication of Unallocated space with an indication of the total available space that corresponds to the hard disk or SSD capacity.
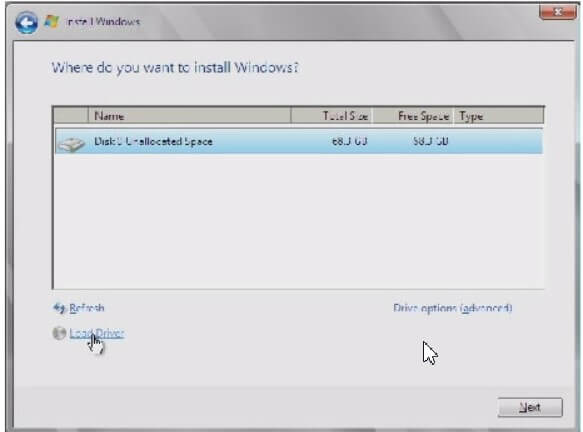
By selecting Unallocated Space and then clicking on Next, the Windows installation will take care of configuring the operating system on the storage media.
In case you receive the message, ” I could not create a new partition or locate an existing one, “you can apply the solutions shown in the article I could not create a new partition or locate an existing one: how to fix.
6) Use the custom Windows installation and keep the previous version of Windows in the Windows.old folder
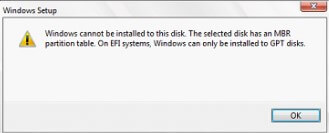
Also, delete the partitions present on the hard disk or the SSD; you can request the installation of Windows in the same partition where the operating system you are reinstalling is already present. Choosing the same partition where Windows is installed as the destination for the new installation of the operating system, a message similar to the one shown in the figure will appear.
Continuing, as soon as the new installation is completed, inside the Windows.old folder – created in the root directory – you will find the contents of the old folders of the previous installation.
By carefully checking the contents, you can check the programs that need to be reinstalled and Copy, subsequently, any preferences, licenses, and configuration files.
For more information, we suggest reading the article How to restore Windows 10 without losing data in the paragraph Restore Windows 10 without losing data.
7) The optimizations to be applied after formatting the system and reinstalling Windows
After the installation is complete, you will have to start Windows Update (type Windows Update in the Windows search box) to allow all available updates to be downloaded and installed.
Telemetry can sink the performance of the local network: if the Windows 10 updates are slow to download or if the performance of the entire LAN is unsatisfactory after the successful reinstallation of the operating system.
Excellent is the script to optimize Windows 10 presented at Optimize and speed up Windows 10: how to do it automatically. It allows you to automate some interventions that help you significantly speed up the Microsoft operating system.
To speed up the operating system and keep it always snappy, we suggest reading the following insights:
Computer slow at startup, how to find out the cause

A tech-savvy writer with a knack for finding the latest technology in the market, this is what describes John Carter. With more than 8 years of experience as a journalist, John graduated as an engineer and ventured soon into the world of online journalism. His interest includes gadget reviews, decoding OS errors, hunting information on the latest technology, and so on.


. What are the news of the new format for images")


. What are the news of the new format for images")


