We present a script that, using PowerShell exclusively, allows you to deeply adjust the operating system’s behavior. Useful for optimizing and speeding up Windows 10, making it even more usable. Update: the new version of the script now allows you to apply all the changes “in one go” and to restore the default Windows 10 behavior as needed. We have added further useful interventions that may or may not be applied at your discretion of the user.
After installation, Windows 10 hardly meets all users’ needs: as we have seen in other articles, the operating system automatically installs superfluous applications (even on the Pro edition). It highlights behaviors that many do not like at all.
To optimize Windows 10 and make it faster, you can use some settings accessible through the operating system’s graphical interface, make some changes in the registry, or any case from the command line.
For some users, these are operations that can be really tedious and often even complicated.
The good news is that PowerShell allows you to automatically perform all operations without colliding with the creation of keys and values in the system registry ( Regedit and system registry: a guide to the most useful aspects ) without having to resort to the reg command.
Using as a basis the fantastic ” Win10-Initial-Setup-Script ” script available on GitHub and continuously updated by its author, we have proceeded to adapt it and add some new features to customize Windows 10 and adapt it to your needs.
Rather than letting the script perform all the changes the author provided by default, we have made it possible for the user to think about applying each change.
In the configuration we have prepared, the script to optimize and speed up Windows 10 will offer the following opportunities:
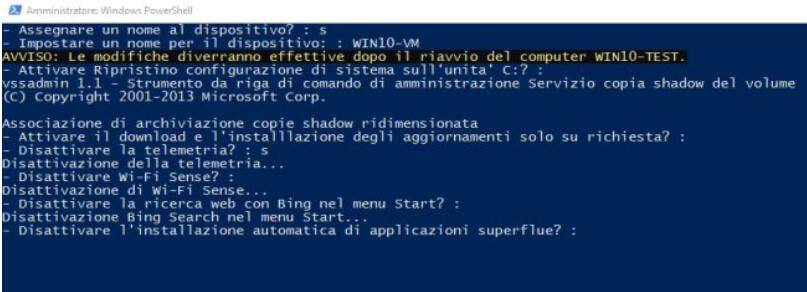
1) Give the device a name. It is done manually by pressing the Windows + R key combination by typing sysdm.cpl, but the script allows you to proceed automatically without tedious steps.
2) Enable the System Restore feature. By default, it appears disabled in Windows 10, but together with Previous Versions, it is useful. It can be enabled (see System Restore still exists: how it works). The script allows you to do this automatically for drive C: by assigning 10% of the available space to the System Restore feature. For the other drives, for now, you will have to do it manually by pressing the Windows + R key combination and typing sysdm.cpl, 4.
3) Enable the download and installation of Windows 10 updates on-demand only. This is the feature available in Windows 7 that has been lost over time. The applied change is the one described in the article How to disable automatic updates in Windows 10.
4) Disable WiFi Sense. Functionality that is activated (it is no longer present in the most recent Windows 10) shares the credentials of the wireless networks used with other users: Disable WiFi Sense, Windows 10 deletes the function.
5) Disable the integrated web search in the Windows 10 Start menu. If the Start menu, in your opinion, should only do the Start menu and not use the Microsoft Bing search engine in case the local searches do not offer any results, you can easily disable this feature. See also Search for files on your Windows 10 PC: How the new search works.
6) Uninstall the automatic installation of unnecessary applications. Avoid Windows 10 downloading and uploading potentially useless apps.
Attention. This change is irreversible: the Restore.cmd file presented below will not reinstall any third-party apps present on the System.
7) Prevent UWP applications downloaded from the Microsoft Store from exchanging data in the background, even when using other programs.
8) Disable geolocation services. However, it will no longer be possible to determine the position of your Windows 10 devices.
9) Deactivate the automatic updating of Microsoft Maps.
10) Disable sending feedback to Microsoft
11) Stop Windows 10 from showing suggestions on applications to install or download add-ons.
12) Disable the unique ID used to identify the same Windows 10 PC device and show “ad hoc” advertisements.
13) Prevent websites from accessing the list of languages installed in Windows 10.
14) Completely disable Cortana: the digital assistant will no longer be integrated into Windows 10 and will no longer offer its services.
15) Avoid sending any errors found to Microsoft on your System.
16) Limit the distribution of Windows 10 updates to the local network only, avoiding them, using a peer-to-peer scheme. The operating System shares them on the Internet and third-party systems (occupying bandwidth in upload).
17) Deactivate the Consumer Experience services. Connected with some of the features briefly described in the previous points, these services study the user’s behavior, interests and download and install potentially interesting apps.
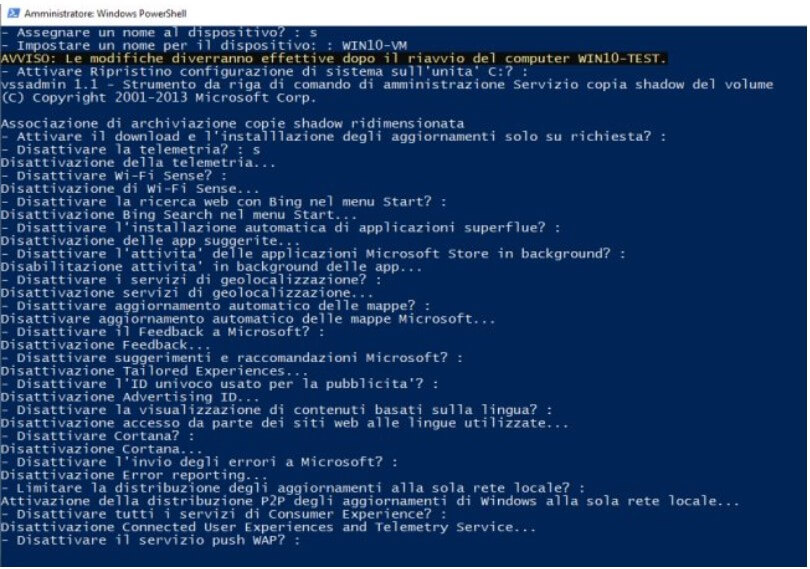
18) Disable the WAP push service, which facilitates file sharing between the Windows 10 PC and other devices.
19) Automatically set the network connection currently in use as “private” . In the article Difference between the public network and private network in Windows 10, we have highlighted the differences between private and public connection .
20) Prevent Windows Defender from showing a warning when not using a Microsoft user account.
21) Enable the F8 key at boot. In previous versions of Windows, it allowed access to the operating system recovery menu.
22) Windows 10 is set to activate at night, proceed with the possible download of updates, and carry out other maintenance operations. The script allows you to disable this behavior.
23) Disable the Remote Assistance function. If you don’t use it, why keep it enabled in Windows 10?
24) Remove background blur effect on lock screen (introduced with Windows 10 May 2019 Update).
25) Do not allow the use of so-called accessibility keys. We have often used them for tricks like the one illustrated in the article Forgot password Windows 10: exclusive, how to log into the system.
26) Configure the Windows 10 Task Manager, greatly improved compared to previous versions (Windows 10 Task Manager: what it allows you to do) to show all possible technical details.
27) Show details while performing operations on files and folders, transform the icons in the application bar by showing their compact version (to have more space on the screen and show more), disable the People icon (only in some versions of Windows 10), show all icons in the tray bar, prevent the operating system from looking for apps to use for opening unknown files.
With the script, all operations using a few simple PowerShell commands, you can also perform on copies of Windows 10 not yet activated: Activate Windows 10, when the message appears and how to delete it.
28) Whenever a new shortcut is created, Windows adds the suffix ” – Shortcut ” to the name. The script allows you to eliminate it by modifying the default Windows 10 behavior.
29) Disable the heavier visual effects to improve system performance and overall Windows 10 responsiveness.
30) Show file extensions and hidden items—two adjustments applicable from the card Show to Explore files that can now be applied automatically.
31) Show the This PC icon on the desktop and its contents as soon as you press the key combination Windows + E ( File Explorer ).
32) Using the script, you can uninstall all potentially useless apps currently known that were already present on the system. You can also remove Xbox features and disable Flash in Edge and Internet Explorer (the Edge shortcut can be automatically deleted from the taskbar and desktop). Finally, virtual printers like XPS and Microsoft fax can be removed.
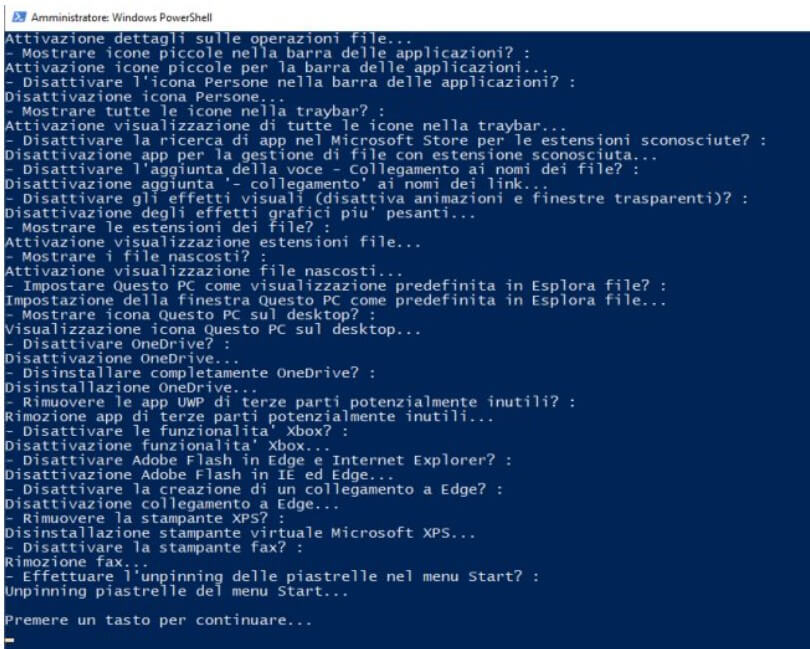
33) With a single operation, it is possible to disconnect the Windows 10 Start menu’s tiles to obtain a compact and Windows 7-style menu.
Warning. This change is irreversible: the Restore.cmd file presented below will not allow you to restore the Start menu configuration (once the tiles have been removed, they will not be recoverable).
34) The script also allows you to activate again, in Windows 10, the periodic backup of the system registry contents. Starting from version 1803, the operating system no longer saves a backup copy of the registry in the % systemroot% \ system32 \ config \ RegBack folder.
35) The script allows you to possibly disable the Reserved Space feature that Microsoft introduced with the release of Windows 10 May 2019 Update (version 1903).
36) The script automates the operations illustrated by allowing you to lock the Start menu layout and apply the same structure to any new users added to the system.
The Start menu layout is automatically stored in the C: \ Backup_MenuStart.xml file: do not delete this object.
37) As the last step, it is possible to disable the request to set up three security questions when creating a new Windows user account. By setting this policy, Windows 10 will only ask you to set a password and a personalized hint to remember it.
How to use the script to optimize and speed up Windows 10
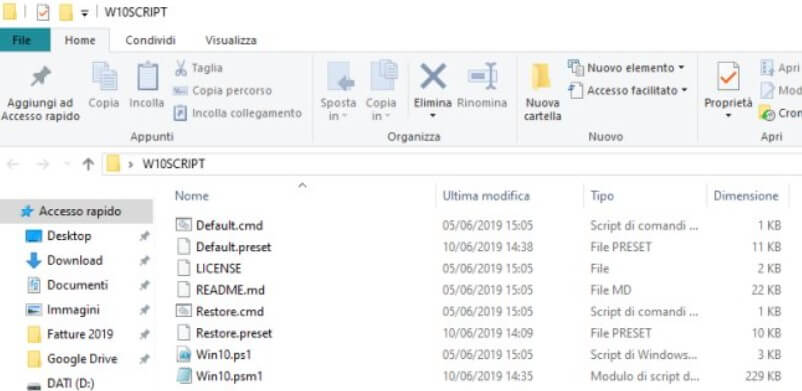
The compressed archive contents must be entirely saved in a folder of your choice, so just double-click on the Default.cmd file to start customizing, optimizing, and speeding up Windows 10.
To apply a change, just type S and press Enter or simply use the Enter key. To avoid setting an adjustment on your Windows 10 system, simply type N and press Enter.
How to accept and apply all changes by simply pressing the Enter key
Compared to the first version of our script, we have added the ability to accept all the changes that allow you to optimize and speed up Windows 10.
When the question ” ATTENTION: ACCEPT ALL DEFAULT CHANGES (no further questions will be asked)? “, Pressing the S or Enter key will accept all customizations and default settings contained in the script. Otherwise, by typing N, you can decide whether to apply every single change from time to time.
The changes are all reversible, with some exceptions.
By double-clicking on the Restore.cmd file, you can undo all previously applied changes or restore only some default operating system behaviors.
The Restore.cmd file will not allow you to restore the Start menu configuration (once the tiles have been removed, they will not be recoverable), it will not reinstall any third-party apps that may have been previously loaded on the system by Windows 10 and will not ask you to change the name of the device in use.
IMPORTANT: Before proceeding with any changes in systems used in production, we suggest that you perform some tests using Windows 10 virtual machines or installations not used for production purposes.
As a precaution, before applying one or more changes proposed by the script, it is essential to create a backup of your files and system configuration.
IMPORTANT: The advice is to use the script on “clean” Windows 10 machines with all Microsoft updates already downloaded and applied. This does not mean that the script cannot be used on Windows 10 machines already in use, but it is not excluded that any problems not directly caused by the script may arise.
IMPORTANT: Before running the script, it is advisable to close all running applications and save any open documents because the machine’s automatic reboot is performed as the last step.
It should be borne in mind that the script would allow you to make many more changes: we decided to select and propose only the most useful ones by adding the possibility of applying some interventions not foreseen in the original version of the script.
– The download of the script to optimize and speed up Windows 10 can be done by clicking here.
PLEASE NOTE: Before starting the script, it is good to read the entire article and evaluate if Windows 10 features should be disabled. It is also essential to read the notes indicated as “IMPORTANT”, shown above.
If the script is started on a system already configured and in use, it is essential to make a complete backup of the sSystemas as a precaution before using the script.
Again, as a precaution, the script’s latest version no longer asks if the user intends to disable and possibly completely uninstall OneDrive (the script is, however, freely manageable and customizable by each user).
The script’s basis is ” Win10-Initial-Setup-Script ” available on GitHub: all directives are documented in this spreadsheet. Our version of the script selects the best applicable interventions, allows users to choose which ones to apply, and introduces some additional directives such as those to change the name of the Windows 10 PC, to enable the SSystemRestore utility, updates installed on- demandinstead of automatically, the unpinning of the “tiles” in the Start menu, the blocking of the Start menu layout, the periodic backup of the registry, to disable the Reserved Space feature and the removal of security questions when creating a new account user.
For users who want to reactivate the classic display of icons in the Windows 10 traybar: without rerunning the recovery script, those who want to reactivate the system management of the icons shown in the traybar (the area near the system clock) can open the command prompt with administrator rights and type the following:
reg delete HKCU \ Software \ Microsoft \ Windows \ CurrentVersion \ Policies \ Explorer / v NoAutoTrayNotify / f
Make sure to copy the command (all on one line) respecting the syntax and then restart Windows 10.

A tech-savvy writer with a knack for finding the latest technology in the market, this is what describes John Carter. With more than 8 years of experience as a journalist, John graduated as an engineer and ventured soon into the world of online journalism. His interest includes gadget reviews, decoding OS errors, hunting information on the latest technology, and so on.


. What are the news of the new format for images")


. What are the news of the new format for images")

