How to set up a VPN server in Windows 10 and Windows Server without resorting to third-party solutions: the main differences.
Creating a VPN server is very useful when connecting to your local network and access all shared resources safely, remotely. How a VPN works, and why it is useful to use it?
The advice, as we have indicated several times, is to set the VPN server on the router or on a device that is always on (for example, a NAS server) and, above all, use a secure protocol such as OpenVPN .
Unfortunately, to date, Windows does not directly support OpenVPN nor WireGuard. Both the setting of a VPN server and the client mode connection is only possible by installing the respective third-party software.
Windows 10, like previous versions of the operating system, allows you to create a VPN service without installing third-party software. Users can still only create a server that uses the old and outdated Microsoft PPTP ( Point to Point Encryption Protocol ). We explained how to use this option back in 2011 ( Create a simple VPN network with Windows 7 and Windows XP ), but today, as mentioned, there are many much safer alternatives.
Please, in case of emergency, to establish a VPN connection with a server created on a Windows 10 system, you can still use PPTP: the connected client will have full remote access to all shared resources in the local network, regardless of the device used ( you can also connect remotely from smartphones and tablets). However, the Windows 10 VPN server does not offer particular guarantees in terms of security, and it is not possible to connect with more than one number of remote clients.
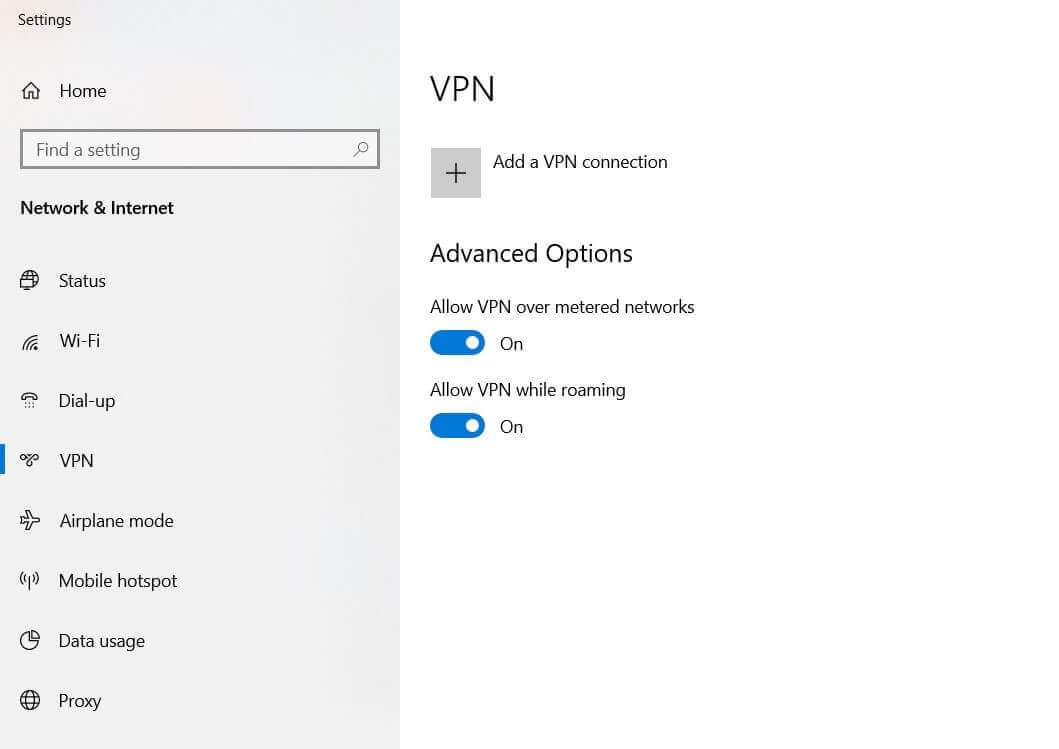
Set up a VPN server in Windows 10
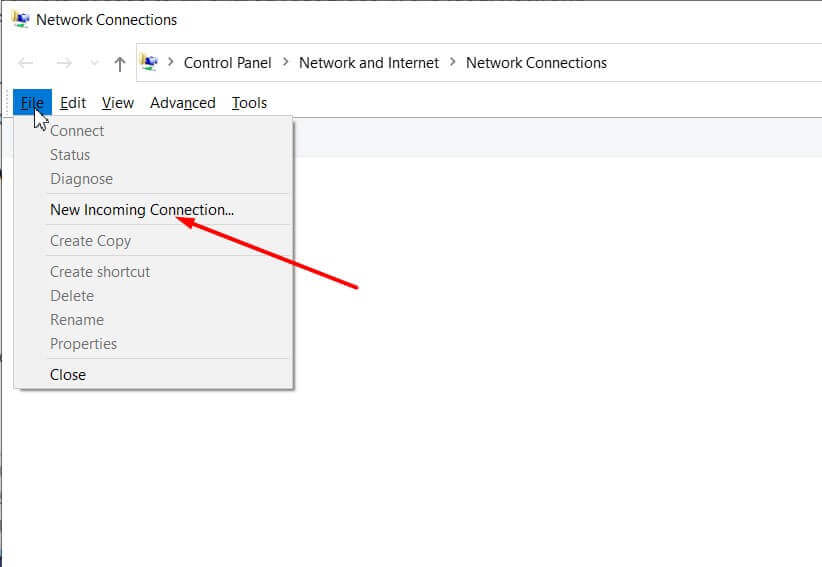
To activate a VPN server based on PPTP protocol in Windows 10, just press the Windows + R key combination, type ncpa.cpl, press the ALT button and then choose New incoming connection.
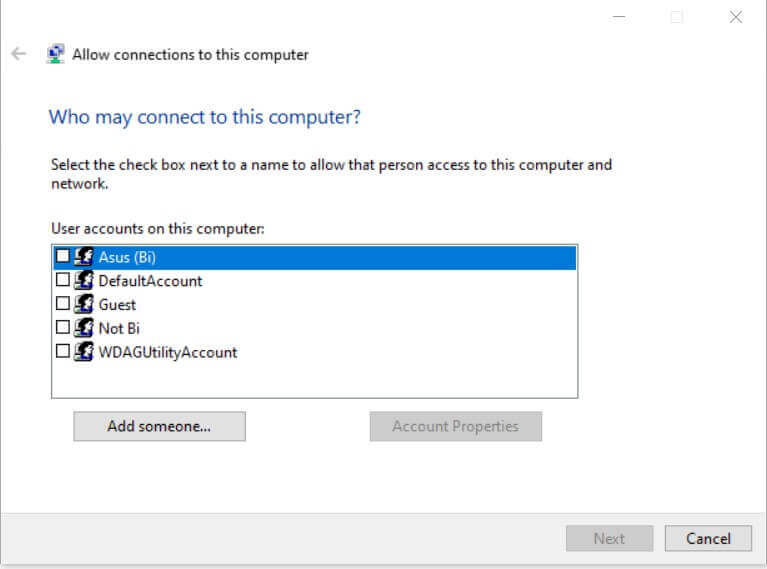
You have to choose the username to authenticate from the remote device that connects to the VPN server on the screen that will appear.
After clicking Next, you will need to check the Through Internet box and activate Internet Protocol version 4, File and Printer Sharing for Microsoft Networks and QoS Packet Scheduler.
By selecting Internet Protocol version 4 and clicking on Properties, you will have to check the box Allow callers to access the local network, then specify a range of IP addresses that can be assigned to devices connected from time to time via VPN (outside the range that can be used by the server DHCP configured on the router).

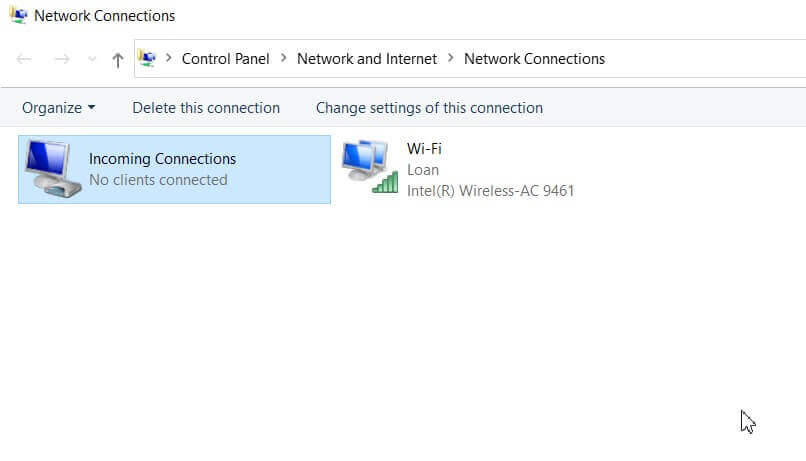
By clicking on Allow access, the new Inbound Connections icon will appear in the Network Connections window. As soon as a client accesses remotely through the newly configured VPN server, a second icon will appear with WAN Miniport (PPTP) and a reference to the user account in use.
Windows 10 takes care of automatically setting its firewall by allowing the management of connection requests arriving on the VPN. You can check this by typing Windows Defender Firewall in the search box, clicking on Allow app or feature through Windows Defender Firewall (left column) then on the Change settings button. The Routing and Remote Access rule will be enabled for private and public networks: Difference between the public network and private network in Windows 10.
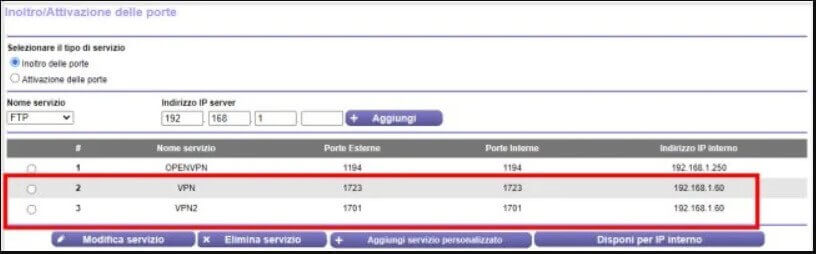
The Windows 10 system that acts as an intermediary for remote access to the LAN via VPN must have a static private IP address.
After having noted it, you need to go to the router administration panel and activate port forwarding ( Port forwarding, what is it, and what is the difference with port triggering ) of the TCP ports 1723 and UDP 1701.
In the example in the figure, the server Windows 10 VPN has private IP 192.168.1.60 .
Connecting the client to the Windows 10 VPN server
After restarting the Windows 10 system on which you have just configured the VPN, you can try to connect from a client device, be it Windows, Linux, Android, or iOS.
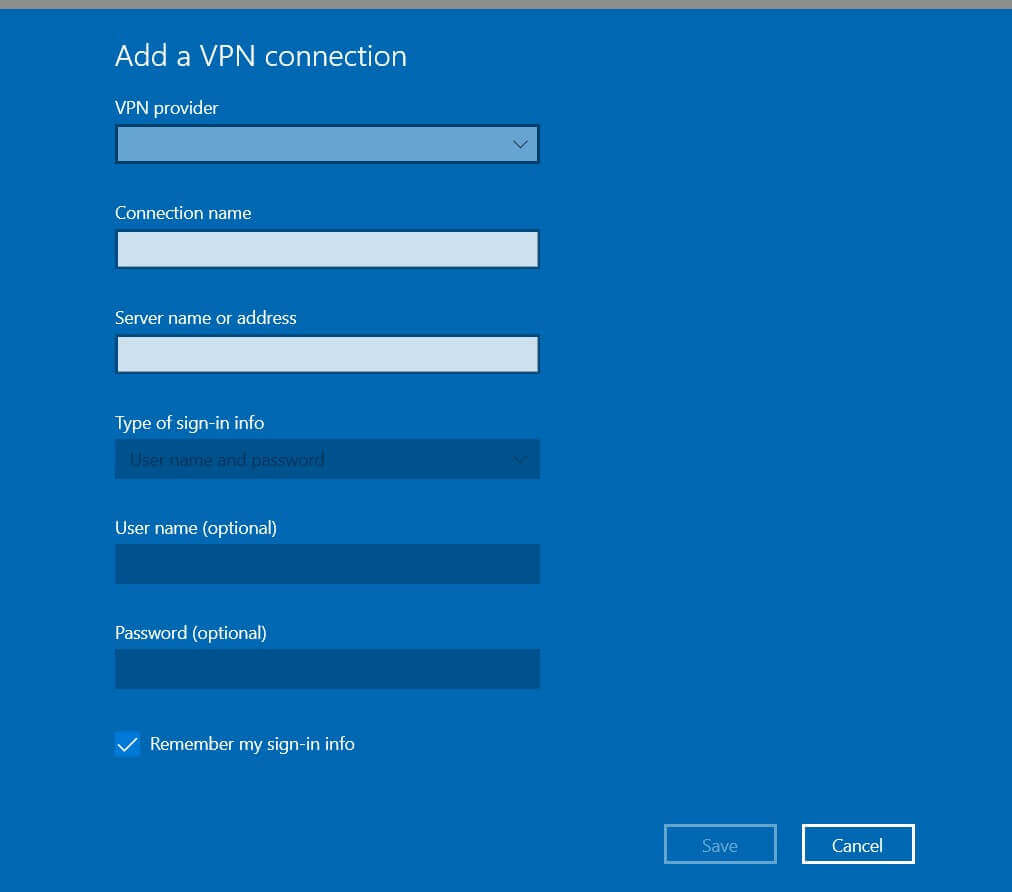
In Windows 10, just type VPN settings in the search box, then click Add VPN connection.
At this point, it will be sufficient to indicate the various data requested, taking care to specify, in the Name or server address field, the static public IP address or the mnemonic address (managed via DDNS) of the Windows 10 machine on which the VPN server has been configured.
The remote connection will thus be established immediately. By opening a command prompt window with the ping command 192.168.1.1 (replace the IP with that of the router or another system connected to the LAN), you will immediately get an answer.
Not only. In the Windows Network window, you will get the list of systems connected to the local network, despite being connected remotely from a completely different network, and by pressing Windows + R then typing \\ NAME-PC \ NAME-RESOURCE, you can directly access a shared folder (make the appropriate replacements).
The same operation can be done from an Android client by searching for a VPN in the settings (choose PPTP as the VPN server type ).

In all cases, by default, once the connection to the VPN is established, the clients will also browse the Internet using the public IP associated with the remote router.
By right-clicking on Inbound Connections in the Windows 10 System Network Connections window, the VPN server will be immediately disabled and removed.
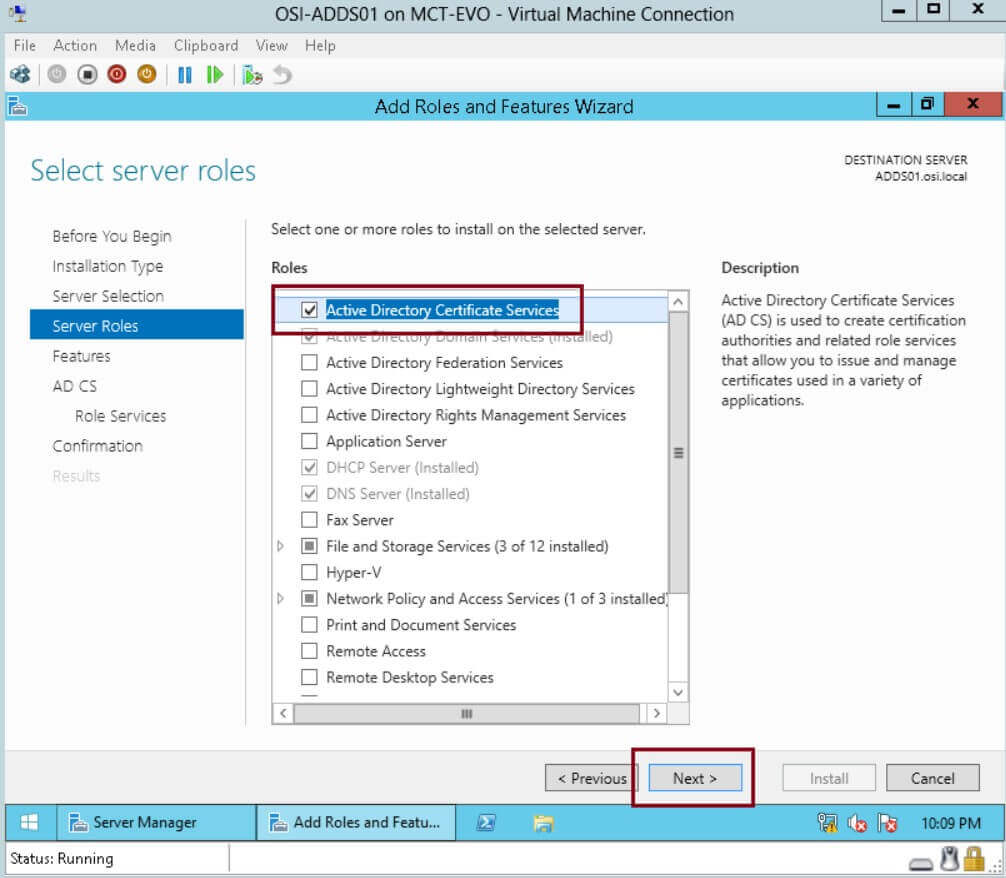
Create a VPN server with IPSec on Windows Server
To create a more secure VPN server, you can rely on Windows Server, which also allows using the IPSec protocol: VPN networks: differences between PPTP, L2TP IPSec, and OpenVPN.
To proceed, from the Server Manager window, click on Add Roles and Features, select the local system, and then check the Remote access box.
In the next Role Services section , check the DirectAccess and VPN (RAS) and Routing boxes .

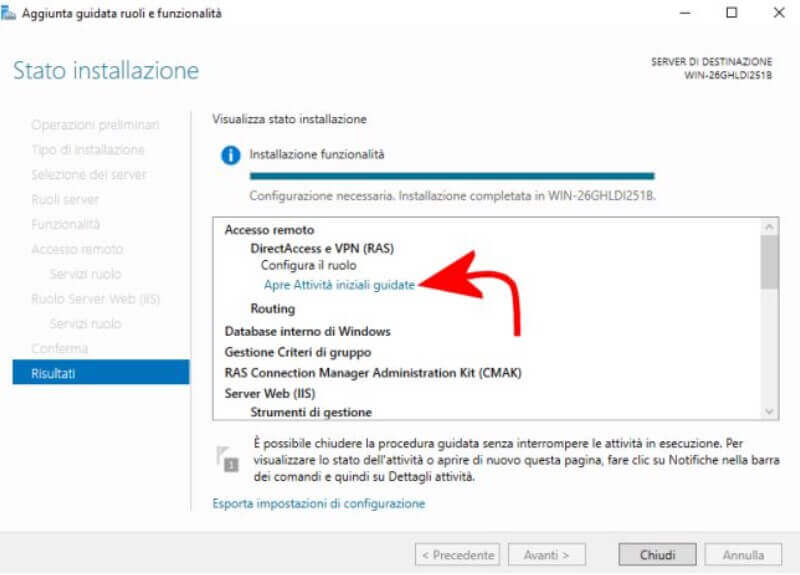
Once you have finished installing the remote access features, you can click the Open guided starter tasks link and then click the Deploy VPN Only button .
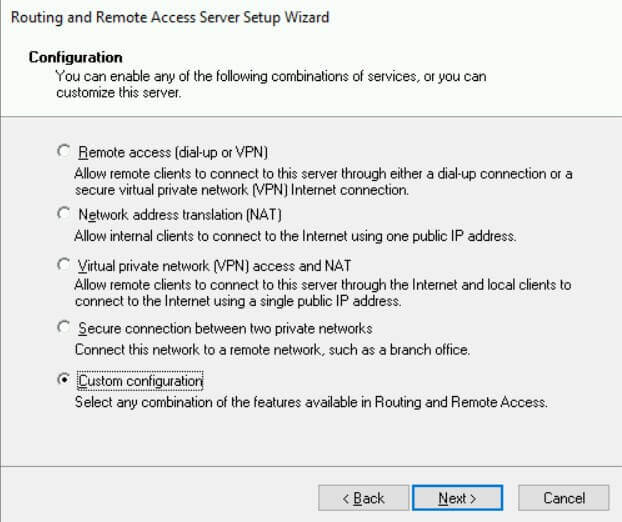
By right clicking on the server name, you will need to select Configure and enable Routing and Remote Access . You will then need to choose the Custom configuration option , then activate the VPN access box and click on the Start service button .
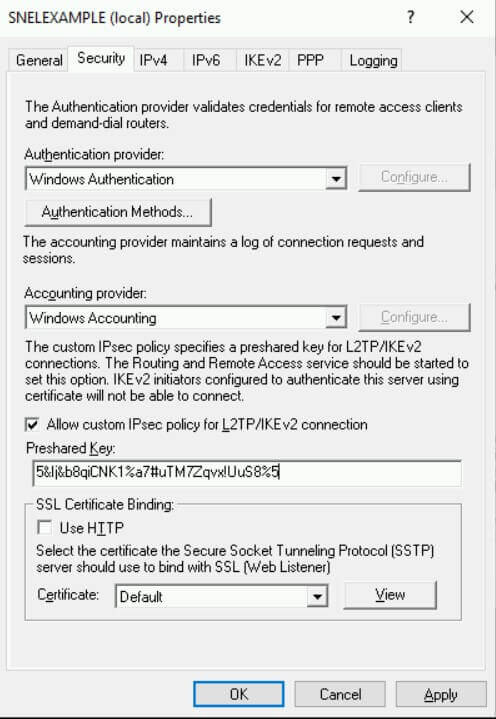
With a right click on the server name in the Routing and Remote Access window (which can also be called up from the Server Manager by clicking on the Tools menu item ), selecting Properties, you will have to go to the Security tab. By checking the Allow custom IPsec policy for the L2TP / IKEv2 connection box, you will have to set an access key in the field below.
By clicking on the IPv4 tab, as seen in the Windows 10 VPN server’s case, selecting the Static address pool option, you will have to set a range of private IPs that Windows Server can assign to remotely connected clients.
After clicking OK, you will need to right-click the server name, choose All Tasks then Restart.
On a separate server, by pressing Windows + R and typing lusrmgr.msc, you will have to double-click on the user’s name authorized to access the VPN remotely, select the Incoming Calls tab, and then select Allow access in the Access Permission box to the network.
Otherwise, for servers connected with a domain, you will have to access the window for managing users and computers in Active Directory.
At this point, on the router, you will need to activate port forwarding on the following ports by specifying the private IP address of the Windows Server machine:
– TCP 1701
– UDP 500
– UDP 4500
Connect a client to the IPSec VPN server created on the Windows Server machine
Regardless of the type of client with which you connect to the remote VPN server, this time, you will need to select the L2TP / IPSec entry with pre-shared key or L2TP / IPSec PSK (acronym for pre-shared key ). Then indicate the key you decide previously when setting up the VPN server and the credentials of the account authorized to access remotely.
In the case of Android devices, for example, the VPN setup screen is very similar:

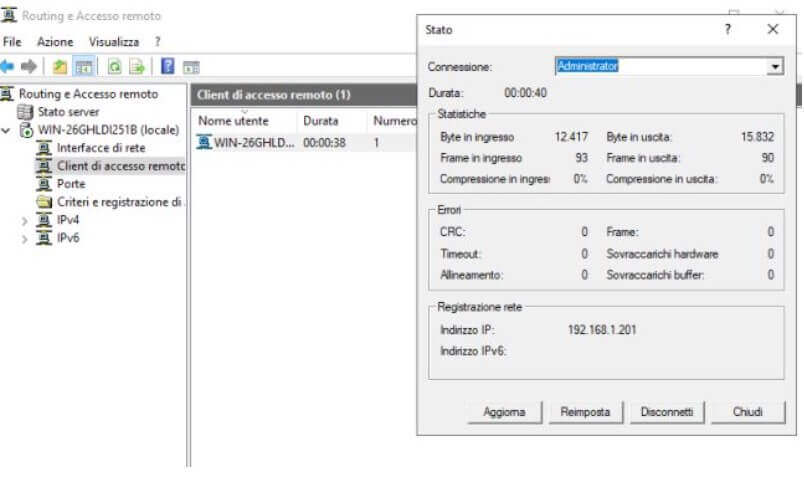
In the Windows Server Routing and Remote Access window, you will get the list of client devices currently connected to the VPN server clicking on Remote Access Client.
Also, in this case, the clients connected to the VPN and being able to remotely access shared resources in the local network, will browse using the public IP of the router to which Windows Server is connected.

In the figure, the PING command launched from a remote Android device connected to the VPN server to a system connected to the LAN network (IP 192.168.1.2 ). As you can see, from the smartphone connected to the mobile telephone operator’s data network, the system responds in this case with a latency of 90-130 ms.

A tech-savvy writer with a knack for finding the latest technology in the market, this is what describes John Carter. With more than 8 years of experience as a journalist, John graduated as an engineer and ventured soon into the world of online journalism. His interest includes gadget reviews, decoding OS errors, hunting information on the latest technology, and so on.


. What are the news of the new format for images")


. What are the news of the new format for images")

