The checks and actions to be carried out when the WiFi does not work.
It is quite common not to connect to your own or someone else’s WiFi network. To solve the problem and access the Internet, it is important to know where to put your hands.
If the WiFi does not work, the reasons can be many, and it is good to go by exclusion to get to the resolution of the problem. It’s important to conduct a network assessment and wireless site check to determine if there are any potential issues with your wifi connection.
WiFi is not working; what to do if the router or access point is yours
If the WiFi does not work and the wireless router or access point is your property, it is good to carry out a series of checks:
1) Check if other wireless devices can use the WiFi connection and access the Network
The first check is trivial and consists of checking if the WiFi connection is limited to one device or affects all the others as well.
It is also good to use a device connected via ethernet cable, that the Internet connection is up and running.
In this regard, we suggest, for example, to open the command prompt (from a Windows system press the key combination Windows + R, type cmd) then issue the following command: ping 8.8.8.8
The IP address 8.8.8.8 corresponds to the Google DNS server: if it responds (no expired requests) in a short time (latency less than 100 ms), it means that the Internet connection is working.
2) Check that the WiFi network is visible
By accessing the WiFi screen of the device, you intend to connect, check that the SSID or the identification of the network connection is visible and that it is possible to activate a connection by entering the password.
If the WiFi network is not visible (its SSID does not appear in the list), go to the administration panel of the router or wireless access point using, for example, a system connected via ethernet cable (usually just type, in the toolbar browser addresses, http://192.168.1.1 or http://192.168.0.1 ). See also.
In the WiFi or Wireless section, check the type of WiFi networks that can be enabled.
Not all client devices, especially older ones, are 802.11n or 802.11ac compatible, and not all of them can work on the 5 GHz frequency bands.
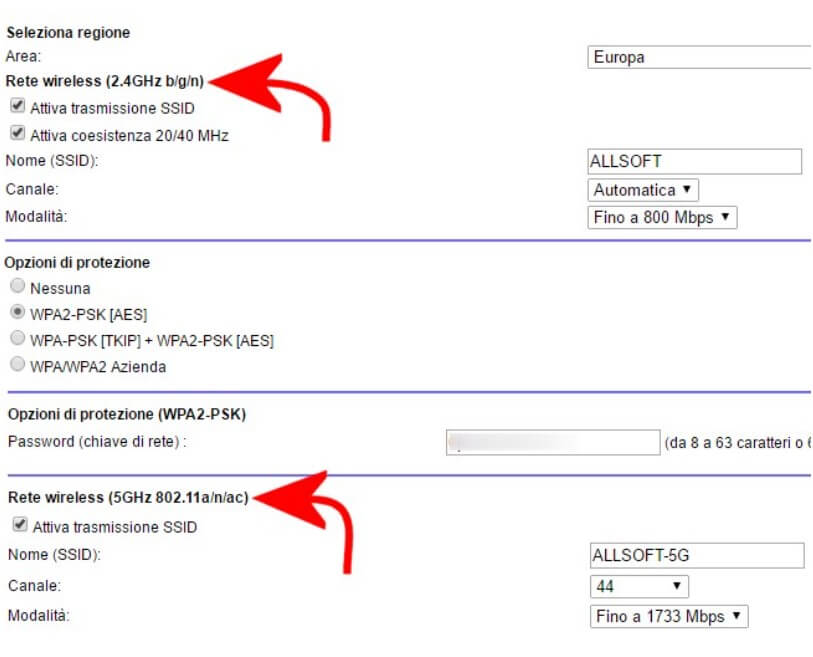
In the WiFi module’s configuration screen, therefore, it will be necessary to make the appropriate changes to allow the connection of older devices, whether they are notebooks, tablets, or smartphones. Usually, turning on WiFi on 2.4 GHz (802.11a / b / g / n) solves most problems.
By doing so, the SSID of the WiFi network should appear among the selectable and configurable connections on the client device.
We assume that the WiFi network, on the router/access point side, is configured in such a way as to show (and not hide) the SSID.
3) If the client device connects to the WiFi, but the connection does not work
When the wireless device detects the SSID of the WiFi but the connection does not work (it is not possible to exchange data; the ping command 8.8.8.8 always gives the request expired), it is good to start with a router/access point control.
The first step is to check how private, local IPs are assigned to client devices. The presence of conflicts (same private IP address used by multiple devices) can effectively prevent data exchange.
It is important to check that the private IP addresses assigned in DHCP by the router do not overlap with any IP statically assigned to individual clients.

If on the local device, however, the ping 8.8.8.8 command correctly offers the answers from the Google server but you are unable to “navigate” (the ping commands www.google.it and ping www.ubuntu.com give the request expired), You must first check the DNS servers set up on the router.
We suggest replacing the default ones (usually found in the Internet Settings section of the router configuration panel) with 8.8.8.8 and 8.8.4.4 (these are Google’s DNS).
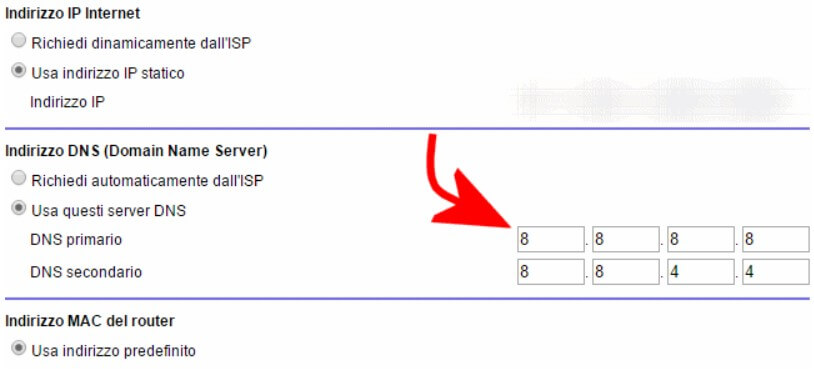
After disconnecting the WiFi connection from the client device, re-enabling it, the router will broadcast the new DNS via DHCP, and navigation should now be possible.
4) If the Windows client shows an error such as “Unidentified Network.”
Suppose the WiFi network should suddenly be indicated as an Unidentified Network on the Windows system. In that case, we recommend that you follow the procedure described in the article Unidentified Network, how to resolve the message error.
5) Android does not work with “ad hoc” networks
Android devices cannot connect to WiFi networks indicated as “ad hoc” ie wireless networks created to share the network connection of a computer.
The fact that an “ad hoc” network, ie a WiFi activated in Windows to share the Internet connection, is not visible by an Android smartphone is therefore completely normal.
6) The Android smartphone disconnects from the WiFi network only after a certain time
When the Android smartphone goes into standby (the display turns off), it may happen that – depending on the manufacturer’s customization – the WiFi network’s connection is temporarily suspended.
3G / 4G connectivity consumes more battery than the WiFi module when it is active but, on the other hand, WiFi remains active by default even when the mobile device is not used.
On some smartphones, therefore, the temporary automatic disabling of WiFi may occur.
To solve the problem, simply go to the sectionWireless and networks settings of Android, select WiFi settings, and then choose Advanced. In correspondence with the WiFi Suspension item, you will therefore have to set Never to avoid any disconnection.
If on the Android device, there are applications for optimizing energy consumption, it is necessary to check that they do not also act on the WiFi connection.
7) The Android smartphone suddenly fails to connect to WiFi.
You may connect to a WiFi network with the Android device, but you get stuck on the message that informs you about obtaining the IP address.
To solve the problem, you can try the free app (among other things also distributed under the GNU GPL license) WiFi Fixer.
It allows you to reset various parameters by restoring the correct operation of the network interface.
If you know the private IP of the wireless router or access point and how the addresses are assigned, you can try to access the properties of the WiFi network on the Android device, select Static instead of DHCP, and then manually assign an IP static that does not fall into the group of those assigned via DHCP.
Assigning a static local IP such as 192.168.1.241 usually does not create problems because the DHCP server usually never gets to assign such IPs.

8) Improve the coverage of the WiFi network
Suppose the WiFi signal is not reachable in all the environments in which one would expect to receive it. In that case, the advice is to review – where possible – the router’s position by placing it in the center of the building and never in the basement or near elements that may block the correct diffusion of the signal.
What to do if the WiFi fails and you connect to a third party router/access point
Most of the interventions described above are also applicable if the WiFi does not work and you connect to routers or access points managed by third parties.
The only difference is that, in this case, it will not be possible to verify the configuration of the router, but the various attempts must be made only on the client-side.
In particular, in the previous point 3), instead of intervening on the WiFi router, the suggestion is to access the local network interface configuration and manually set the addresses 8.8.8.8 and 8.8.4.4 as DNS.
If the client device detects the WiFi SSID and connects to the network, the online browsing failure can be resolved by manually specifying the DNS servers.
Tips 4), 5), 6) and 7) are also applicable in the case of WiFi networks managed by third parties.

A tech-savvy writer with a knack for finding the latest technology in the market, this is what describes John Carter. With more than 8 years of experience as a journalist, John graduated as an engineer and ventured soon into the world of online journalism. His interest includes gadget reviews, decoding OS errors, hunting information on the latest technology, and so on.
 Extender for Their Networks")


 Extender for Their Networks")


