One of the most common problems among users who have upgraded to Windows 10 or otherwise decided to install the latest Microsoft operating system is the inexplicable appearance of a black screen on startup or after login.
To fix the black screen appearing in Windows 10, you can apply some simple steps, which vary depending on when the black screen appears.
Black screen in Windows 10 after login
If Windows 10 shows the login screen and the screen goes black only after choosing the desired user account and entering the corresponding password, we recommend carrying out – one after the other – a series of checks:
1) If you see the mouse pointer regularly move on the black screen
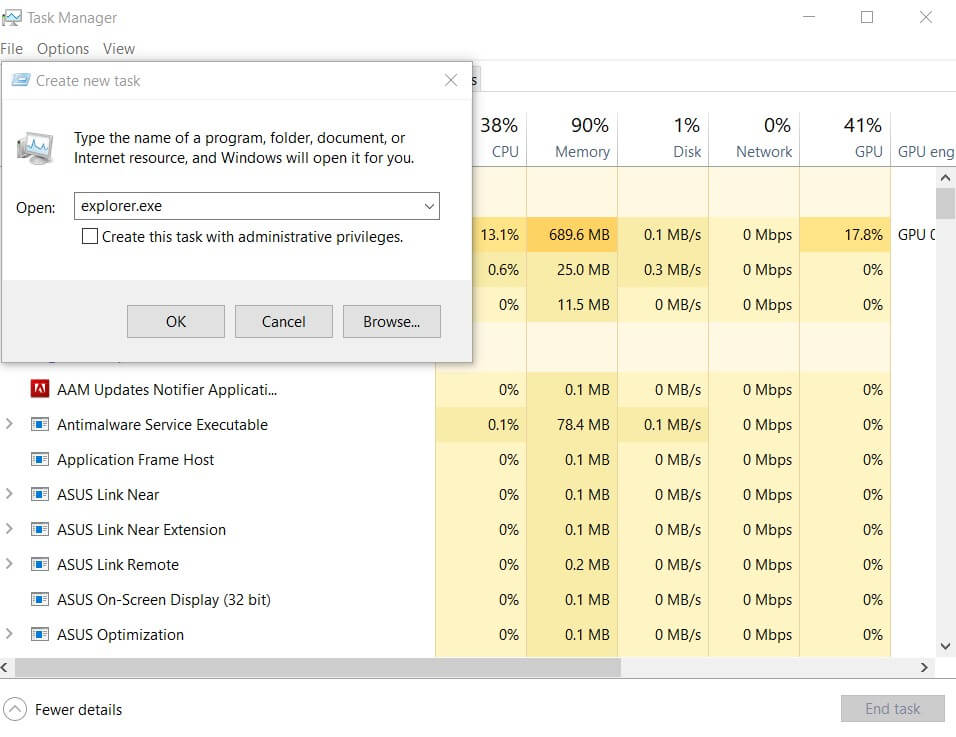
You can press the key combination CTRL + SHIFT + ESC to bring up the Windows 10 Task Manager.
Selecting the File menu, Run new task; you will have to type explorer. exe in the Open box, and finally click OK.
Let Windows 10 optimize the operating system startup, then reboot the system. To check when Windows 10 has optimized startup, just select the Processes tab, click on the Disk header and wait for the Service Host: Startup Optimization process to disappear completely (make sure that the entries in the Disk column are displayed in descending order. starting with the software elements that stress the disk or SSD most importantly).
After restarting your PC, the black screen problem on startup should be resolved.
2) Disconnect all external hardware devices, one after the other.
If following the disconnection of a specific device, the black screen disappears, the cause of the problem has been identified.
To resolve the black screen’s appearance in Windows 10, usually, just visit the website of the hardware manufacturer then download and install the updated driver. If disconnecting the various external devices does not solve the problem, the advice is to restart Windows 10 in safe mode.
As already seen in the case of Windows 8.1 ( Reboot in safe mode Windows 8.1, Windows 8 and Windows 7 ), even Windows 10 no longer takes into account pressing the F8 key when booting the system.
To quickly restart in safe mode from within Windows 10, just click on the new Start button, select the Shutdown item from the menu and then hold down the SHIFT key while clicking on Restart.
The next time the machine is restarted, the emergency menu will automatically appear with the three options Continue, Troubleshoot, and Turn off the PC.
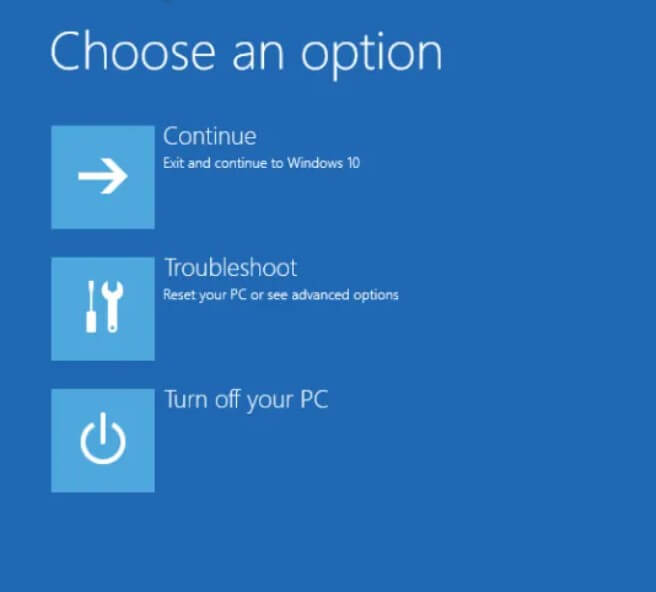
After clicking on Troubleshoot, then on Advanced Options, you will need to select Startup Settings and finally click on Restart.
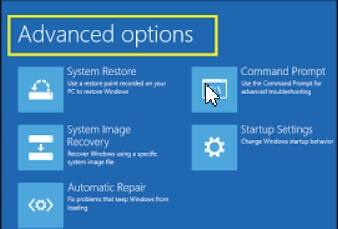
After reboot, pressing the F5 key will activate the Windows 10 Safe Mode access.
Once in Windows 10 Safe Mode, you will have to go to the Control Panel of the operating system ( Windows + X, Control Panel ) then choose Display.
From here, by clicking on Change display settings, you will need to verify that Windows 10 is using the correct screen.
3) Uninstall video card drivers from Windows 10 Safe Mode.
If the intervention described in the previous point does not prove to be decisive or if you are using a single screen, you can try to uninstall the video card drivers.
To proceed, simply use – again – the Windows + X key combination from Windows 10 Safe Mode, then choose Device Manager from the menu.
Once in the Device Manager window, you will have to double-click on Display adapters, right-click on the graphics card’s name, and then select the Uninstall command.
Restarting the system normally, Windows 10 should reinstall the correct video card driver, and the problem related to the appearance of the black screen should be resolved.
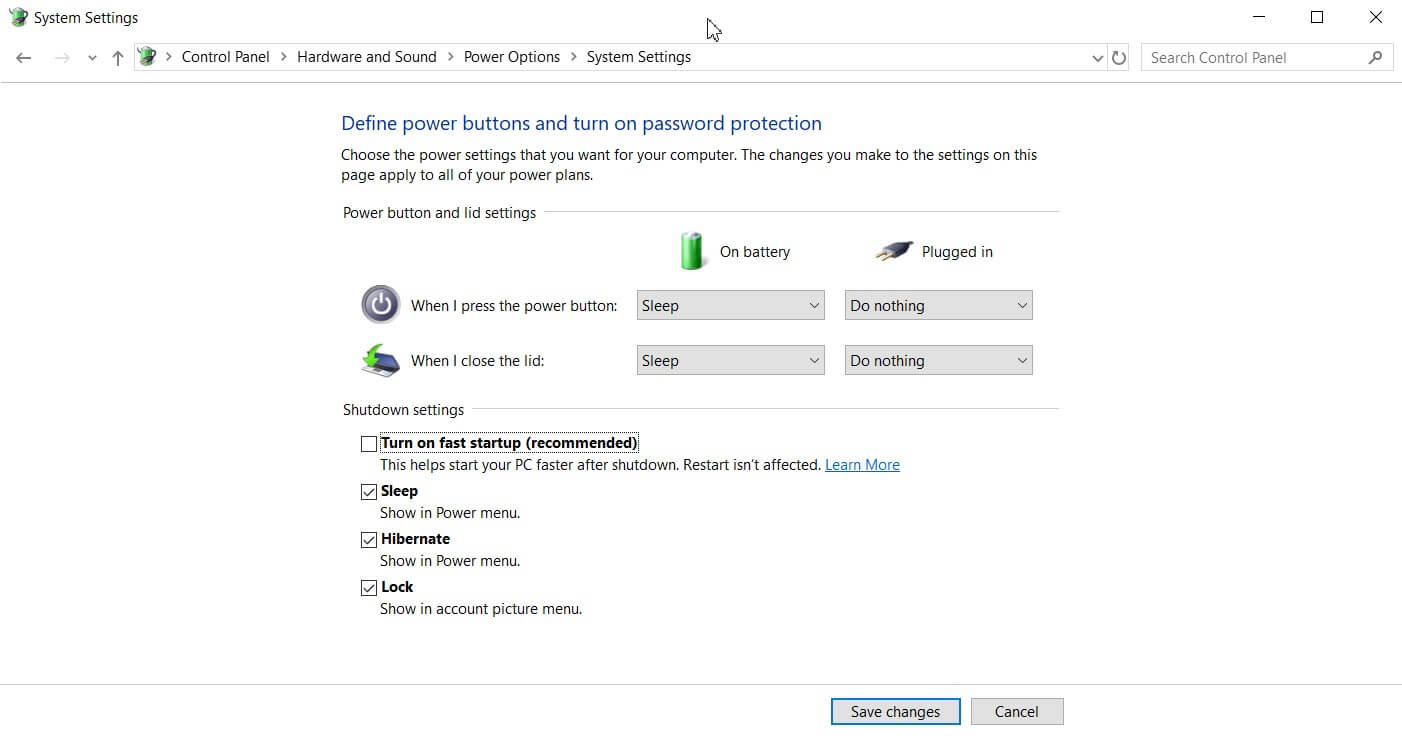
4) Disable Windows 10 Fast Startup.
Activating quick start, especially on PCs not equipped with the latest drivers, can result in the black screen appearing when the operating system starts.
It is suggested that you start in safe mode, press Windows + R, type powercfg.cpl, click the entry “Specification power button behaviour”, and click Edit Settings that are currently unavailable. As the last step, you will have to remove the checkmark from the Enable quick start box, click on the Save changes button and restart the machine.
5) On systems with multiple video cards, Windows 10 may fail – at startup – to select the correct one use 1.
To solve the black screen problem when Windows 10 starts, you can try to access the operating system in safe mode – as seen in the previous steps -, press the Windows + R key combination and type Regedit.
Press the key combination CTRL + F and type EnableULPS to search for all instances in the registry.
As soon as you will find a DWORD value called EnableULPS that is displayed in the right pane of the Registry Editor, you will need to double-click it and set it.
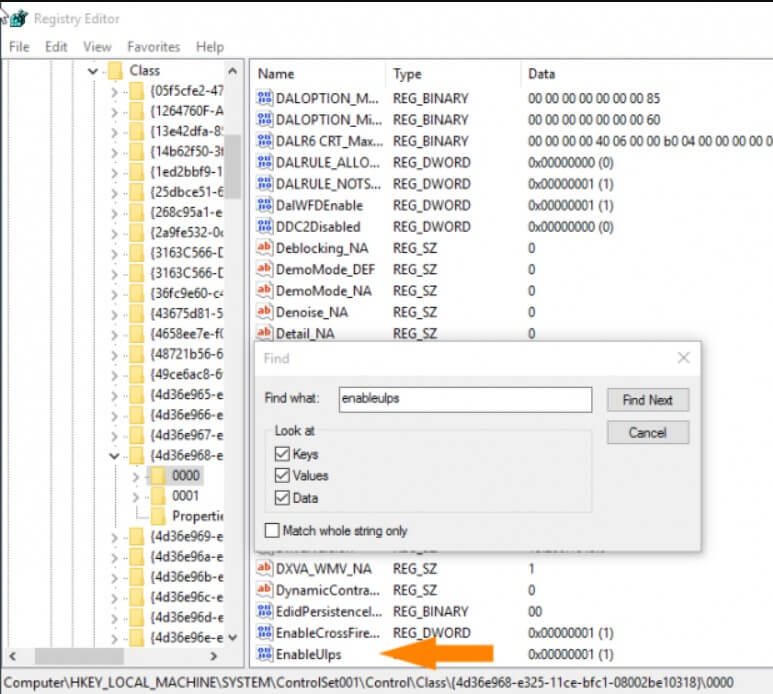
Continue with the Search for any further instances of EnableULPS in the system registry (press the F3 key ) and change them to 0, as seen previously.
Important: do not change the setting of the EnableUlps_NA value, which must remain the default one.
6) Try a clean boot of Windows 10.
Like any other Windows version, multiple third-party drivers, services, and programs can be loaded when Windows 10 starts.
We suggest you press the Windows + R key combination from safe mode, then type msconfig and disable all third-party programs automatically loaded every time Windows 10 starts.
By deactivating the applications and drivers loaded when Windows 10 starts and then reactivating them one at a time, you can trace the problem’s root.
7) Some software that changes the appearance of the Windows 10 GUI and, in particular, the shell ( File Explorer ) may be the cause of the black window appearing after login.
Applications like UXStyle and StartIsBack can cause the black screen in Windows 10 – completely uninstalling these programs usually solves the problem.
Finally, some outdated antimalware solutions may be responsible for the black screen appearing in Windows 10: it may be advisable to uninstall them and restart the machine.
Black screen before the Windows 10 logon window appears.
If the black screen in Windows 10 appears before the log in window appears, you will need to restart the safe mode system.
Since Windows 10, by default, does not support pressing the F8 button at startup, the advice is to restart the machine a couple of times when the operating system logo appears during boot.
After a couple of forced reboots, performed manually, the message “Preparing for automatic recovery” should appear under the Windows 10 logo.
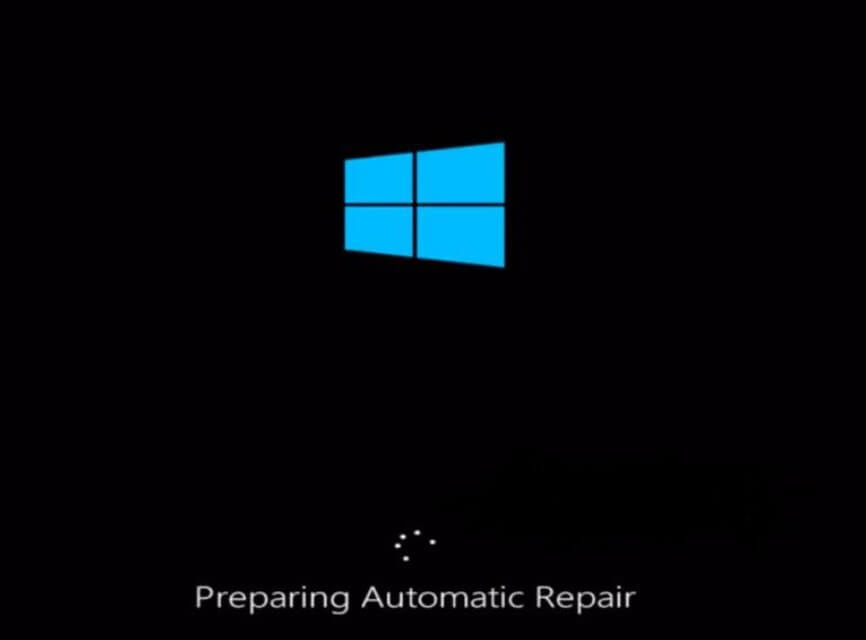
Just wait for the appearance of the Windows boot menu 10.
Now, click the Advanced Options and then click Troubleshooting and follow the directions in the previous paragraph ( Black Screen in Windows 10 after login ) to open safe mode.

We suggest trying the following interventions one after the other by attempting to restart Windows 10 after each step and re-entering Safe Mode in case of failure:
1) Press the Windows + R key combination, then type powercfg.cpl.
Then click Specify power buttons behaviour and choose Change settings that are currently unavailable.
Under Shutdown settings, remove the checkmark from the Enable quick start box.
2) If you are using a dedicated video card, but the motherboard has an integrated graphics card, press the Windows + R key combination, then type devmgmt.msc.
Following this, you need to click on Display adapters, then with the right mouse button, select the integrated graphics card and choose the item Disable device.
If the problem disappears the next time Windows is restarted, the cause has been identified. Otherwise, the other video drivers can be disabled, one by one, thus by exclusion.
3) After checking the screen set as default ( Windows + P key combination ), you can try to update the video card driver (make sure you have started Windows 10 in safe mode with network support so you can download the updated driver from the manufacturer’s website).
From the Device Manager screen ( Windows + R,devmgmt.msc ), just right-click on the video card, choose Update driver, click Search for driver software on your computer indicating the updated driver previously taken from the manufacturer’s site.
4) If necessary, try to create a new user account in Windows 10 following the instructions that are given in point 8) in the article Black screen when Windows starts: how to solve.
5) If this still does not resolve, you can try to reset your PC by typing Reset your PC in the Windows 10 search box and clicking on the Get started button.
Alternatively, you can request a complete reinstall of Windows 10 without losing your data: How to restore Windows 10 without losing data.
What to do if the recovery menu did not contain boot options?
It may happen that in the recovery menu that appears automatically ( Preparing for automatic recovery ) after two successive failed attempts to start Windows 10, the features for entering safe mode are not made available.
In these cases, it is possible to solve the black screen problem by clicking on Advanced Options, Troubleshooting, Advanced Options, Command Prompt, and typing the following:
bcdedit / set {bootmgr} displaybootmenu yes
At the command prompt typing mode, use the curly brackets by holding down the ALT key, and then by typing 123 and 125 on the numeric keypad, you can help resolve the problem.
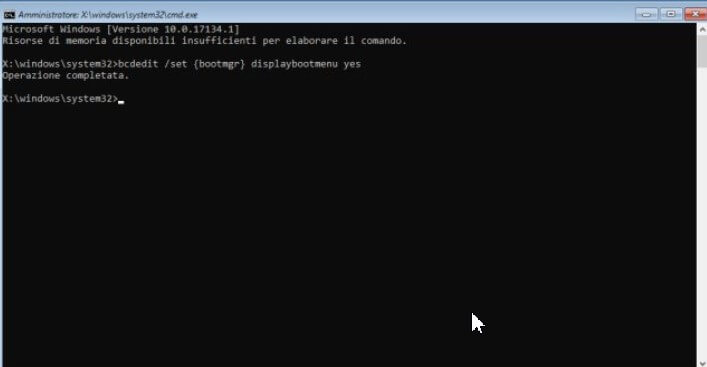
Doing so will reactivate the old Windows start menu, which can be called up by the F8 key, as was done with Windows 7. Typing exit, turning off the PC, and turning it on again, the Windows Boot Manager screen will appear.
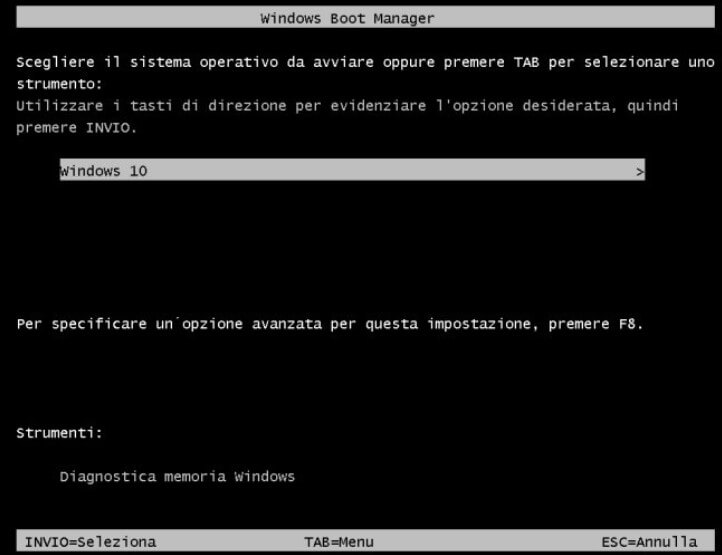
Instead of pressing Enter at the Windows 10 entry, you will have to press the F8 key to access the boot menu by opting to boot in safe mode with networking (item number 5).
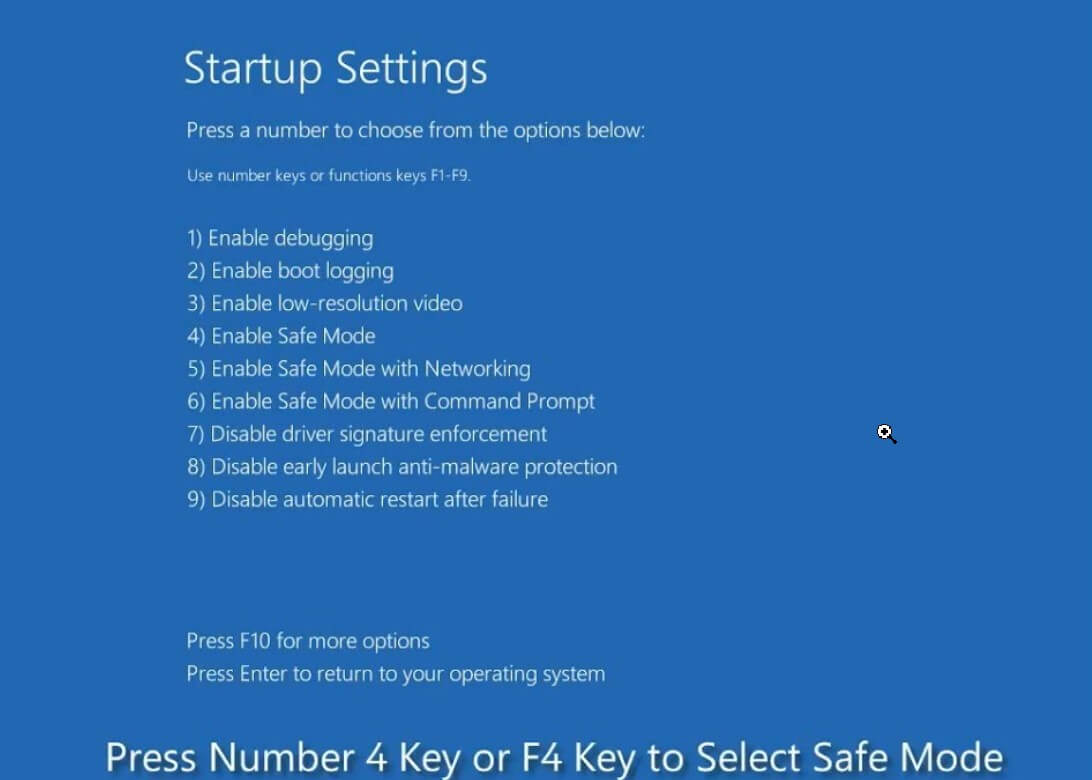
Once in safe mode, you can try to solve the problem, following the instructions described above (for example, disable or uninstall the video card driver, create a new user account, delete some program that causes problems, etc. loaded at the Windows startup …).
After correcting the problem that prevented Windows 10 from loading and caused the appearance of the black screen, if you later wanted to delete the Windows Boot Manager, just open the command prompt with administrator rights (type cmd in the Windows search box then press the key combination CTRL + SHIFT + ENTER ) and issue the following command 2 :
bcdedit / set {bootmgr} displaybootmenu no

A tech-savvy writer with a knack for finding the latest technology in the market, this is what describes John Carter. With more than 8 years of experience as a journalist, John graduated as an engineer and ventured soon into the world of online journalism. His interest includes gadget reviews, decoding OS errors, hunting information on the latest technology, and so on.


